SanDisk SDSSDP-128G-G25 Quick Installation Guide - Page 2
Connecting Your SSD to Your Computer - review
 |
View all SanDisk SDSSDP-128G-G25 manuals
Add to My Manuals
Save this manual to your list of manuals |
Page 2 highlights
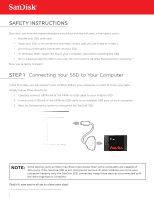
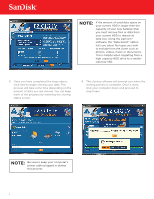
SAFETY INSTRUCTIONS Now that you have the required hardware and data cloning software, a few safety notes: • Handle your SSD with care. • Keep your SSD in the protective anti-static sleeve until you are ready to install it. • Do not touch the gold connectors on your SSD. • To minimize static electricity, touch your computer case before handling the SSD. • Do not disassemble the SSD in any way; this will void the SanDisk Manufacturer's warranty.** Now you're ready to begin! STEP 1 Connecting Your SSD to Your Computer In the first step, you will connect your SanDisk SSD to your computer in order to clone your data. Simply follow these directions: 1. Carefully connect SATA end of the SATA-to-USB cable to your SanDisk SSD. 2. Connect the USB end of the SATA-to-USB cable to an available USB port on your computer. 3. Wait for the operating system to recognize the SanDisk SSD. NOTE: SATA devices such as SSDs may draw more power than some computers are capable of delivering. If the SanDisk SSD is not recognized, remove all other USB devices from your computer keeping only the SanDisk SSD connected. Keep these devices disconnected until the data migration is complete. That's it, now you're all set to clone your data! ** To review the warranty for this product, see www.sandisk.com/wug. 2
-
 1
1 -
 2
2 -
 3
3 -
 4
4 -
 5
5 -
 6
6 -
 7
7
 |
 |