SanDisk SDSSDP-128G-G25 Quick Installation Guide - Page 5
Replacing your HDD, Notebook Computer SSD Installation
 |
View all SanDisk SDSSDP-128G-G25 manuals
Add to My Manuals
Save this manual to your list of manuals |
Page 5 highlights
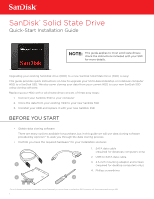
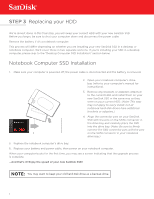
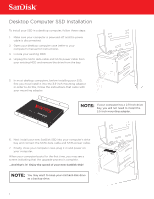
STEP 3 Replacing your HDD We're almost done! In this final step, you will swap your current HDD with your new SanDisk SSD. Before you begin, be sure to shut your computer down and disconnect the power cable. Remove the battery if it's a notebook computer. This process will differ depending on whether you are installing your new SanDisk SSD in a desktop or notebook computer. We'll cover these in two separate sections. If you're installing your SSD in a desktop computer, please skip to the "Desktop Computer SSD Installation" section below. Notebook Computer SSD Installation 1. Make sure your computer is powered off, the power cable is disconnected and the battery is removed. 2. Open your notebook computer's drive bay (refer to your computer's manual for instructions). 3. Remove any brackets or adapters attached to the current HDD and install them on your new SanDisk SSD in the same way as they were on your current HDD. (Note: This step may not apply to every install, not all notebook hard disk drives have additional brackets or adapters.) 4. Align the connector pins on your SanDisk SSD with the pins on the SATA connector in the drive bay and carefully place the SSD into the drive bay. (Note: Be sure to firmly connect the SSD connector pins with the pins on the SATA connector in your notebook drive bay.) 5. Replace the notebook computer's drive bay. 6. Replace your battery and power cable, then power on your notebook computer. When your computer boots for the first time, you may see a screen indicating that the upgrade process is complete. ...And that's it! Enjoy the speed of your new SanDisk SSD! NOTE: You may want to keep your old hard disk drive as a backup drive. 5
-
 1
1 -
 2
2 -
 3
3 -
 4
4 -
 5
5 -
 6
6 -
 7
7
 |
 |