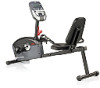
Schwinn A20 Recumbent Bike 2013 Model Assembly and Owner's Manual - Page 25
Troubleshooting
 |
View all Schwinn A20 Recumbent Bike 2013 Model manuals
Add to My Manuals
Save this manual to your list of manuals |
Page 25 highlights
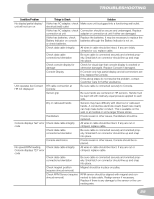
Troubleshooting Condition/Problem Things to Check Solution No display/partial display/ If bike has AC adapter, check Make sure unit is plugged into a functioning wall outlet. unit will not turn on electrical (wall) outlet If bike has AC adapter, check Connection should be secure and undamaged. Replace connection at unit adapter or connection at unit if either are damaged. If bike has batteries, check Battery Indicator on console or check batteries. Replace the batteries. It may be necessary to replace the batteries although the Battery Indicator is not on. Check data cable integrity All wires in cable should be intact. If any are visibly crimped or cut, replace cable. Check data cable connections/orientation Be sure cable is connected securely and oriented properly. Small latch on connector should line up and snap into place. Check console display for damage Check for visual sign that console display is cracked or otherwise damaged. Replace Console if damaged. Console Display If Console only has partial display and all connections are fine, replace the Console. If the above steps do not resolve the problem, contact Customer Care for further assistance. Unit operates but Contact HR cable connection at HR not displayed Console Be sure cable is connected securely to Console. Sensor grip Be sure hands are centered on HR sensors. Hands must be kept still with relatively equal pressure applied to each side. Dry or calloused hands Sensors may have difficulty with dried out or calloused hands. A conductive electrode cream (heart rate cream) can help make better conduct. This is available on the web or at medical or some larger fitness stores. Handlebars If tests reveal no other issues, Handlebars should be replaced. Console displays "E2" error Check data cable integrity code All wires in cable should be intact. If any are cut or crimped, replace cable. Check data cable connections/orientation Be sure cable is connected securely and oriented properly. Small latch on connector should line up and snap into place. Console electronics If tests reveal no other issues, Console should be replaced. No speed/RPM reading, Check data cable integrity Console displays "E3" error code All wires in cable should be intact. If any are cut or crimped, replace cable. Check data cable connections/orientation Be sure cable is connected securely and oriented properly. Small latch on connector should line up and snap into place. Check magnet position (requires shroud removal) Magnet should be in place on pulley. Check RPM Sensor (requires shroud removal) RPM sensor should be aligned with magnet and connected to data cable. Realign sensor if necessary. Replace if there is any damage to the sensor or the connecting wire. 25
-
 1
1 -
2
-
3
-
4
-
5
-
6
-
7
-
8
-
9
-
10
-
11
-
12
-
13
-
14
-
15
-
16
-
17
-
18
-
19
-
 20
20 -
 21
21 -
 22
22 -
 23
23 -
 24
24 -
 25
25 -
 26
26 -
 27
27 -
 28
28
 |
 |