Seagate Maxtor OneTouch III USB 2.0 User Guide for Windows & Mac - Page 25
Maxtor OneTouch Manager, Opening the OneTouch Manager Utility
 |
View all Seagate Maxtor OneTouch III USB 2.0 manuals
Add to My Manuals
Save this manual to your list of manuals |
Page 25 highlights
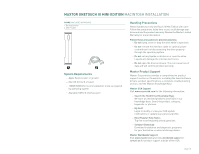
MAXTOR ONETOUCH III MINI EDITION MACINTOSH INSTALLATION Using the OneTouch III Mini Edition Maxtor OneTouch Manager Your OneTouch III Mini Edition includes a utility that allows you to: - Find out more information about your drive - Customize your OneTouch button to open a different application or synchronize folders - Control power management settings for your drive - Enable password security to restrict access to your OneTouch III Mini Edition - Run diagnostic tests to troubleshoot potential hardware problems with your OneTouch III Mini Edition Opening the OneTouch Manager Utility Go to Finder - Applications and open the Maxtor OneTouch Manager. Features What's New - click this and you'll travel to Maxtor's website where you can learn more about the OneTouch III Mini Edition's new features. Maxtor Support - whoever thought that they could be just one click away from online technical support? By clicking on the Maxtor Support button, you will be transported to Maxtor's Knowledge Base. Other Features Diagnostics - checks the health of your OneTouch III Mini Edition Backup - launches MaxBack Directory. Restore - launches MaxBack Directory Settings - allows you to customize the OneTouch button and apply password security Sync Now - allows you to synchronize folders from your Mac to the OneTouch III Mini Edition Drive Information This tool displays the selected OneTouch III Mini Edition's volume information, free space available, serial number and firmware revision of the drive. Click the Information icon. Then click Close when finished to return the OneTouch Manager's main window. Diagnostic If you suspect there may be problems with your OneTouch III Mini Edition, you can run the diagnostic test. Click on Diagnostics. The diagnostic test will launch immediately. A status bar will appear along with a message indicating "The drive is now being tested." When finished, a message will appear indicating "The drive passed its most recent diagnostic test". If the test finds your drive to be defective, it will display a Return Material Authorization (RMA) diagnostic code you will use to return your drive for replacement under warranty. PAGE 23
-
 1
1 -
2
-
3
-
4
-
5
-
6
-
7
-
8
-
9
-
10
-
11
-
12
-
13
-
14
-
15
-
16
-
17
-
18
-
19
-
 20
20 -
 21
21 -
 22
22 -
 23
23 -
 24
24 -
 25
25 -
 26
26 -
 27
27 -
 28
28 -
 29
29 -
 30
30 -
31
-
32
-
33
-
34
 |
 |
