Seagate ST9750420AS Momentus 7200 FDE.1 SATA Product Manual - Page 27
Configuring and mounting the drive
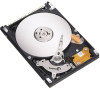 |
View all Seagate ST9750420AS manuals
Add to My Manuals
Save this manual to your list of manuals |
Page 27 highlights
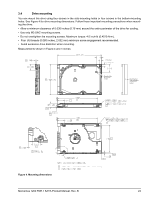
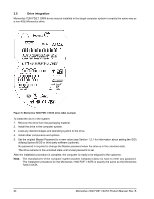
3.0 Configuring and mounting the drive This section contains the specifications and instructions for configuring and mounting the drive. Momentus® 7200 FDE.1 SATA drives may be connected to any computer system that supports a standard SATA interface. You can elect to use Momentus 7200 FDE.1 SATA drives in one of two different security modes: 1. The ATA Security mode To operate in ATA Security mode, you only need a host system and operating system that supports the existing ATA Security Command Set. The drive is shipped to operating in this mode, ready to use. 2. The DriveTrust Security mode To enable a robust enterprise-level security and management policy, you may elect to operate in DriveTrust Security mode. To do so, you will need to use a third-party security application to manage the DriveTrust features. Please contact your system or software provider for more details. Refer to Table 1 on page 2 to determine which mode is best for your particular solution. Note. As with any disc drive, Seagate highly encourages consumers to consistently back up their data as well as the security pre-boot password, user name, and domain name on another storage device. Seagate is not responsible for lost or stolen authentication data such as passwords, user names, domain names, or any authentication data perceived to be inoperative, and as a consequence of lost or stolen passwords, user names, or domain names, Seagate cannot be held liable for data that cannot be retrieved from the drive due to inability to authenticate the user to the drive as required by the security pre-boot software. 3.1 Handling and static-discharge precautions After unpacking, and before installation, the drive may be exposed to potential handling and electrostatic discharge (ESD) hazards. Observe the following standard handling and static-discharge precautions: Caution: • Keep the drive in the electrostatic discharge (ESD) bag until you are ready for installation to limit the drive's exposure to ESD. • Before handling the drive, put on a grounded wrist strap, or ground yourself frequently by touching the metal chassis of a computer that is plugged into a grounded outlet. Wear a grounded wrist strap throughout the entire installation procedure. • Handle the drive only by its edges or frame. • The drive is fragile-handle it with care. Do not press down on the drive top cover. • Always rest the drive on a padded, antistatic surface until you mount it in the computer. • Do not touch the connector pins or the printed circuit board. • Do not remove the factory-installed labels from the drive or cover them with additional labels. Removal voids the warranty. Some factory-installed labels contain information needed to service the drive. Other labels are used to seal out dirt and contamination. Momentus 7200 FDE.1 SATA Product Manual, Rev. B 21
-
 1
1 -
2
-
3
-
4
-
5
-
6
-
7
-
8
-
9
-
10
-
11
-
12
-
13
-
14
-
15
-
16
-
17
-
18
-
19
-
20
-
21
-
 22
22 -
 23
23 -
 24
24 -
 25
25 -
 26
26 -
 27
27 -
 28
28 -
 29
29 -
 30
30 -
 31
31 -
 32
32 -
33
-
34
-
35
-
36
-
37
-
38
-
39
-
40
-
41
-
42
-
43
-
44
-
45
-
46
-
47
-
48
-
49
-
50
-
51
-
52
-
53
-
54
-
55
-
56
-
57
-
58
-
59
-
60
-
61
-
62
-
63
-
64
 |
 |