Sharp 4W-B65FT5U Setup guide - Page 2
ieÓaÔÕlÖµdÔcÓ
 |
View all Sharp 4W-B65FT5U manuals
Add to My Manuals
Save this manual to your list of manuals |
Page 2 highlights
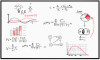
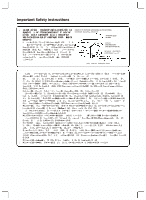
A. Supplied accessories CD Remote control unit ( x 1) 0 "AAA" size battery ( x 2) 00 ® Setup guide (this publication) @) RS-232C conversion cable (3.5 mm-diameter mini stereo jack) ® Touch pen x 2 ® USB flash drive (utility for Windows) 0 USB cable for touch panel ® USB-C to USB-A conversion adapter ® External IR receiver @ Screws for VESA mounting • For only 55 inch and 65 inch model. There are no screws in 75 inch model. A FR Accessoires fournies CD Telecommande 0 Pile format «AAA» ® Setup by configuration (ce document) ES Accesorios suministrados Control remoto Baterfa de tamafio "AAA" Gufa de instalaci6n (esta publicaci6n) @) FR Cable de conversion RS-232C (mini-jack stereo de 3,5 mm de diametre) ES Cable de conversion RS-232C (miniclavija estereo de 3,5 mm de diametro) ® Style! Lapiz tactil @ Cable USB Cable USB (J) ® ® @) Adaptateur FR USB Cle USB Recepteur Vis pour montage VESA (Utility pour Windows ) infrarouge externe • Uniquement pour les modeles 55 pouces et 65 pouces ES Adaplador USB Memoria USB (Ulilidades para Windows) Receptor de infrarrojos externo Tornillos para montaje VESA • Solo para modelos de 55 y 65 pulgadas. B. Inserting the batteries G) Remote control unit @ Place batteries with their terminals corresponding to the (±) and 8 indications in the battery compartment. @ Place battery cover B CD 0 ® FR Insertion des piles Placez les piles en suivant les indications 8 Telecommande (±) et relatives aux bornes dans le compartiment des piles. Placez couvercle de la batterie Coloque las baterfas con las terminates siguiendo 8 ES Colocaci6n de las baterfas Control remoto las indicaciones (±) y de las baterfas. en el compartimento Coloque la tapa de las baterfas.
-
 1
1 -
 2
2 -
 3
3 -
 4
4 -
 5
5 -
 6
6 -
 7
7 -
 8
8 -
9
-
10
-
11
-
12
-
13
-
14
-
15
-
16
-
17
-
18
-
19
-
20
-
21
-
22
-
23
-
24
-
25
-
26
-
27
-
28
-
29
-
30
-
31
-
32
-
33
-
34
-
35
-
36
-
37
-
38
-
39
-
40
-
41
-
42
-
43
-
44
-
45
-
46
-
47
-
48
-
49
-
50
-
51
-
52
-
53
-
54
-
55
-
56
-
57
-
58
-
59
 |
 |
