Sharp A1000 UXA100 Operation Manual
Sharp A1000 - B/W Inkjet - Fax Manual
 |
View all Sharp A1000 manuals
Add to My Manuals
Save this manual to your list of manuals |
Sharp A1000 manual content summary:
- Sharp A1000 | UXA100 Operation Manual - Page 1
MODEL UX-A1000 FACSIMILE OPERATION MANUAL 1. Installation 2. Using the Answering System 3. Sending Faxes 4. Receiving Faxes 5. Making Copies 6. Special Functions 7. Printing Lists 8. Maintenance 9. Troubleshooting - Sharp A1000 | UXA100 Operation Manual - Page 2
user's authority to operate this equipment. Note: This equipment has been tested and found to comply with the limits for a Class B digital device, pursuant to Part for help. ABOUT machine, please refer to the appropriate instructions in the operation manual." As an ENERGY STAR partner, SHARP - Sharp A1000 | UXA100 Operation Manual - Page 3
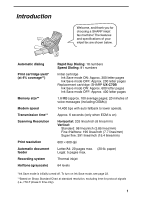
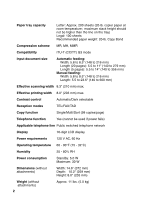
Introduction Welcome, and thank you for choosing a SHARP inkjet fax machine! The features and specifications of your inkjet fax are shown below. Automatic dialing Print cartridge yield* (at 4% coverage**) Memory size** Modem speed Transmission time** Scanning Resolution Print resolution Automatic - Sharp A1000 | UXA100 Operation Manual - Page 4
Reception modes TEL/FAX/TAD Copy function Single/Multi/Sort (99 copies/page) Telephone function Yes (cannot be used if power fails) Applicable telephone line Public switched telephone network Display 16-digit LCD display Power requirements 120 V AC, 60 Hz Operating temperature 60 - 90 - Sharp A1000 | UXA100 Operation Manual - Page 5
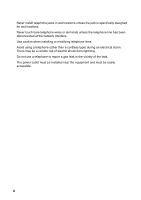
experience errors during transmission and reception of facsimile messages. The fax machine is not compatible with digital telephone systems. Important safety information Do not disassemble this machine or attempt any procedures not described in this manual. Refer all servicing to qualified service - Sharp A1000 | UXA100 Operation Manual - Page 6
designed for wet locations. Never touch bare telephone wires or terminals unless the telephone line has been disconnected at the network interface. Use caution when installing or modifying telephone lines. Avoid using a telephone (other than a cordless type) during an electrical storm. There may be - Sharp A1000 | UXA100 Operation Manual - Page 7
Cartridge 17 Connecting the Telephone Line Cord 24 Entering Your Name and Fax Number 26 Setting the Date and Time 28 Setting the Reception Mode 30 Volume Adjustment 31 2. Using the Answering System 33 Recording an Outgoing Message 33 Operating the Answering System 34 Optional Answering - Sharp A1000 | UXA100 Operation Manual - Page 8
Lists 100 8. Maintenance 105 Cleaning the Machine 105 Improving Print Quality 108 9. Troubleshooting 113 Problems and Solutions 113 Messages and Signals 117 Clearing Paper Jams 120 Ordering Parts 123 FCC Regulatory Information 124 Quick Reference Guide 128 Guía de referencia rápida - Sharp A1000 | UXA100 Operation Manual - Page 9
Operation Panel 1 23 45 6 TEL FAX 01 02 PLAIN PAPER INKJET FAX 03 04 05 06 TAD REC/MEMO PLAY 07 08 13 14 09 10 11 12 15 16/POLL 17/G1 18/G2 1 GHI 4 PQRS 7 ABC 2 DEF 3 JKL MNO 56 TUV WXYZ 89 RESOLUTION/ RECEPTION MODE FUNCTION COPY/HELP help you operate the machine - Sharp A1000 | UXA100 Operation Manual - Page 10
key to make a copy of a document (page 85). At any other time, press this key to print out the Help List, a quick reference guide to the operation of your fax machine. 16 STOP key Press this key to cancel an operation before it is completed. 17 START/MEMORY key Press this key after dialing to begin - Sharp A1000 | UXA100 Operation Manual - Page 11
Checklist Before setting up, make sure you have all of the following items. If any are missing, contact your dealer or retailer. Paper tray Paper tray cover Document tray Document Print exit support cartridge Handset Handset cord Telephone line cord Operation manual Rapid Key labels 9 - Sharp A1000 | UXA100 Operation Manual - Page 12
, preventing proper scanning of documents for transmission. To remove the condensation, turn on the power and wait approximately two hours before using the machine. Removing the packing tape 1 Open the print compartment cover. • Press as shown and pull the cover toward you. 2 Remove the tape. 10 - Sharp A1000 | UXA100 Operation Manual - Page 13
, so they will go into either jack. Make sure the handset cord goes into the jack marked with a handset symbol on the side of the machine! Use the handset to make ordinary phone calls, or to transmit and receive faxes manually. 11 - Sharp A1000 | UXA100 Operation Manual - Page 14
Attachments Attaching the paper trays Attach the paper tray. Pull the paper plate toward you and attach the paper tray cover. Paper plate Attach the document tray. 2 1 12 - Sharp A1000 | UXA100 Operation Manual - Page 15
1. Installation Pull out the received document tray. Attachments Attach the document exit support. 13 - Sharp A1000 | UXA100 Operation Manual - Page 16
the tray, take it out and combine it into a single stack with the new paper. The stack should not be higher than this line Be sure to load the paper so that printing takes place on the print side of the paper. Printing on the reverse side may result in poor print quality. 14 - Sharp A1000 | UXA100 Operation Manual - Page 17
1. Installation 4 Pull the paper plate toward you and replace the paper tray cover. Loading Printing Paper LETTER Place the LEGAL cover using the appropriate notch for the size of paper loaded 15 - Sharp A1000 | UXA100 Operation Manual - Page 18
turned on and off by simply plugging in or unplugging the power cord. "CHECK CARTRIDGE" normally appears in the display the first time you plug in the machine. This message appears until you install the print cartridge. Note: If your area experiences a high incidence of lightning or power surges - Sharp A1000 | UXA100 Operation Manual - Page 19
may be considerably degraded. ♦ Make sure the power cord of the machine is plugged in and paper is loaded before installing or replacing the print cartridge. 1 Open the operation panel. If PRINTER ERROR or PRINTER ERROR/CHECK PAPER appears... In the event that the display shows either of the above - Sharp A1000 | UXA100 Operation Manual - Page 20
EXCHANGE AREA" arrows on the label, and then pull the green lever and open the cartridge holder cover. • If you are replacing the cartridge, remove the old cartridge. If you are going to use the old cartridge again, place it in an air-tight container. • CAUTION! DO NOT touch the contact area - Sharp A1000 | UXA100 Operation Manual - Page 21
holder. 6 Place your index finger on the tab as shown and close the cartridge holder cover with your thumb. Make sure the cover clicks into place. 7 Close the print compartment cover. 8 Close the operation panel, pressing down firmly on both front corners to make sure it clicks into place. Display - Sharp A1000 | UXA100 Operation Manual - Page 22
previous step, this completes the installation procedure. (Note: If you find that print quality is not satisfactory after reinstalling the old cartridge, align the cartridge as explained on page 108.) If you selected "NEW", the display will show the alternating messages at right. Continue with the - Sharp A1000 | UXA100 Operation Manual - Page 23
1. Installation Installing the Print Cartridge 12 In the alignment page that the machine prints, locate the line that comes closest to forming a completely straight line. In this example, "15" comes closest to forming a straight line. After the alignment page is printed, the display shows: ENTER - Sharp A1000 | UXA100 Operation Manual - Page 24
Installing the Print Cartridge Note: If at any time the display shows the alternating messages at right, check the printing paper. If the tray is empty, add paper. If there is paper in the tray, take it out and then reinsert it. START/ When you are finished, press . MEMORY ADD PAPER & PRESS START - Sharp A1000 | UXA100 Operation Manual - Page 25
1. Installation Installing the Print Cartridge Ink save mode If you wish to use less ink or speed up ink drying time when printing faxes and copies, turn on ink save mode. If you prefer a higher quality image, turn off ink save mode. ♦ Ink save mode is initially turned off. 1 Press FUNCTION once - Sharp A1000 | UXA100 Operation Manual - Page 26
jack on the back of the machine marked TEL. LINE. Insert the other end into a standard (RJ11C) single-line wall telephone jack. L.SET TEL.LINE Setting the dial mode The fax machine is set for tone dialing. If you are on a pulse dial line, you must set the fax machine for pulse dialing. Press the - Sharp A1000 | UXA100 Operation Manual - Page 27
1. Installation Connecting the Telephone Line Cord Extension phone (optional) If desired, you can connect an extension phone to the TEL. SET jack on the fax machine. 1 Remove the seal covering the TEL. SET jack. TEL.SET TEL.LINE 2 Connect the extension phone line to the TEL. SET jack. TEL.SET TEL. - Sharp A1000 | UXA100 Operation Manual - Page 28
here and set the date and time as explained in the following section to have the fax machine include this information automatically at the top of your fax messages. FUNCTION 123 456 789 0 01 02 07 08 13 14 03 04 05 06 09 10 11 12 15 16/POLL 17/G1 18 - Sharp A1000 | UXA100 Operation Manual - Page 29
Entering Your Name and Fax Number 1. Installation 4 Enter your fax number by pressing the number keys (max. 20 digits). • To insert a space between digits, press . • To clear a mistake, press SPEAKER . 5 START/ Press MEMORY . 6 Enter your name by pressing number keys for each letter as shown in - Sharp A1000 | UXA100 Operation Manual - Page 30
in the display and are printed at the top of every page you fax. Set the date and time as shown below. FUNCTION 123 456 789 SET 3 Press . The currently set date appears (example): DATE 08-15-2004 4 Enter a two-digit number for the month ("01" for January, "02" for February, "12" for December, etc - Sharp A1000 | UXA100 Operation Manual - Page 31
). Example: 2004 2 0 0 4 The currently set time appears (example): TIME 12:19 PM 7 Enter a two-digit number for the hour ("01" to "12") and a two-digit number for the minute ("00" to "59"). Example: 9:25 0 9 2 5 TIME 09:25 PM 8 Press to select A.M. or to select P.M. 9 START/ Press MEMORY - Sharp A1000 | UXA100 Operation Manual - Page 32
: Select this mode when you want to receive both phone calls and faxes on the line connected to the fax machine. All calls, including faxes, must be answered by picking up the fax machine's handset or an extension phone connected to the same line. TAD mode: Select this mode when you go out and want - Sharp A1000 | UXA100 Operation Manual - Page 33
1. Installation Volume Adjustment Volume Adjustment You can adjust the volume of the speaker, handset, and ringer using the up and down arrow keys. 123 456 789 0 01 02 07 08 13 14 03 04 05 06 09 10 11 12 15 16/POLL 17/G1 18/G2 UP SPEAKER DOWN Speaker 1 Press SPEAKER . 2 UP - Sharp A1000 | UXA100 Operation Manual - Page 34
Volume Adjustment Handset 1 When talking through the handset, UP press or to select the DOWN desired volume level. • Note: The volume reverts to MIDDLE each time you replace the handset. Display: RECEIVER: HIGH RECEIVER: MIDDLE RECEIVER: LOW Ringer 1 UP Press or to select the DOWN - Sharp A1000 | UXA100 Operation Manual - Page 35
reception mode to TAD. Recording an Outgoing Message The outgoing message (OGM) is the greeting that the machine plays after answering a call to inform callers that they can leave a message or send a fax. Follow the steps below to record a message. Example: "Hello. You've reached ______ . No one is - Sharp A1000 | UXA100 Operation Manual - Page 36
repeat the recording procedure. Operating the Answering System Activating the answering system To turn on the answering system so that callers can Note: In TAD mode, the machine will automatically switch to fax reception if it detects six seconds of silence after answering a call. For this reason, - Sharp A1000 | UXA100 Operation Manual - Page 37
Answering Machine Operating the Answering System Number of rings in TAD mode (Toll Saver function) The number of rings on which the machine answers incoming ! Hi! Hi! 4 Rings Ring Ring Ring Ring 2 Rings Ring Ring (Answer according to NUMBER OF RINGS setting) Ring Ring Ring Ring To turn off the - Sharp A1000 | UXA100 Operation Manual - Page 38
Operating the Answering System Listening to received messages When you return, the display will show the number of messages recorded. Follow the steps below to listen to your - Sharp A1000 | UXA100 Operation Manual - Page 39
2. Answering Machine Operating the Answering System Erasing received messages It is important to the message is being played. Recording memos You can record memos for yourself and other users of the machine. These will be played back together with incoming messages when the PLAY key is pressed. - Sharp A1000 | UXA100 Operation Manual - Page 40
System Settings Setting ICM time Incoming messages (ICMs) are the messages which callers leave for you on the built-in answering system. The answering system is set at the factory to allow each caller a maximum of 4 minutes to leave a message. If desired, you can change this setting to 15, - Sharp A1000 | UXA100 Operation Manual - Page 41
this setting, you can still use the remote commands to listen to your messages and then erase them (see Remote Operations on page 47). ♦ NO (do not switch to FAX mode): The machine will answer after 20 rings, after which it will wait to receive a remote command. Most callers will hang up before it - Sharp A1000 | UXA100 Operation Manual - Page 42
Optional Answering System Settings OGM only mode If needed, you can turn off recording of incoming messages. In this case, your outgoing message will play, but callers will not be able to leave a message. (The machine will still receive faxes sent by automatic dialing.) 1 Press FUNCTION once and - Sharp A1000 | UXA100 Operation Manual - Page 43
such as Call Waiting or Call Forwarding, signals used by these services may be mistaken for a CPC signal, causing the answering system to hang up during a call. If you experience this problem, follow these steps to turn off CPC Detection. 1 Press FUNCTION once and once. Display: T.A.D. SETTING - Sharp A1000 | UXA100 Operation Manual - Page 44
at a remote location. To use the Transfer function, you must first program the number that you wish the machine to call (the transfer number), and record the transfer message that plays when you answer the phone at the remote location. When you go out and wish to use the transfer function, turn - Sharp A1000 | UXA100 Operation Manual - Page 45
2. Answering Machine Transfer Function Recording the transfer message The transfer message plays when you answer the telephone, and informs you that the call is a transfer call. It can be up to 15 seconds long. To record a transfer message, follow the - Sharp A1000 | UXA100 Operation Manual - Page 46
erase the transfer message, follow Steps 1 and 2 of the above procedure, and then press PLAY to check the message, or to erase DELETE the message. Turning the Transfer function on and off When you go out and wish to use the Transfer - Sharp A1000 | UXA100 Operation Manual - Page 47
call, the machine will not immediately resume normal operation. If you want the machine to accept calls machine but only want to talk with certain callers, taking all other calls on the answering system. Programming the override code To override the answering system, your callers must enter a 3-digit - Sharp A1000 | UXA100 Operation Manual - Page 48
four beeps. He or she must re-enter the correct code within 10 seconds or the line will be disconnected. 3 Your machine will make a special ringing sound. Pick up the handset to answer the call. • If you do not answer within 30 seconds, the outgoing message will play again and the caller can leave - Sharp A1000 | UXA100 Operation Manual - Page 49
2. Answering Machine Remote Operations Remote Operations When you are out, you can call the machine from any touch-tone once and twice. REMOTE CODE 3 Press . 4 Press the number keys to enter a 3-digit remote code number. 5 START/ Press . MEMORY OVERRIDE CODE 6 Press to return to the date - Sharp A1000 | UXA100 Operation Manual - Page 50
Remote Operations Toll Saver When you call the machine to listen to your messages, it will answer after two rings if it function, you can turn it off by following the steps below. In this case, the machine will answer after the number of rings set with the NUMBER OF RINGS setting (see Changing the - Sharp A1000 | UXA100 Operation Manual - Page 51
Remote Operations 2. Answering Machine Retrieving your messages 1 Call the machine from a touch-tone telephone. When your outgoing recorded, or one long beep if four or more messages have been received. The machine will then play back the messages, beeping once at the end of each message. When - Sharp A1000 | UXA100 Operation Manual - Page 52
after you hang up unless you press twice). Note: You can also call the machine and perform remote operations when the reception mode is set to FAX. In this case, when you call the machine, press immediately after it answers (before you hear the fax tone), and then continue from Step 2 above. 50 - Sharp A1000 | UXA100 Operation Manual - Page 53
2. Answering Machine Remote Operations Comments: ♦ When a remote command is accepted by the machine, you will errors while entering your remote code number, the line will be disconnected. (This prevents unauthorized people from attempting to guess your remote code number.) Other remote operations - Sharp A1000 | UXA100 Operation Manual - Page 54
Operations Recording a new outgoing message 1 Press 4 and on the telephone. 2 When you hear a short beep, speak into the telephone to record the new message. • The message can be up to 15 seconds long. After 15 seconds (or earlier if the machine between any two digits of the number, press . 52 - Sharp A1000 | UXA100 Operation Manual - Page 55
2. Answering Machine Remote Operations Recording a new transfer message 1 Press 9 , 3 , and on the telephone. 2 When you hear a short beep, speak into the telephone to record the new message. • The time for the transfer message is fixed at 15 seconds. After 15 seconds (or earlier if the machine - Sharp A1000 | UXA100 Operation Manual - Page 56
3. Sending Faxes Transmittable Documents Size and weight Minimum document size: Minimum size . size: Letter (8.5" x 11", 216 x 279 mm) Max. weight: 21.5 lbs. (80 g/m2) 1 page at a time (manual feeding): Max. size: 8.5" x 23.6" (216 x 600 mm) Max. weight: 42 lbs. (157 g/m2) 5 pages at once: Max - Sharp A1000 | UXA100 Operation Manual - Page 57
ink. ♦ Ink, glue, and correcting fluid on documents must be dry before they pass through the document feeder. ♦ All clips, staples, and pins must be removed from documents before loading in the feeder. If these are not removed, they may damage the machine 1 Adjust the document guides to the width of - Sharp A1000 | UXA100 Operation Manual - Page 58
the resolution and/or contrast settings as explained on page 57, then dial the receiving machine as explained on page 60. Removing a document from the feeder If you need to remove a document from the feeder, open the operation panel. Important! Do not try to remove a document without opening the - Sharp A1000 | UXA100 Operation Manual - Page 59
and the default contrast setting is AUTO. You must adjust the settings each time you don't want to use the default settings. 3. Sending Faxes Note: The resolution and contrast settings are only effective for sending a document. They are not effective for receiving a document. Resolution settings - Sharp A1000 | UXA100 Operation Manual - Page 60
:AUTO HALF TONE :AUTO STANDARD :DARK FINE :DARK SUPER FINE :DARK HALF TONE :DARK Note: In order to transmit in SUPER FINE resolution, the receiving fax machine must also have that resolution. If it doesn't, your machine will automatically step down to the next best available setting. 58 - Sharp A1000 | UXA100 Operation Manual - Page 61
Adjusting the Resolution and Contrast Changing the default resolution If desired, you can change the default resolution for faxing documents to FINE. Follow the steps below. 1 Press FUNCTION once and 3 times. Display: OPTION SETTING 2 Press once. FINE PRIORITY 3 Press once. 1=YES, 2=NO 4 - Sharp A1000 | UXA100 Operation Manual - Page 62
) and dial by ♦ If a person answers, you can talk with them through the handset before sending the fax. (If you pressed talk.) SPEAKER , you must pick up the handset to ♦ Normal Dialing allows you to listen to the line and make sure the other fax machine is responding. 1 Load the document - Sharp A1000 | UXA100 Operation Manual - Page 63
. • If an error occurs, the machine will beep three times and print a Transaction Report to inform you of the problem (see page 102). Sending a Fax by Automatic Dialing You can dial a fax or phone number by simply pressing a Rapid Key, or by pressing SPEED DIAL and entering a two-digit number. ♦ To - Sharp A1000 | UXA100 Operation Manual - Page 64
are only for Speed Dialing. 3 Enter the fax or phone number by pressing the number keys. (Note: A space cannot be entered.) • To clear a mistake, press SPEAKER . • If a pause is required between any of the digits to access a special service or an outside line, press FUNCTION . The pause appears as - Sharp A1000 | UXA100 Operation Manual - Page 65
Sending a Fax by Automatic Dialing 3. Sending Faxes 4 START/ Press . MEMORY 5 Enter a name by pressing number keys for each letter as shown in the chart below. Up to 20 characters can be entered. (If you do not wish to enter a name, go directly to Step 6.) Example: SHARP = 7777 44 2 777 7 SPACE - Sharp A1000 | UXA100 Operation Manual - Page 66
Sending a Fax by Automatic Dialing 7 Return to Step 2 to store another number, or or clear a number, follow these steps: 1 Press FUNCTION once and once. Display: 2 Enter the 2-digit Speed Dial number that you wish to edit or clear (for example, press 0 1 ), or press or until the - Sharp A1000 | UXA100 Operation Manual - Page 67
Sending a Fax by Automatic Dialing 6 START/ Press . MEMORY 7 Make the desired changes to the name. • Press or to move the cursor to the letter 8 START/ Press . MEMORY 9 Return to Step 2 to edit or clear another number, or press to return STOP to the date and time display. 3. Sending Faxes 65 - Sharp A1000 | UXA100 Operation Manual - Page 68
party will appear in the display. If no name was stored, the fax number will appear. (If the name or number is incorrect, press .) successfully, the machine will beep once. • If an error occurs, the machine will beep three times and print a Transaction Report to inform you of the problem (see page - Sharp A1000 | UXA100 Operation Manual - Page 69
Faxes Sending a Fax DIAL and then enter the 2-digit Speed Dial number. • For example, to enter Speed Dial 19, press 1 9 . 3 Check the display. If the name machine will beep once. • If an error occurs, the machine will beep three times and print a Transaction Report to inform you of the problem - Sharp A1000 | UXA100 Operation Manual - Page 70
START/ If you are sending a fax, press MEMORY . Dialing and transmission begins. • If the transmission is completed successfully, the machine will beep once. • If an error occurs, the machine will beep three times and print a Transaction Report to inform you of the problem (see page 102). If you are - Sharp A1000 | UXA100 Operation Manual - Page 71
a pause is required between any of the digits to access a special service or an outside line, press FUNCTION . The pause will appear as a hyphen (two seconds per pause). Several pauses can be entered in a row. 3 Check the display. If the number of the receiving machine shown is START/ correct, press - Sharp A1000 | UXA100 Operation Manual - Page 72
and the line is busy, the fax machine will automatically redial the number. The fax machine will make three redial attempts at intervals of five minutes. During this time, RECALLING will appear in the display, followed by a two-digit number assigned to the fax job. You will not be able to dial any - Sharp A1000 | UXA100 Operation Manual - Page 73
in a transmission due to noise on the telephone line before printing at the receiving end. This function is called Error Correction Mode (ECM). ECM is effective for both transmissions and receptions, and is only effective when the other fax machine has ECM as well. When there is considerable noise - Sharp A1000 | UXA100 Operation Manual - Page 74
check Dial the receiving machine and send the fax. ♦ If you need to cancel a batch number entry, remove the document from the feeder or press . STOP ♦ If the number of pages actually transmitted does not coincide with the batch number entered, the alarm will sound and PAGE COUNT ERROR - Sharp A1000 | UXA100 Operation Manual - Page 75
This function allows you to send the same fax to as many as 20 different destinations in just one operation. ♦ When sending a fax to multiple destinations, only auto-dial numbers can be used to dial the numbers of the receiving machines. 1 Load the document(s). • If desired, press RESOLUTION/ to - Sharp A1000 | UXA100 Operation Manual - Page 76
out after Broadcasting is completed. Check the "Note" column of the report to see if any of the destinations are marked "Busy" or have a communication error code. If so, send the document to those destinations again. Broadcasting using a Group Key If the fax machines to which you want to broadcast - Sharp A1000 | UXA100 Operation Manual - Page 77
Memory Storing numbers in Group Keys Group Keys allow you to send a fax to a group of fax machines by simply pressing the appropriate Group Key once. To store a group of numbers in a Group Key, follow the steps below. ♦ Rapid Keys 17/G1 and - Sharp A1000 | UXA100 Operation Manual - Page 78
Sending a Fax From Memory 6 Select a destination using one of the following methods: Press a Rapid Key. Press SPEED DIAL and enter a 2-digit Speed Dial number. Press (or ) until the name of the destination appears in the display (if no name was stored, the number will appear). 7 Press - Sharp A1000 | UXA100 Operation Manual - Page 79
line is often busy, as it saves you from waiting to pick up the original document and frees the feeder for other operations. START/ To send a fax enter the fax number and then press . MEMORY START/ ♦ Press a Rapid Key and then press . MEMORY START/ ♦ Press SPEED DIAL , enter a 2-digit Speed Dial - Sharp A1000 | UXA100 Operation Manual - Page 80
the arrow in the display points to FAX. RESOLUTION/ RECEPTION MODE TEL FAX TAD When the reception mode is set to FAX, the fax machine will automatically answer all calls on four rings and receive incoming faxes. ♦ If you pick up the handset before the machine answers, you can talk to the other - Sharp A1000 | UXA100 Operation Manual - Page 81
display. STOP Note: If you are using Distinctive Ring, the fax machine will answer calls after two rings regardless of the above setting. Using TEL RECEPTION MODE TEL FAX TAD When the reception mode is set to TEL, you must answer all calls (even faxes) by picking up the fax machine's handset or - Sharp A1000 | UXA100 Operation Manual - Page 82
When RECEIVING appears in the display, hang up. START/ MEMORY RECEIVING Answering on an extension phone connected to the same line 1 Answer the extension phone when it rings. 2 If you hear a soft fax tone, wait until your fax responds (you will hear pronounced, high-pitched tones), then hang up - Sharp A1000 | UXA100 Operation Manual - Page 83
resume conversation. 4. Receiving Faxes Optional Reception Settings Fax Signal Receive Your fax will automatically begin reception if you hear a soft fax tone after answering a call on your fax or an extension phone. If you use a computer fax modem to send documents on the same line, you must turn - Sharp A1000 | UXA100 Operation Manual - Page 84
telephone. You can select any number from 0 to 9. 1 Press FUNCTION once and 3 times. Display: OPTION SETTING 2 Press once and twice. FAX REMOTE # 3 Press once. 4 Enter the desired number (any number from 0 to 9). Example: 3 ENTER (0-9) (5) The display briefly shows your selection, then - Sharp A1000 | UXA100 Operation Manual - Page 85
Reception Ratio The fax has been set at the factory to automatically reduce the size of received documents to fit the size of the printing paper. This ensures that this case, the cut-off point may occur in the middle of a line. ♦ Automatic reduction may not be possible if the received document is - Sharp A1000 | UXA100 Operation Manual - Page 86
a document in memory, FAX RX IN MEMORY will appear in the display, alternating with ADD PAPER & PRESS START KEY, COVER OPEN, PAPER JAMMED, OUT OF INK, or PRINTER ERROR / START/ CHECK PAPER. When you add paper (and press MEMORY ), or clear the jam, or replace the print cartridge, the stored documents - Sharp A1000 | UXA100 Operation Manual - Page 87
Copies Your fax machine can also be used to make copies. Single and multiple copies (up to 99 per original) can be made, enabling your fax to double 88%, 94%, and AUTO (automatic adjustment to match the size of the paper). The default setting is 100%. Example: Press twice COPY RATIO: 125% • - Sharp A1000 | UXA100 Operation Manual - Page 88
HELP than the printing paper, use the copy cut-off setting to select whether the remaining part of the document will part of the document will not be printed), or 2 to set copy cut-off to NO (the remaining part will be printed on a second page). The display briefly shows your selection, then: INK - Sharp A1000 | UXA100 Operation Manual - Page 89
6. Special Functions Caller ID (Requires Subscription to Service) If you subscribe to a caller identification service from your telephone company, you can have the fax machine display the name and number of the caller when you receive a call. Important: To use this function, you must subscribe to - Sharp A1000 | UXA100 Operation Manual - Page 90
messages will appear while the fax rings if caller information is not available. NO SERVICE No caller information was received from your telephone company. Make sure that the telephone company has activated your service. CALLER-ID ERROR Noise on the telephone line prevented reception of caller - Sharp A1000 | UXA100 Operation Manual - Page 91
Caller ID service and have turned on the Caller ID function, your fax machine will keep information on the most recent 30 calls and faxes you have you can immediately dial a number when it appears. 1Z Press REDIAL twice. 2 Press or to scroll through the list. 3 If you wish - Sharp A1000 | UXA100 Operation Manual - Page 92
to Service) To Call If you have turned on Caller ID, you can set the machine to make a special ringing sound when you receive a call from a go to Step 6.) 5 Enter the number by pressing the number keys (max. 20 digits). 6 START/ Press MEMORY to store (or clear) the number. GROUP ENTRY 7 Press - Sharp A1000 | UXA100 Operation Manual - Page 93
transmission comes in from the number you have specified as a "Junk Number", your fax will break the connection as soon as it receives the calling phone number from the caller ID service (before the second ring). To use this function, enter the number that you wish to block as explained in Blocking - Sharp A1000 | UXA100 Operation Manual - Page 94
whereby they assign an additional second number to your regular single line. The second number rings differently from your normal number. If you subscribe to a distinctive ring service, you can set the fax machine to automatically answer when your second number is called. This allows you to use - Sharp A1000 | UXA100 Operation Manual - Page 95
ring, you must set the reception mode of your fax machine to FAX. When your designated fax number is dialed, your fax will automatically answer and begin reception after two rings. Note that other devices on the same line will also ring until your fax answers. If one of your other numbers is dialed - Sharp A1000 | UXA100 Operation Manual - Page 96
faxes from a party that you specify. This saves paper by not printing out unwanted "junk" faxes. To use this function, follow the steps below to enter the fax number from which you do not wish to receive faxes. One fax 5 Enter the fax number by pressing the number keys (max. 20 digits). 6 START/ - Sharp A1000 | UXA100 Operation Manual - Page 97
and have it send a document (previously loaded in its feeder) to your machine without assistance from the operator of the other machine. Hint: Polling is useful when you want the receiving fax machine, not the transmitting fax machine, to bear the cost of the call. To use the polling function, you - Sharp A1000 | UXA100 Operation Manual - Page 98
digit Speed Dial number. • Enter the full number using the numeric keys. 2 16/POLL Press . • If you used the handset, replace it when POLLING appears in the display. Reception will begin. Being polled (polling standby) To let another fax machine poll your machine, press reception mode to FAX - Sharp A1000 | UXA100 Operation Manual - Page 99
Security allows you to prevent unauthorized polling of your machine. When this function is turned on, polling will only take place when the fax number of the polling fax machine has been entered in your machine's list of permitted fax numbers (called "passcode numbers"). The number of the polling - Sharp A1000 | UXA100 Operation Manual - Page 100
can store up to 10 fax numbers in your machine's list of permitted numbers. 1 Press FUNCTION once and 3 times. Display: ENTRY MODE 2 Press once and twice. PASSCODE MODE 3 Press . 4 Press . ENTER FAX # 5 Enter the fax number (maximum of 20 digits). 6 START/ Press . MEMORY - Sharp A1000 | UXA100 Operation Manual - Page 101
Polling (Requesting a Fax Transmission) Editing and clearing polling permission numbers If you need number. • Press or to move the cursor to the digit or digits you wish to change, and then enter the new digit. The new digit will replace the old digit. 8 START/ Press . MEMORY 9 Return - Sharp A1000 | UXA100 Operation Manual - Page 102
print lists showing settings and information entered in the fax machine, and a report showing recent fax transactions. The lists and report are described below. 30 fax transactions. The report is divided into two parts: the TRANSMISSIONS ACTIVITY REPORT, which shows information on fax transmissions - Sharp A1000 | UXA100 Operation Manual - Page 103
The list also shows your name and fax/telephone number as entered in the machine, and a sample of the header answering system, including the date and time each messages was recorded, the length, and the type. Caller-ID List This list shows information on your 30 most recently received calls and faxes - Sharp A1000 | UXA100 Operation Manual - Page 104
Printing Lists Transaction Report This report is printed out automatically after an operation is completed to allow you to check the result. Your fax machine is set at the factory to print out the report only when an error occurs. ♦ The Transaction report cannot be printed on demand. Headings in - Sharp A1000 | UXA100 Operation Manual - Page 105
. 1 ALWAYS PRINT A report will be printed after each transmission, reception, or error. 2 ERROR/MEMORY 3 SEND ONLY A report will be printed after an error or a memory operation. A report will be printed after each transmission. 4 ERROR ONLY 5 NEVER PRINT A report will be printed only when an - Sharp A1000 | UXA100 Operation Manual - Page 106
Printing Lists Auto print-out of Activity Report You can set the Activity Report to print automatically whenever information on 30 fax transactions has accumulated. (A report can still be printed on demand at any time.) Follow these steps: 1 Press FUNCTION once and 3 times. Display: OPTION - Sharp A1000 | UXA100 Operation Manual - Page 107
8. Maintenance 8. Maintenance Cleaning the Machine Cleaning the scanning glass and rollers Clean the scanning glass and rollers frequently to ensure the quality of transmitted images and copies. 1 Open the operation panel. 2 Flip up the green levers on each side of the white roller. 3 Wipe the - Sharp A1000 | UXA100 Operation Manual - Page 108
denatured alcohol. Take care that no alcohol gets on the rollers. 4 Flip down the green levers on each side of the white roller. 5 Close the operation panel, pressing down firmly on both front corners to make sure it clicks into place. 106 - Sharp A1000 | UXA100 Operation Manual - Page 109
beep. Cleaning the housing Wipe the external parts and surface of the machine with a dry cloth. Caution! Do not use benzene or thinner. These solvents may damage or discolor the machine. About the lithium battery: The fax machine uses a lithium battery to retain settings and information programmed - Sharp A1000 | UXA100 Operation Manual - Page 110
is not satisfactory, first try aligning the print cartridge. Note: Make sure that paper is loaded before beginning this procedure. 1 Press machine prints, locate the line that comes closest to forming a completely straight line. In this example, "15" comes closest to forming a straight line. - Sharp A1000 | UXA100 Operation Manual - Page 111
, follow these steps to clean the print cartridge nozzles. 1 Press FUNCTION once and twice. Display: PRINT SET-UP 2 Press once and once. CLEAN NOZZLES 3 Press once. PRESS START KEY 4 START/ Press . MEMORY • The machine prints a test pattern similar to the one shown in the following step - Sharp A1000 | UXA100 Operation Manual - Page 112
after running the test a third time, continue with Step 7. 7 Open the operation panel and then the print compartment cover, and remove and reinstall the print cartridge (see page 17). 8 Repeat the nozzle test. If the lines are still broken, wipe the nozzles as explained in the following section. 110 - Sharp A1000 | UXA100 Operation Manual - Page 113
nozzles and contacts. 1 Open the operation panel and then the print compartment cover, and remove the print cartridge (see page 17). • CAUTION! contacts and the gold-colored area around the contacts. • To dissolve dried ink, hold the damp cloth against the contacts for about three seconds. Gently - Sharp A1000 | UXA100 Operation Manual - Page 114
Maintenance Cleaning the cartridge holder A dirty print cartridge holder may cause smudges on your printed pages. To clean the print cartridge holder, open the operation panel and then the print compartment cover, and remove the print cartridge (see page 17). Wipe ➊ on the holder with a damp cloth. - Sharp A1000 | UXA100 Operation Manual - Page 115
following troubleshooting guide. If you cannot solve the problem, call Sharp's Customer Assistance Center at 1-877-794-8675. Line error Problem Solution LINE ERROR appears in the display. A line error occurs when your fax machine cannot communicate correctly with the other fax machine. The error - Sharp A1000 | UXA100 Operation Manual - Page 116
sure that the receiving machine has paper. • Make sure that the telephone line cord is plugged into the TEL. LINE jack, and not the TEL. SET jack. • If the receiving machine is in manual mode with no attendant, reception will not be possible. • Check the display for error messages. • Pick up the - Sharp A1000 | UXA100 Operation Manual - Page 117
help prevent distortions due to line noise. Note that ECM mode must be turned on in the other machine as well. • Make a copy of the document on your fax machine. If the copy is also distorted, your fax machine may need service. Reception and copying problems Problem Solution The fax machine - Sharp A1000 | UXA100 Operation Manual - Page 118
ECM mode (see page 71) will help prevent distortions due to line noise. Note that ECM mode must be turned on in the other machine as well. • Make a copy or print a report on your fax machine. If the copy or report is also distorted, your fax machine may need service. The quality of copies is poor - Sharp A1000 | UXA100 Operation Manual - Page 119
display messages related to Caller ID. ADD PAPER & / PRESS START KEY (alternating messages) CHANGE CARTRIDGE CHECK CARTRIDGE COVER OPEN DOCUMENT JAMMED FAX RX IN MEMORY FUNCTION MODE INK NEAR EMPTY Check the printing paper. If the tray is empty, add paper and then press the START/MEMORY key. If - Sharp A1000 | UXA100 Operation Manual - Page 120
INK PAPER JAMMED PRINTER ERROR PRINTER ERROR/ CHECK PAPER Transmission or reception was not successful. Press the STOP key to clear the message and then try again. If the error persists, see Line error on page 113. The cartridge is low on ink (approximately one quarter of the ink remains). If faxes - Sharp A1000 | UXA100 Operation Manual - Page 121
01 A document has been loaded and the fax machine is waiting for you to begin faxing or copying. This appears if you attempt to send a fax by automatic dialing and the line is busy or the receiving fax machine does not answer. Your fax machine will automatically reattempt the call. (See Automatic - Sharp A1000 | UXA100 Operation Manual - Page 122
Clearing Paper Jams Clearing Paper Jams Clearing a jammed document If the original document jammed document without releasing it as explained below. This may damage the feeder mechanism. 1 Slowly open the operation panel until it is half open. 2 Flip up the green levers on each side of the white - Sharp A1000 | UXA100 Operation Manual - Page 123
4 Flip down the green levers on each side of the white roller. Clearing Paper Jams 9. Troubleshooting 5 Close the operation panel, pressing down on both sides to make sure it clicks into place. Clearing jammed printing paper 1 Open the operation panel. 121 - Sharp A1000 | UXA100 Operation Manual - Page 124
as shown and pull the cover toward you. 3 Gently pull the jammed paper out of the machine, making sure no torn pieces of paper remain in the print compartment or rollers. 4 Close the print compartment cover. 5 Close the operation panel, pressing down firmly on both front corners to make sure it - Sharp A1000 | UXA100 Operation Manual - Page 125
Parts To order parts, contact the parts distribution center located nearest you. When ordering a part, use the part order number shown below. Operation manual TINSE4404XHTZ Setup Guide TCADH3657XHZZ Handset cord QCNWG209BXGY Telephone line cord QCNWG370BXHZZ Handset DUNTK497CXHFW Paper - Sharp A1000 | UXA100 Operation Manual - Page 126
the operation of the equipment. If this happens the telephone company will provide advance notice in order for you to make necessary modifications to maintain uninterrupted service. If trouble is experienced with this equipment, or for repair or warranty information, please contact Sharp's Customer - Sharp A1000 | UXA100 Operation Manual - Page 127
date :Sep.19.2002 MATERIAL SAFETY DATA SHEET (1/3) MSDS No. B-1028 Section 1. Product Identification Product Code : Ink-Cartridge (Mono) UX-C70B Section 2. Supplier's Name and Address Sharp Corporation 22-22 Nagaike-cho, Abeno-ku, Osaka, Japan Local suppliers are listed below. Please contact the - Sharp A1000 | UXA100 Operation Manual - Page 128
or poison center. Do not induce vomiting unless instructed to do so by a physician or poison center Measures Occupational Spill: Absorb small ink spills with cloth or paper towels or other suitable material. printer. None needed for intended use in printer. None needed for intended use in printer - Sharp A1000 | UXA100 Operation Manual - Page 129
information is supplied to us by the manufacturer and Sharp offers no warranties as to its accuracy and accepts no responsibilities for any typographical errors which may appear on these sheets. It is the responsibility of the user to determine the suitability of this product for each particular - Sharp A1000 | UXA100 Operation Manual - Page 130
/ RECEPTION MODE JAN-03 10:30 TEL FAX TAD JAN-03 10:30 TEL FAX TAD TEL FAX JAN-03 10:30 TAD FAX mode: The fax machine automatically answers and receives faxes. TEL mode: Answer all calls (even faxes) by picking up the handset. To begin fax START/ reception, press . MEMORY TAD mode: Select - Sharp A1000 | UXA100 Operation Manual - Page 131
del display señale el modo de recepción deseado. RESOLUTION/ RECEPTION MODE JAN-03 10:30 TEL FAX TAD JAN-03 10:30 TEL FAX TAD TEL FAX JAN-03 10:30 TAD Modo FAX: El aparato de telefax contestará y recibirá documentos automáticamente. Modo TEL: Contesta todas las llamadas (incluso las - Sharp A1000 | UXA100 Operation Manual - Page 132
, 78 Fax Signal Receive, 81 Fine resolution priority, 59 G Group Keys, 75 Group List, 101 H Halftone setting, 57 Handset, 11 Handset receiver volume, 32 Hold, 81 Housing, cleaning, 107 I Ink save mode, 23 J Jams, clearing, 120-122 L Letters, entering, 27, 63 Line error, 113 Loading paper, 14 Loading - Sharp A1000 | UXA100 Operation Manual - Page 133
FAX reception mode, 78 Number of rings in TAD mode, 35 O OGM only mode, 40 Ordering parts, 123 Outgoing message, 33 Override Ringing, 45 P Page numbering, batch, 72 Paper jams, clearing, 120-122 Paper size setting, 22 Paper trays, 12 Paper, loading, 14 Polling, 95-98 Power cord, 16 Print cartridge - Sharp A1000 | UXA100 Operation Manual - Page 134
132 - Sharp A1000 | UXA100 Operation Manual - Page 135
of purchase set forth below. Neither the sales personnel of the seller nor any other person service: What to do to obtain service: Personal Facsimile Ninety (90) days parts and labor from date of purchase. Any consumable items such as paper supplied with the Product. At a Sharp Authorized Servicer - Sharp A1000 | UXA100 Operation Manual - Page 136
Please record the model number and serial number below, for easy reference, in case of loss or theft. These numbers are located on the rear side of the unit.Space is also provided for other relevant information. Model Number Serial Number Date of Purchase Place of Purchase UX-A1000 PRINTED IN
-
 1
1 -
 2
2 -
 3
3 -
 4
4 -
 5
5 -
 6
6 -
 7
7 -
8
-
9
-
10
-
11
-
12
-
13
-
14
-
15
-
16
-
17
-
18
-
19
-
20
-
21
-
22
-
23
-
24
-
25
-
26
-
27
-
28
-
29
-
30
-
31
-
32
-
33
-
34
-
35
-
36
-
37
-
38
-
39
-
40
-
41
-
42
-
43
-
44
-
45
-
46
-
47
-
48
-
49
-
50
-
51
-
52
-
53
-
54
-
55
-
56
-
57
-
58
-
59
-
60
-
61
-
62
-
63
-
64
-
65
-
66
-
67
-
68
-
69
-
70
-
71
-
72
-
73
-
74
-
75
-
76
-
77
-
78
-
79
-
80
-
81
-
82
-
83
-
84
-
85
-
86
-
87
-
88
-
89
-
90
-
91
-
92
-
93
-
94
-
95
-
96
-
97
-
98
-
99
-
100
-
101
-
102
-
103
-
104
-
105
-
106
-
107
-
108
-
109
-
110
-
111
-
112
-
113
-
114
-
115
-
116
-
117
-
118
-
119
-
120
-
121
-
122
-
123
-
124
-
125
-
126
-
127
-
128
-
129
-
130
-
131
-
132
-
133
-
134
-
135
-
136
 |
 |
MODEL
UX-A1000
OPERATION MANUAL
FACSIMILE
1.
Installation
2.
Using the Answering System
3.
Sending Faxes
4.
Receiving Faxes
5.
Making Copies
6.
Special Functions
7.
Printing Lists
8.
Maintenance
9.
Troubleshooting