Sharp AR-M205 AR-M160 AR-M205 Operation Manual - Page 38
Creating Margins When Copying
 |
View all Sharp AR-M205 manuals
Add to My Manuals
Save this manual to your list of manuals |
Page 38 highlights
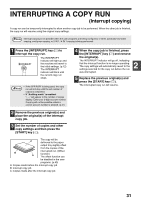
CREATING MARGINS WHEN COPYING (Margin shift) The MARGIN SHIFT feature, in its initial setting, automatically shifts the text or image to increase the margin by approximately 1/2". The location of the margin to be increased can be select to be either at the left edge or the top of the page (AR-M205 only). Example: Model that supports automatic two-sided copying Margin A Margin A A Original Left edge Top edge Note • This feature cannot be used with the 2 IN 1 / 4 IN 1 or rotation copy feature. • This feature cannot be used with non-standard size copy paper. (p.13) • You can also switch between the left margin and the top margin in the user programs. (p.45) • The margin width can be changed in the user programs. (p.45) • Note that a margin is created by shifting the image, and thus if the image is shifted too far, the edge of the image may be cut off. • If the ORIGINAL SIZE indicator blinks when margin shift is selected, rotate the original so that it is in the same orientation as the blinking ORIGINAL SIZE indicator. 1 Place the original(s). If you are using the document glass, place the side of the original where you wish to create the margin on the right. If you are using the SPF/RSPF, place the side of the original where you wish to create the margin on the left. 1 2 If the original is placed on the document glass, select the original size. (p.18) When using the SPF/RSPF, make sure that the same ORIGINAL SIZE indicator as your original size lights up. 3 Press the [MARGIN SHIFT] key. MARGIN SHIFT The MARGIN SHIFT indicator lights up. 4 Set the number of copies and other settings, and then press the [START] key ( ). The copy is delivered to the paper output tray. Note • To cancel margin shift, press the [MARGIN SHIFT] key repeatedly until the MARGIN SHIFT indicator is off. • When margin shift is used in combination with automatic two-sided copying, a margin is also created automatically on the back side of the paper directly behind the margin on the front side. Select the location of the margin (AR-M205 only) Follow this step if you are using a model that supports automatic two-sided copying. On other models, skip to the next step. 1 Hold down the [MARGIN SHIFT] key until the MARGIN SHIFT indicator blinks. The currently selected setting code for the margin position blinks in the display. 1: Left edge 2: Top edge 2 Press the [1] key or the [2] key, and then press the [START] key ( ). The selected setting code for the margin position blinks. 3 Press the [MARGIN SHIFT] key. The MARGIN SHIFT indicator stops blinking. 36
-
 1
1 -
2
-
3
-
4
-
5
-
6
-
7
-
8
-
9
-
10
-
11
-
12
-
13
-
14
-
15
-
16
-
17
-
18
-
19
-
20
-
21
-
22
-
23
-
24
-
25
-
26
-
27
-
28
-
29
-
30
-
31
-
32
-
 33
33 -
 34
34 -
 35
35 -
 36
36 -
 37
37 -
 38
38 -
 39
39 -
 40
40 -
 41
41 -
 42
42 -
 43
43 -
44
-
45
-
46
-
47
-
48
-
49
-
50
-
51
-
52
-
53
-
54
-
55
-
56
-
57
-
58
-
59
-
60
-
61
-
62
-
63
-
64
-
65
-
66
-
67
-
68
-
69
-
70
-
71
-
72
-
73
-
74
-
75
-
76
-
77
-
78
-
79
-
80
-
81
-
82
-
83
-
84
-
85
-
86
-
87
-
88
-
89
-
90
-
91
-
92
-
93
-
94
-
95
-
96
 |
 |
