Sharp AX1200S RK-12S30 Installation Instructions - Page 5
Step 3, Exhaust Duct Bottom Installation, Step 4: Exhaust Duct Back Installation
 |
UPC - 074000617667
View all Sharp AX1200S manuals
Add to My Manuals
Save this manual to your list of manuals |
Page 5 highlights
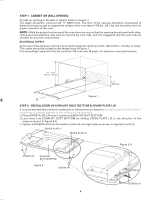
STEP 3: EXHAUST DUCT BOTTOM INSTALLATION 1 Place the oven onto the EXHAUST DUCT BOTTOM, lowering the 4 feet of the oven onto the projections at the 4 corners of EXHAUST DUCT BOTTOM as shown in Figure 3-A. EXHAUST DUCT BOTTOM Figure 3 STEP 4: EXHAUST DUCT BACK INSTALLATION 1 Remove 2 screws (#1) from upper both sides of the oven as shown in Figure 4-A to install the EXHAUST DUCT BACK. (Save 2 screws to be used at step 4-2.) #1 Projection Figure 3-A Figure 4-A 2 Secure EXHAUST DUCT BACK to the oven with the screws (#1) removed at step 4-1 and a SCREW (A) as shown in Figure 4-B. #1 SCREW (A) Figure 4-B 5 EXHAUST DUCT BACK
-
 1
1 -
 2
2 -
 3
3 -
 4
4 -
 5
5 -
 6
6 -
 7
7 -
 8
8
 |
 |

5
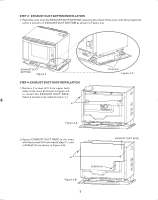
STEP 3:
EXHAUST DUCT BOTTOM INSTALLATION
1
Place the oven onto the EXHAUST DUCT BOTTOM, lowering the 4 feet of the oven onto the projections
at the 4 corners of
EXHAUST DUCT BOTTOM as shown in Figure 3-A.
STEP 4: EXHAUST DUCT BACK INSTALLATION
2
Secure EXHAUST DUCT BACK to the oven
with the screws (#1) removed at step 4-
1
and
a SCREW (A) as shown in Figure 4-B.
Figure 3-A
Figure 3
1
Remove 2 screws (#1) from upper both
sides of the oven as shown in Figure 4-A
to install the EXHAUST DUCT BACK.
(Save 2 screws to be used at step 4-
2
.)
Figure 4-A
EXHAUST DUCT BACK
Figure 4-B
Projection
EXHAUST DUCT
BOTTOM
#1
#1
SCREW (A)