Sharp BD HP52U BD-HP52U Operation Manual - Page 16
Video Connections - sharpe
 |
UPC - 074000354869
View all Sharp BD HP52U manuals
Add to My Manuals
Save this manual to your list of manuals |
Page 16 highlights
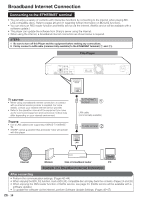
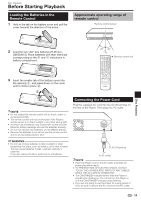
Video Connections Connecting to the HDMI Terminal • You can enjoy high quality digital picture and sound through the HDMI terminal. • See page 50 for information on the output of next generation audio formats. • When you use AQUOS LINK, make sure to use a certified HDMI cable. STEPS 1 Be sure to turn off this Player and the equipment before making any connections. 2 Firmly connect an HDMI cable (commercially available) to the HDMI terminals (1 and 2). NOTE • Audio transmitted in DTS-HD High Resolution Audio and DTS-HD Master Audio formats is output from the HDMI terminal as Bitstream. Connect an amplifier with a built-in decoder to enjoy the fine sound quality. This Player • When using an HDMI output, 7.1 ch Digital Output is available. 1 To HDMI OUT terminal HDMI cable (commercially available) 2 To HDMI IN terminal Selecting the priority video output when connecting HDMI and Component video When you connect both an HDMI cable and a component cable to this player, you need to select the priority video output in "Settings" - "Audio Video Settings" - "Video Out Select". (See page 39.) NOTE • When you connect the player to a SHARP TV with an HDMI cable only and the TV is turned on, the video output switches to HDMI automatically. (The above setting is unnecessary.) • When you connect the player to a TV with an HDMI cable, "HDMI Video Out" is set to "Auto". If you don't get a stable image, select the desired resolution*. When you set "HDMI Video Out" to a setting other than "Auto", you can only select resolutions* that are compatible with the connected TV. * Refer to "HDMI Video Out" on page 39 regarding the resolutions of the HDMI video output. Projector TV AV receiver Equipment with an HDMI terminal After connecting • Secure the HDMI cable to the HDMI cable holder, passing it through the holder. (Page 11) • If desired, connect audio equipment. (Page 17) • If necessary, perform the Audio Video Settings. (Pages 39-40) • Refer to AQUOS LINK function. (Pages 22 and 41) • Load a disc and start playback. (Pages 24-32) 14
-
 1
1 -
2
-
3
-
4
-
5
-
6
-
7
-
8
-
9
-
10
-
 11
11 -
 12
12 -
 13
13 -
 14
14 -
 15
15 -
 16
16 -
 17
17 -
 18
18 -
 19
19 -
 20
20 -
 21
21 -
22
-
23
-
24
-
25
-
26
-
27
-
28
-
29
-
30
-
31
-
32
-
33
-
34
-
35
-
36
-
37
-
38
-
39
-
40
-
41
-
42
-
43
-
44
-
45
-
46
-
47
-
48
-
49
-
50
-
51
-
52
-
53
-
54
-
55
-
56
-
57
-
58
-
59
-
60
-
61
-
62
-
63
-
64
 |
 |
