Sharp CD-BA200 CD-BA200 Operation Manual - Page 9
Compact Disc Operation - 3 disc cd player
 |
View all Sharp CD-BA200 manuals
Add to My Manuals
Save this manual to your list of manuals |
Page 9 highlights
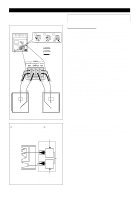
COMPACT DISC OPERATION 4 5 5" (12 cm) 3" (8 cm) 1 2 7 CD 2 1 7 3,6 5 8 5 8 CD Music schedule More tracks indicator Total number of tracks Total playing time s CD playback 1 Press the ON/STAND-BY button to turn the power on. 2 Press the CD button. 3 Press the OPEN/CLOSE button to open the disc tray. 4 Place the CD(s) on the disc tray, label side up. q CDs can be placed on any open position on the disc tray. q Be sure to place 3" (8 cm) CD(s) in the middle of the disc trays. Caution: Do not stack CDs in the tray. This can damage the player and the CDs. 5 When loading a third disc, press the DISC SKIP button to turn the disc tray, then place the CD in the open position. 6 Press the OPEN/CLOSE button to close the disc tray. q The total number of tracks and the total playing time for one disc will be displayed. At this time, the disc number indicator is flashing. q The music schedule will be displayed only for the number of tracks on the disc. q If the CD contains more than 15 tracks, "C" will appear. 7 Press the desired disc number button ( 1 - 3). 8 Press the 0/R (0R) button. q Playback will begin from track 1 on the disc you have selected to play. q After the disc finishes playing, the next disc will automatically play. q When there is no CD in one of the disc 1 - 3 positions, that position will be skipped and the next CD will be played. q When the last track on the third disc has finished playing, the unit will stop automatically. To interrupt playback: x 6 Press the CD button on the remote control. 6 q " " will appear. y 0R Press the button to resume playback from the same point. To stop playback: Press the s (CD s) button. To remove the CDs: While in the stop mode, press the OPEN/CLOSE button. q The disc tray will open. Remove the two discs. Then, press the DISC SKIP button to rotate the disc tray and remove the remaining disc. After use: Press the ON/STAND-BY button to enter the stand-by mode. 8
-
 1
1 -
2
-
3
-
 4
4 -
 5
5 -
 6
6 -
 7
7 -
 8
8 -
 9
9 -
 10
10 -
 11
11 -
 12
12 -
 13
13 -
 14
14 -
15
-
16
-
17
-
18
 |
 |
