Sharp DX-C311 DX-C311 DX-C401 Operation Manual - Page 398
Scanner/internet Fax
 |
View all Sharp DX-C311 manuals
Add to My Manuals
Save this manual to your list of manuals |
Page 398 highlights
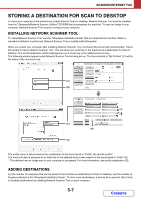
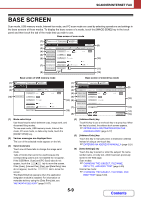
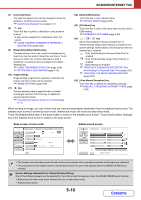
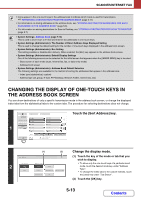
SCANNER/INTERNET FAX (7) Customized keys The keys that appear here can be changed to show the settings or functions that you prefer. ☞ Customizing displayed keys (page 5-11) (8) key Touch this key to specify a destination using a search number*. * 3-digit number assigned to a destination when it is stored. ☞ USING A SEARCH NUMBER TO RETRIEVE A DESTINATION (page 5-20) (9) [Resend] key/[Next Address] key The destinations of the most recent 8 transmissions by Scan to E-mail, fax and/or Internet fax are stored. Touch this key to select one of these destinations. After a destination is selected, this key changes to the [Next Address] key. ☞ USING THE RESEND FUNCTION (page 5-24) ☞ RETRIEVING A DESTINATION (page 5-18) (10) Image settings Image settings (original size, exposure, resolution, file format, and color mode) can be selected. ☞ IMAGE SETTINGS (page 5-49) (11) key This key appears when a special mode or 2-sided scanning is selected. Touch the key to display the selected special modes. ☞ Checking what special modes are selected (page 5-11) (12) [Special Modes] key Touch this key to use a special mode. ☞ SPECIAL MODES (page 5-65) (13) [File Name] key Touch this key to enter a file name when storing a file to USB memory. ☞ ENTERING A FILE NAME (page 5-36) (14) / / key When "Hold Setting for Received Data Print" or "Received Data Image Check Setting" is enabled in the system settings (administrator), this will appear when an Internet fax is received. : Only "Hold Setting for Received Data Print" is enabled : Only "Received Data Image Check Setting" is enabled : Both settings are enabled ☞ PRINTING A PASSWORD-PROTECTED FAX (Hold Setting For Received Data Print) (page 5-96) ☞ CHECKING THE IMAGE BEFORE PRINTING (page 5-97) (15) [I-Fax Manual Reception] key Touch this key to receive an Internet fax manually. ☞ MANUALLY RECEIVING INTERNET FAXES (page 5-95) When sending an image, you can retrieve and use a stored transmission destination from the address book screen. The address book screen is shared by scan mode, Internet fax mode, fax mode and data entry mode. Touch the [Address Book] key in the base screen to switch to the address book screen. Touch the [Condition Settings] key in the address book screen to switch to the base screen. Base screen of scan mode Scan Internet Fax Address Book Original Address Entry Exposure Fax USB Mem. Scan PC Scan Scan: 8½x11 Send: Auto Auto Text Send Settings Resolution 200X200dpi Address Review File Format PDF PDF File Color Mode Auto/Grayscale Mono2 Quick File Special Modes Address book screen 5 10 15 To Cc Condition Settings AAA AAA BBB BBB 1 Address Review 2 CCC CCC DDD DDD Address Entry Global Address Search EEE EEE GGG GGG FFF FFF HHH HHH III III JJJ JJJ Sort Address Freq. ABCD EFGH IJKL MNOP QRSTU VWXYZ etc. Auto Reception Fax Memory:100% • This chapter uses the base screen of scan mode as an example when operations common to all modes are explained. • The procedures in this chapter assume that the base screen of scan mode appears when the [IMAGE SEND] key is touched. System Settings (Administrator): Default Display Settings One of the following screens can be selected for the initial screen that appears when the [IMAGE SEND] key is touched. • Base screen of each mode (scan, Internet fax, fax, or data entry mode) • Address book screen 5-10 Contents
-
 1
1 -
2
-
3
-
4
-
5
-
6
-
7
-
8
-
9
-
10
-
11
-
12
-
13
-
14
-
15
-
16
-
17
-
18
-
19
-
20
-
21
-
22
-
23
-
24
-
25
-
26
-
27
-
28
-
29
-
30
-
31
-
32
-
33
-
34
-
35
-
36
-
37
-
38
-
39
-
40
-
41
-
42
-
43
-
44
-
45
-
46
-
47
-
48
-
49
-
50
-
51
-
52
-
53
-
54
-
55
-
56
-
57
-
58
-
59
-
60
-
61
-
62
-
63
-
64
-
65
-
66
-
67
-
68
-
69
-
70
-
71
-
72
-
73
-
74
-
75
-
76
-
77
-
78
-
79
-
80
-
81
-
82
-
83
-
84
-
85
-
86
-
87
-
88
-
89
-
90
-
91
-
92
-
93
-
94
-
95
-
96
-
97
-
98
-
99
-
100
-
101
-
102
-
103
-
104
-
105
-
106
-
107
-
108
-
109
-
110
-
111
-
112
-
113
-
114
-
115
-
116
-
117
-
118
-
119
-
120
-
121
-
122
-
123
-
124
-
125
-
126
-
127
-
128
-
129
-
130
-
131
-
132
-
133
-
134
-
135
-
136
-
137
-
138
-
139
-
140
-
141
-
142
-
143
-
144
-
145
-
146
-
147
-
148
-
149
-
150
-
151
-
152
-
153
-
154
-
155
-
156
-
157
-
158
-
159
-
160
-
161
-
162
-
163
-
164
-
165
-
166
-
167
-
168
-
169
-
170
-
171
-
172
-
173
-
174
-
175
-
176
-
177
-
178
-
179
-
180
-
181
-
182
-
183
-
184
-
185
-
186
-
187
-
188
-
189
-
190
-
191
-
192
-
193
-
194
-
195
-
196
-
197
-
198
-
199
-
200
-
201
-
202
-
203
-
204
-
205
-
206
-
207
-
208
-
209
-
210
-
211
-
212
-
213
-
214
-
215
-
216
-
217
-
218
-
219
-
220
-
221
-
222
-
223
-
224
-
225
-
226
-
227
-
228
-
229
-
230
-
231
-
232
-
233
-
234
-
235
-
236
-
237
-
238
-
239
-
240
-
241
-
242
-
243
-
244
-
245
-
246
-
247
-
248
-
249
-
250
-
251
-
252
-
253
-
254
-
255
-
256
-
257
-
258
-
259
-
260
-
261
-
262
-
263
-
264
-
265
-
266
-
267
-
268
-
269
-
270
-
271
-
272
-
273
-
274
-
275
-
276
-
277
-
278
-
279
-
280
-
281
-
282
-
283
-
284
-
285
-
286
-
287
-
288
-
289
-
290
-
291
-
292
-
293
-
294
-
295
-
296
-
297
-
298
-
299
-
300
-
301
-
302
-
303
-
304
-
305
-
306
-
307
-
308
-
309
-
310
-
311
-
312
-
313
-
314
-
315
-
316
-
317
-
318
-
319
-
320
-
321
-
322
-
323
-
324
-
325
-
326
-
327
-
328
-
329
-
330
-
331
-
332
-
333
-
334
-
335
-
336
-
337
-
338
-
339
-
340
-
341
-
342
-
343
-
344
-
345
-
346
-
347
-
348
-
349
-
350
-
351
-
352
-
353
-
354
-
355
-
356
-
357
-
358
-
359
-
360
-
361
-
362
-
363
-
364
-
365
-
366
-
367
-
368
-
369
-
370
-
371
-
372
-
373
-
374
-
375
-
376
-
377
-
378
-
379
-
380
-
381
-
382
-
383
-
384
-
385
-
386
-
387
-
388
-
389
-
390
-
391
-
392
-
 393
393 -
 394
394 -
 395
395 -
 396
396 -
 397
397 -
 398
398 -
 399
399 -
 400
400 -
 401
401 -
 402
402 -
 403
403 -
404
-
405
-
406
-
407
-
408
-
409
-
410
-
411
-
412
-
413
-
414
-
415
-
416
-
417
-
418
-
419
-
420
-
421
-
422
-
423
-
424
-
425
-
426
-
427
-
428
-
429
-
430
-
431
-
432
-
433
-
434
-
435
-
436
-
437
-
438
-
439
-
440
-
441
-
442
-
443
-
444
-
445
-
446
-
447
-
448
-
449
-
450
-
451
-
452
-
453
-
454
-
455
-
456
-
457
-
458
-
459
-
460
-
461
-
462
-
463
-
464
-
465
-
466
-
467
-
468
-
469
-
470
-
471
-
472
-
473
-
474
-
475
-
476
-
477
-
478
-
479
-
480
-
481
-
482
-
483
-
484
-
485
-
486
-
487
-
488
-
489
-
490
-
491
-
492
-
493
-
494
-
495
-
496
-
497
-
498
-
499
-
500
-
501
-
502
-
503
-
504
-
505
-
506
-
507
-
508
-
509
-
510
-
511
-
512
-
513
-
514
-
515
-
516
-
517
-
518
-
519
-
520
-
521
-
522
-
523
-
524
-
525
-
526
-
527
-
528
-
529
-
530
-
531
-
532
-
533
-
534
-
535
-
536
-
537
-
538
-
539
-
540
-
541
-
542
-
543
-
544
-
545
-
546
-
547
-
548
-
549
-
550
-
551
-
552
-
553
-
554
-
555
-
556
-
557
-
558
-
559
-
560
-
561
-
562
-
563
-
564
-
565
-
566
-
567
-
568
-
569
-
570
-
571
-
572
-
573
-
574
-
575
-
576
-
577
-
578
-
579
-
580
-
581
-
582
-
583
-
584
-
585
-
586
-
587
-
588
-
589
-
590
-
591
-
592
-
593
-
594
-
595
-
596
-
597
-
598
-
599
-
600
-
601
-
602
-
603
-
604
-
605
-
606
-
607
-
608
-
609
-
610
-
611
-
612
-
613
-
614
-
615
-
616
-
617
-
618
-
619
-
620
-
621
-
622
-
623
-
624
-
625
-
626
-
627
-
628
-
629
-
630
-
631
-
632
-
633
-
634
-
635
-
636
-
637
-
638
-
639
-
640
-
641
-
642
-
643
-
644
-
645
-
646
-
647
-
648
-
649
-
650
-
651
-
652
-
653
-
654
-
655
-
656
-
657
-
658
-
659
-
660
-
661
-
662
-
663
-
664
-
665
-
666
-
667
-
668
-
669
-
670
-
671
-
672
-
673
-
674
-
675
-
676
-
677
-
678
-
679
-
680
-
681
-
682
-
683
-
684
-
685
-
686
-
687
-
688
-
689
-
690
-
691
-
692
-
693
-
694
-
695
-
696
-
697
-
698
-
699
 |
 |