Sharp DX-C311 DX-C311 DX-C401 Operation Manual - Page 685
Problems Related To Scan Results
 |
View all Sharp DX-C311 manuals
Add to My Manuals
Save this manual to your list of manuals |
Page 685 highlights
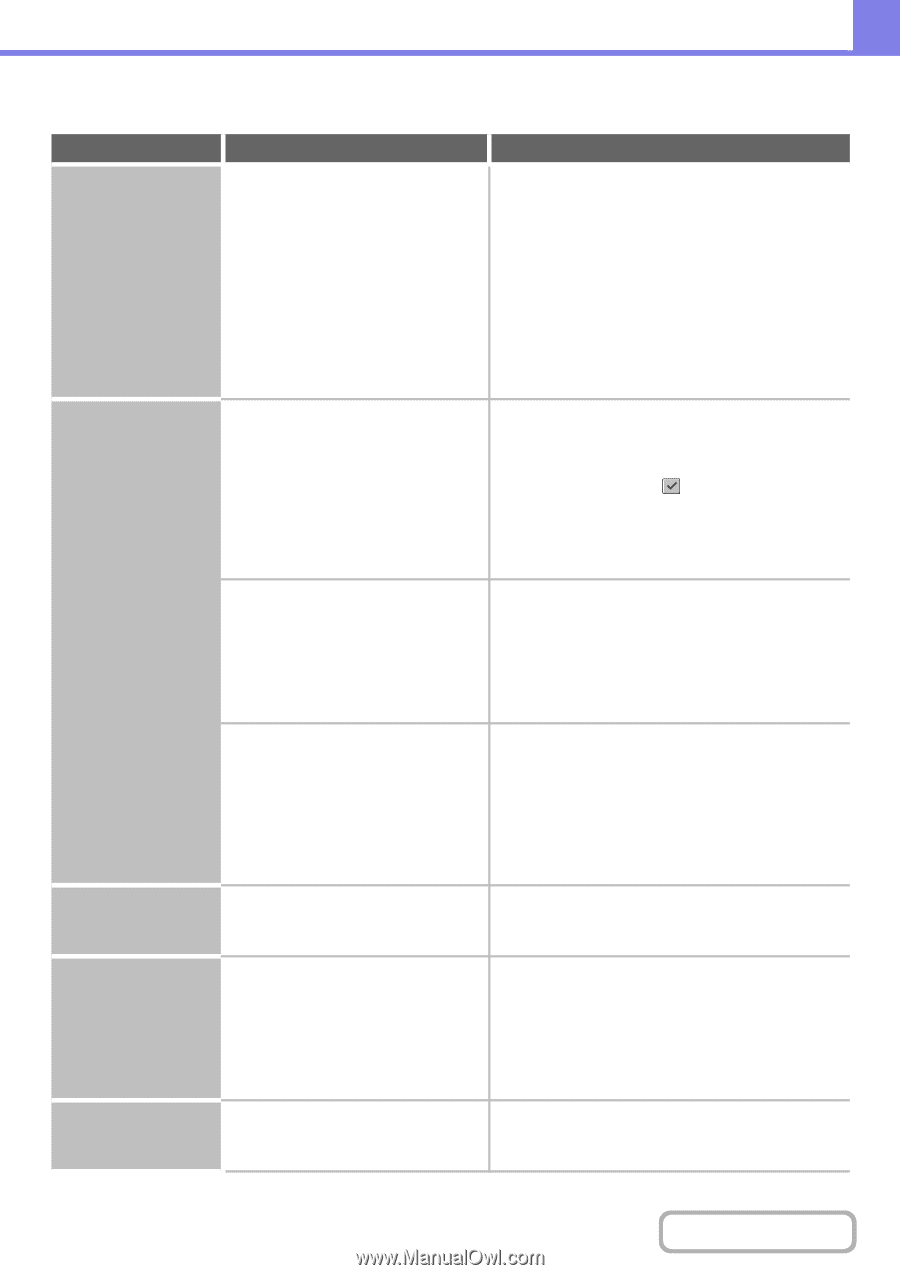
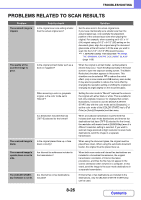
TROUBLESHOOTING PROBLEMS RELATED TO SCAN RESULTS Problem The scanned image is clipped. Point to check Is the original scan size setting smaller than the actual original size? The quality of the scanned image is poor. Is the original printed matter such as a book or magazine? When scanning a color or grayscale original, is the color mode set to "Mono2"? Is a destination included that has [TIFF-S] selected for the format? The scanned image is blank. Is the original placed face up or face down correctly? The scanned image is upside down or on its side. Are Internet fax addresses included in the transmission? The [COLOR START] key indicator is not lit. Are Internet fax or fax destinations included? Solution Set the scan size to the actual original size. If you have intentionally set a smaller size than the actual original size, note carefully the placement position of the selected scan size when placing the original. For example, when scanning an 8-1/2" x 11" (A4) original using a 5-1/2" x 8-1/2" (B5) setting on the document glass, align the original using the document glass scale at the left center to fit the area you wish to scan into the 5-1/2" x 8-1/2" (B5) scanning area. ☞ 1. BEFORE USING THE MACHINE "PLACING THE ORIGINAL ON THE DOCUMENT GLASS" (page 1-38) When the original is printed matter, vertical patterns (moiré) may occur. Touch the [Exposure] key in the base screen to open the exposure setting screen. The [Moiré Reduction] checkbox appears in this screen. This checkbox can be selected to reduce the moiré effect. (only in scan mode and USB memory scan mode) It may also be possible to reduce the moiré effect by changing the resolution setting or shifting the original (or changing its angle) slightly on the document glass. Setting the color mode to "Mono2" replaces the colors in the original with either black or white. This is suitable for text-only originals; however, for originals that contain illustrations, it is best to use the [BLACK & WHITE START] key with the color mode set to [Grayscale], or set the color mode of the [COLOR START] key to [Full Color] or [Auto]-[Grayscale] and then scan. When a broadcast transmission is performed that includes both scan mode destinations and Internet fax destinations that have [TIFF-S] selected for the format, the resolution will remain fixed at [200X200dpi] even if a different resolution setting is selected. If you wish to send an image scanned at high resolution to scan mode destinations, send the image in a separate transmission. When using the document glass, the original must be placed face down. When using the automatic document feeder, the original must be placed face up. When both scan mode and Internet fax destinations are included in a broadcast transmission, the original transmission orientation of Internet fax takes precedence, and thus the file may not appear in the correct orientation when viewed on a computer. In this event, send the image to the scan mode destinations in a separate transmission. If Internet fax or fax destinations are included in the destinations, only the [BLACK & WHITE START] key can be used. 8-26 Contents
-
 1
1 -
2
-
3
-
4
-
5
-
6
-
7
-
8
-
9
-
10
-
11
-
12
-
13
-
14
-
15
-
16
-
17
-
18
-
19
-
20
-
21
-
22
-
23
-
24
-
25
-
26
-
27
-
28
-
29
-
30
-
31
-
32
-
33
-
34
-
35
-
36
-
37
-
38
-
39
-
40
-
41
-
42
-
43
-
44
-
45
-
46
-
47
-
48
-
49
-
50
-
51
-
52
-
53
-
54
-
55
-
56
-
57
-
58
-
59
-
60
-
61
-
62
-
63
-
64
-
65
-
66
-
67
-
68
-
69
-
70
-
71
-
72
-
73
-
74
-
75
-
76
-
77
-
78
-
79
-
80
-
81
-
82
-
83
-
84
-
85
-
86
-
87
-
88
-
89
-
90
-
91
-
92
-
93
-
94
-
95
-
96
-
97
-
98
-
99
-
100
-
101
-
102
-
103
-
104
-
105
-
106
-
107
-
108
-
109
-
110
-
111
-
112
-
113
-
114
-
115
-
116
-
117
-
118
-
119
-
120
-
121
-
122
-
123
-
124
-
125
-
126
-
127
-
128
-
129
-
130
-
131
-
132
-
133
-
134
-
135
-
136
-
137
-
138
-
139
-
140
-
141
-
142
-
143
-
144
-
145
-
146
-
147
-
148
-
149
-
150
-
151
-
152
-
153
-
154
-
155
-
156
-
157
-
158
-
159
-
160
-
161
-
162
-
163
-
164
-
165
-
166
-
167
-
168
-
169
-
170
-
171
-
172
-
173
-
174
-
175
-
176
-
177
-
178
-
179
-
180
-
181
-
182
-
183
-
184
-
185
-
186
-
187
-
188
-
189
-
190
-
191
-
192
-
193
-
194
-
195
-
196
-
197
-
198
-
199
-
200
-
201
-
202
-
203
-
204
-
205
-
206
-
207
-
208
-
209
-
210
-
211
-
212
-
213
-
214
-
215
-
216
-
217
-
218
-
219
-
220
-
221
-
222
-
223
-
224
-
225
-
226
-
227
-
228
-
229
-
230
-
231
-
232
-
233
-
234
-
235
-
236
-
237
-
238
-
239
-
240
-
241
-
242
-
243
-
244
-
245
-
246
-
247
-
248
-
249
-
250
-
251
-
252
-
253
-
254
-
255
-
256
-
257
-
258
-
259
-
260
-
261
-
262
-
263
-
264
-
265
-
266
-
267
-
268
-
269
-
270
-
271
-
272
-
273
-
274
-
275
-
276
-
277
-
278
-
279
-
280
-
281
-
282
-
283
-
284
-
285
-
286
-
287
-
288
-
289
-
290
-
291
-
292
-
293
-
294
-
295
-
296
-
297
-
298
-
299
-
300
-
301
-
302
-
303
-
304
-
305
-
306
-
307
-
308
-
309
-
310
-
311
-
312
-
313
-
314
-
315
-
316
-
317
-
318
-
319
-
320
-
321
-
322
-
323
-
324
-
325
-
326
-
327
-
328
-
329
-
330
-
331
-
332
-
333
-
334
-
335
-
336
-
337
-
338
-
339
-
340
-
341
-
342
-
343
-
344
-
345
-
346
-
347
-
348
-
349
-
350
-
351
-
352
-
353
-
354
-
355
-
356
-
357
-
358
-
359
-
360
-
361
-
362
-
363
-
364
-
365
-
366
-
367
-
368
-
369
-
370
-
371
-
372
-
373
-
374
-
375
-
376
-
377
-
378
-
379
-
380
-
381
-
382
-
383
-
384
-
385
-
386
-
387
-
388
-
389
-
390
-
391
-
392
-
393
-
394
-
395
-
396
-
397
-
398
-
399
-
400
-
401
-
402
-
403
-
404
-
405
-
406
-
407
-
408
-
409
-
410
-
411
-
412
-
413
-
414
-
415
-
416
-
417
-
418
-
419
-
420
-
421
-
422
-
423
-
424
-
425
-
426
-
427
-
428
-
429
-
430
-
431
-
432
-
433
-
434
-
435
-
436
-
437
-
438
-
439
-
440
-
441
-
442
-
443
-
444
-
445
-
446
-
447
-
448
-
449
-
450
-
451
-
452
-
453
-
454
-
455
-
456
-
457
-
458
-
459
-
460
-
461
-
462
-
463
-
464
-
465
-
466
-
467
-
468
-
469
-
470
-
471
-
472
-
473
-
474
-
475
-
476
-
477
-
478
-
479
-
480
-
481
-
482
-
483
-
484
-
485
-
486
-
487
-
488
-
489
-
490
-
491
-
492
-
493
-
494
-
495
-
496
-
497
-
498
-
499
-
500
-
501
-
502
-
503
-
504
-
505
-
506
-
507
-
508
-
509
-
510
-
511
-
512
-
513
-
514
-
515
-
516
-
517
-
518
-
519
-
520
-
521
-
522
-
523
-
524
-
525
-
526
-
527
-
528
-
529
-
530
-
531
-
532
-
533
-
534
-
535
-
536
-
537
-
538
-
539
-
540
-
541
-
542
-
543
-
544
-
545
-
546
-
547
-
548
-
549
-
550
-
551
-
552
-
553
-
554
-
555
-
556
-
557
-
558
-
559
-
560
-
561
-
562
-
563
-
564
-
565
-
566
-
567
-
568
-
569
-
570
-
571
-
572
-
573
-
574
-
575
-
576
-
577
-
578
-
579
-
580
-
581
-
582
-
583
-
584
-
585
-
586
-
587
-
588
-
589
-
590
-
591
-
592
-
593
-
594
-
595
-
596
-
597
-
598
-
599
-
600
-
601
-
602
-
603
-
604
-
605
-
606
-
607
-
608
-
609
-
610
-
611
-
612
-
613
-
614
-
615
-
616
-
617
-
618
-
619
-
620
-
621
-
622
-
623
-
624
-
625
-
626
-
627
-
628
-
629
-
630
-
631
-
632
-
633
-
634
-
635
-
636
-
637
-
638
-
639
-
640
-
641
-
642
-
643
-
644
-
645
-
646
-
647
-
648
-
649
-
650
-
651
-
652
-
653
-
654
-
655
-
656
-
657
-
658
-
659
-
660
-
661
-
662
-
663
-
664
-
665
-
666
-
667
-
668
-
669
-
670
-
671
-
672
-
673
-
674
-
675
-
676
-
677
-
678
-
679
-
 680
680 -
 681
681 -
 682
682 -
 683
683 -
 684
684 -
 685
685 -
 686
686 -
 687
687 -
 688
688 -
 689
689 -
 690
690 -
691
-
692
-
693
-
694
-
695
-
696
-
697
-
698
-
699
 |
 |