Sharp FO-2080 FO-2080 Operation Manual for General Use - Page 49
Using the machine as a network printer - ip address
 |
View all Sharp FO-2080 manuals
Add to My Manuals
Save this manual to your list of manuals |
Page 49 highlights
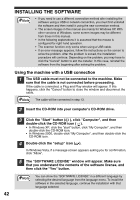
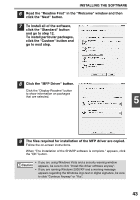
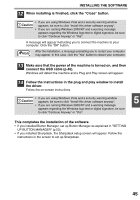
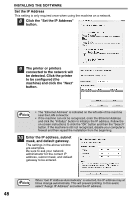
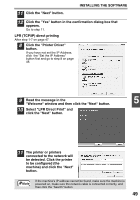
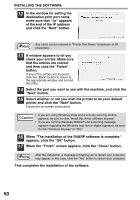
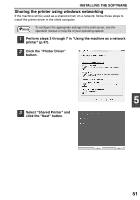
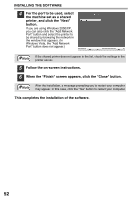
INSTALLING THE SOFTWARE Using the machine as a network printer Note • Interface cables for connecting the machine to your computer are not included with the machine. Please purchase the appropriate cable for your computer. • If you intend to use the machine as a scanner, it must be connected to your computer with a USB interface cable. The scanner function cannot be used if the machine is connected with a LAN cable. 1 Insert the LAN cable into the LAN connector on the machine. Use a network cable that is shielded. 2 Turn on the machine. 3 Insert the CD-ROM into your computer's CD-ROM drive. 4 Click the "Start" button ( ), click "Computer", and then double-click the CD-ROM icon ( ). • In Windows XP, click the "start" button, click "My Computer", and then double-click the CD-ROM icon. • In Windows 2000, double-click "My Computer", and then double-click the 5 CD-ROM icon. 5 Double-click the "setup" icon ( ). In Windows Vista, if a message screen appears asking you for confirmation, click "Allow". 6 The "SOFTWARE LICENSE" window will appear. Make sure that you understand the contents of the software license, and then click the "Yes" button. Note You can show the "SOFTWARE LICENSE" in a different language by selecting the desired language from the language menu. To install the software in the selected language, continue the installation with that language selected. 7 Read the "Readme First" in the "Welcome" window and then click the "Next" button. Note To set the IP address of the machine, follow the steps below. If the machine is already connected to the network and its IP address has been set, go to "LPR (TCP/IP) direct printing" (p.49). 47
-
 1
1 -
2
-
3
-
4
-
5
-
6
-
7
-
8
-
9
-
10
-
11
-
12
-
13
-
14
-
15
-
16
-
17
-
18
-
19
-
20
-
21
-
22
-
23
-
24
-
25
-
26
-
27
-
28
-
29
-
30
-
31
-
32
-
33
-
34
-
35
-
36
-
37
-
38
-
39
-
40
-
41
-
42
-
43
-
 44
44 -
 45
45 -
 46
46 -
 47
47 -
 48
48 -
 49
49 -
 50
50 -
 51
51 -
 52
52 -
 53
53 -
 54
54 -
55
-
56
-
57
-
58
-
59
-
60
-
61
-
62
-
63
-
64
-
65
-
66
-
67
-
68
-
69
-
70
-
71
-
72
-
73
-
74
-
75
-
76
-
77
-
78
-
79
-
80
-
81
-
82
-
83
-
84
-
85
-
86
-
87
-
88
-
89
-
90
-
91
-
92
-
93
-
94
-
95
-
96
-
97
-
98
-
99
-
100
-
101
-
102
-
103
-
104
-
105
-
106
-
107
-
108
-
109
-
110
-
111
-
112
 |
 |
