Sharp LC-32LB481U User Guide LC 32 43 50LB481U - Page 58
Advanced audio settings, Advanced audio settings menu options, RIGHT, Audio effect
 |
View all Sharp LC-32LB481U manuals
Add to My Manuals
Save this manual to your list of manuals |
Page 58 highlights
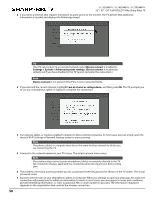
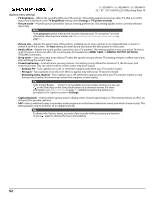
LC-32LB481U / LC-43LB481U / LC-50LB481U 32" / 43" / 50" Full HD LED 1080p Sharp Roku TV Advanced audio settings The Advanced audio settings menu for each TV input provides settings for fine tuning the audio. All of the settings in this menu apply only to the currently-selected input. To use the Advanced Audio Settings menu, first press to display the Options menu. Then select Advanced audio settings. To adjust the settings on the Advanced audio settings menu, press the UP or DOWN arrow to highlight a setting, and then press the LEFT or RIGHT arrow to change the setting. You'll notice the changes you make right away in sound quality. Tip When you highlight a setting, the header text explains the effect of its current value. When you begin to adjust a setting, the other options are hidden so you can see more of the screen. Even though the other settings are hidden, you can move the highlight up or down to adjust the other settings. As soon as you press the UP or DOWN arrow, the other settings become visible again. Advanced audio settings menu options • Audio effect-Select from among various preset audio modes to improve speech, make music sound its best, boost bass or treble, or simulate a theater. Use Reset audio settings, described below, to return the input's current settings to their original values. • Virtual surround-When on, virtual surround simulates surround sound from multiple speakers. Sometimes, the effect interferes with dialog clarity. Use the Dialog clarity option to compensate. • Dialog clarity-Available only when Virtual surround is On. Choose among Low, Medium, and High settings to improve the clarity of dialog when you are using the virtual surround feature. • Reset audio settings-Returns Virtual surround and Dialog clarity to their default settings for the selected Audio effect. 53
-
 1
1 -
2
-
3
-
4
-
5
-
6
-
7
-
8
-
9
-
10
-
11
-
12
-
13
-
14
-
15
-
16
-
17
-
18
-
19
-
20
-
21
-
22
-
23
-
24
-
25
-
26
-
27
-
28
-
29
-
30
-
31
-
32
-
33
-
34
-
35
-
36
-
37
-
38
-
39
-
40
-
41
-
42
-
43
-
44
-
45
-
46
-
47
-
48
-
49
-
50
-
51
-
52
-
 53
53 -
 54
54 -
 55
55 -
 56
56 -
 57
57 -
 58
58 -
 59
59 -
 60
60 -
 61
61 -
 62
62 -
 63
63 -
64
-
65
-
66
-
67
-
68
-
69
-
70
-
71
-
72
-
73
-
74
-
75
-
76
-
77
-
78
-
79
-
80
-
81
-
82
-
83
-
84
-
85
-
86
-
87
-
88
-
89
-
90
-
91
-
92
-
93
-
94
 |
 |
