Sharp PG-A10S-SL Operation Manual
Sharp PG-A10S-SL - Notevision SVGA LCD Projector Manual
 |
UPC - 074000358966
View all Sharp PG-A10S-SL manuals
Add to My Manuals
Save this manual to your list of manuals |
Sharp PG-A10S-SL manual content summary:
- Sharp PG-A10S-SL | Operation Manual - Page 1
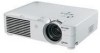
Connections and Setup Basic Operation SHARP CORPORATION OPERATION MANUAL MODEL PG-A10X PG-A10S A10X_A10S#E_Print#H1+4.p65 1 LCD PROJECTOR Printed in Japan TINS-A505WJN1 03P02-JWM 03.2.4, 1:59 PM Easy to Use Functions Appendix Downloaded from www.Manualslib.com manuals search engine - Sharp PG-A10S-SL | Operation Manual - Page 2
assistance in reporting the loss or theft of your Projector, please record the Serial Number located on the bottom of the projector and retain this information. Before recycling the packaging, A10X_A10S#E_Print#pii_iv.p65 1 Downloaded from www.Manualslib.com manuals search engine 03.2.4, 2:40 PM - Sharp PG-A10S-SL | Operation Manual - Page 3
serious electric shock may occur. To fit an appropriate plug to the mains lead, follow the instructions below: IMPORTANT: The wires in the mains lead are coloured in accordance with the following code: #E_Print#pii_iv.p65 2 Downloaded from www.Manualslib.com manuals search engine 03.2.4, 2:40 PM - Sharp PG-A10S-SL | Operation Manual - Page 4
Chinese) and Korean. Carefully read through the operation instructions before operating the projector. Die mitgelieferte CD-ROM enthält Bedienungsanleitungen in Englisch operar o projetor. A10X_A10S#E_Print#pii_iv.p65 3 Downloaded from www.Manualslib.com manuals search engine 03.2.4, 2:40 PM - Sharp PG-A10S-SL | Operation Manual - Page 5
operation manual carefully. Introduction ENGLISH There are two important reasons for prompt warranty registration of your new SHARP Projector, using the REGISTRATION CARD packed with the projector. 1. WARRANTY This is to assure that you immediately receive the full benefit of the parts, service - Sharp PG-A10S-SL | Operation Manual - Page 6
the upper part of the "Notevision" logo on the top cabinet of the projector as shown in the drawing on the right. Do not attach the "QUICK GUIDE" Label anywhere else. "QUICK GUIDE" Label 2 A10X_A10S#E_Print#p01_03.p65 2 Downloaded from www.Manualslib.com manuals search engine 03.2.4, 2:00 PM - Sharp PG-A10S-SL | Operation Manual - Page 7
4. High Brightness Despite Compact Size • Use of 165 W SHP lamp achieves excellent color uniformity and high brightness. • The Eco mode function buttons on the projector to prevent unauthorized adjustment. A10X_A10S#E_Print#p01_03.p65 3 Downloaded from www.Manualslib.com manuals search engine 3 - Sharp PG-A10S-SL | Operation Manual - Page 8
How to Access the PDF Operation Manuals ..... 9 Part Names 10 Projector (Front and Top View 10 Projector (Rear View 11 Remote Control ( 43 Taking the Keylock off 43 Using the "Options" Menu 44 Lamp Timer (Life) (Checking the Lamp Life Status 44 OSD Display (Setting On-screen Display 44 Video - Sharp PG-A10S-SL | Operation Manual - Page 9
the Lamp Unit 58 Resetting the Lamp Timer 59 Connecting Pin Assignments 60 RS-232C Specifications and Command Settings 61 Computer Compatibility Chart 62 Troubleshooting 63 For SHARP Assistance 65 Specifications 66 Dimensions 67 Glossary 68 Index 69 This operation manual includes - Sharp PG-A10S-SL | Operation Manual - Page 10
the following basic rules for its installation, use and servicing. 1. Read Instructions All the safety and operating instructions should be read before the product is operated. 2. Retain Instructions The safety and operating instructions should be retained for future reference. 3. Heed Warnings All - Sharp PG-A10S-SL | Operation Manual - Page 11
by following the operating instructions. Adjust only those controls that are covered by the operating instructions, as an improper Safety Check Upon completion of any service or repairs to this product, ask the service technician to perform safety checks to manuals search engine 7 03.2.4, 2:01 PM - Sharp PG-A10S-SL | Operation Manual - Page 12
hazard of glass particles if lamp ruptures. In case of lamp rupture, contact your nearest Sharp Authorized Projector Dealer or Service Center for a replacement. See "Replacing the Lamp" on page 57. Caution concerning the setup of the projector I For minimal servicing and to maintain high image - Sharp PG-A10S-SL | Operation Manual - Page 13
) that you want to view. 6 Double click the installation program and follow the instructions on the screen. For Macintosh: 1 Insert the CD-ROM in the CD-ROM that you want to view. 5 Double click the "A10" pdf file to access the projector manuals. Note • If the desired pdf file cannot be opened - Sharp PG-A10S-SL | Operation Manual - Page 14
manual where the topic is explained. Projector (Front and Top View) Power indicator 26 Illuminates red when the projector is in standby. When the power is turned on, this indicator will illuminate green 55 Lamp replacement indicator Illuminates green indicating normal function. Replace the lamp when - Sharp PG-A10S-SL | Operation Manual - Page 15
to the information that came with the system for instructions on how to use it to secure the projector. 18 INPUT 2 terminal Terminal for connecting video (on the bottom of the projector) A10X_A10S#E_Print#p06_14.p65 11 Downloaded from www.Manualslib.com manuals search engine 11 03.2.4, 2:01 PM - Sharp PG-A10S-SL | Operation Manual - Page 16
Part Names Numbers in refer to the main pages in this operation manual where the topic is explained. Remote Control (Front View) Power ON/OFF buttons 26 the speaker sound level. 12 A10X_A10S#E_Print#p06_14.p65 12 Downloaded from www.Manualslib.com manuals search engine 03.2.4, 2:01 PM - Sharp PG-A10S-SL | Operation Manual - Page 17
high temperature. • The remote control may malfunction under a fluorescent lamp. In this case, move the projector away from the fluorescent lamp. Remote control sensor 45° 30° Remote control signal transmitters 30° .p65 13 03.2.4, 2:01 PM Downloaded from www.Manualslib.com manuals search engine - Sharp PG-A10S-SL | Operation Manual - Page 18
PFILDA008WJZZ Projector manual and technical reference CD-ROM UDSKAA022WJN1 "QUICK GUIDE" label TLABZA191WJZZ Operation manual (this manual) on the region. Please check with your nearest Sharp Authorized Projector Dealer or Service Center. 14 A10X_A10S#E_Print#p06_14.p65 14 03.2.4, 2: - Sharp PG-A10S-SL | Operation Manual - Page 19
the last device to be turned on after all the connections are made. • Be sure to read the operation manuals of the devices to be connected before making connections. This projector can be connected to: A computer using: I An RGB cable and a ø3.5 mm audio cable (commercially available) (See page 16 - Sharp PG-A10S-SL | Operation Manual - Page 20
for use with some Macintosh computers. Contact your nearest Sharp Authorized Projector Dealer or Service Center. • Depending on the computer you are using manual for switching the computer signal output settings. 1 RGB cable 2 ø3.5 mm audio cable (commercially available or available as Sharp service - Sharp PG-A10S-SL | Operation Manual - Page 21
the connected computer last. Note • The DDC "Plug and Play" function of this projector operates only when used in conjunction with a VESA DDC compatible computer. Connections and Setup A10X_A10S#E_Print#p15_20.p65 17 Downloaded from www.Manualslib.com manuals search engine 17 03.2.4, 2:02 PM - Sharp PG-A10S-SL | Operation Manual - Page 22
quality image, use a commercially available S-video cable to connect the INPUT 2 terminal on the projector and the Svideo output terminal on the video equipment. • A ø3.5 mm minijack to RCA 18 A10X_A10S#E_Print#p15_20.p65 18 Downloaded from www.Manualslib.com manuals search engine 03.2.4, 2:02 PM - Sharp PG-A10S-SL | Operation Manual - Page 23
(sold separately) 2 ø3.5 mm minijack to RCA audio cable (commercially available) Note • When connecting the projector to the video equipment in this way, select "Component" for "Signal Type" in the "Picture" menu .p65 19 Downloaded from www.Manualslib.com manuals search engine 19 03.2.4, 2:02 PM - Sharp PG-A10S-SL | Operation Manual - Page 24
serial control cable (sold separately). 2 Use the above cables to connect the projector and the computer. Note • Do not connect or disconnect an RS-232C serial your computer terminal is not correctly set up. Refer to the operation manual of the computer for details. • See page 60 for connection of - Sharp PG-A10S-SL | Operation Manual - Page 25
caught in the area between the adjustment foot and the projector. A10X_A10S#E_Print#p21_25.p65 21 Downloaded from www.Manualslib.com manuals search engine Rear adjustment foot (on the bottom) Foot release (on the other side of the projector as well) Front adjustment feet 21 03.2.4, 2:02 PM - Sharp PG-A10S-SL | Operation Manual - Page 26
Setup Adjusting the Lens The image is focused and adjusted to the desired size using the focus ring or zoom knob on the projector. FoFcoucsusrirningg ZZoooommknkonbob 1 Adjust the focus by rotating the focus ring. 2 Adjust zooming by moving the zoom knob. Zoom out Zoom in 22 A10X_A10S# - Sharp PG-A10S-SL | Operation Manual - Page 27
Note • The projector lens should be with this projector. Standard Setup (Front Projection) I Place the projector at the required the screen to the projector may vary depending on the size of the screen PRJ Mode" menu. P.50 • Place the projector so that an imaginary horizontal line that passes - Sharp PG-A10S-SL | Operation Manual - Page 28
(-) sign indicate the distance from the lens center below the bottom of the image. 24 A10X_A10S#E_Print#p21_25.p65 24 Downloaded from www.Manualslib.com manuals search engine 03.2.4, 2:02 PM - Sharp PG-A10S-SL | Operation Manual - Page 29
Sharp ceilingmount bracket for this installation. Before mounting the projector, contact your nearest Sharp Authorized Projector Dealer or Service Center E_Print#p21_25.p65 25 Downloaded from www.Manualslib.com manuals search engine When using the default setting. MOn-screen Display The image is inverted. - Sharp PG-A10S-SL | Operation Manual - Page 30
projector is ready to start operation. Note • The lamp replacement indicator illuminates, indicating the status of the lamp. Green: The lamp is ready. Blinking in green: The lamp is warming up and shutting down. Red: The lamp buttons previously set on the projector or the remote control. • Lamp - Sharp PG-A10S-SL | Operation Manual - Page 31
RGB ➝ ➝ ➝ Note • When no signal is received, "NO SIGNAL" will be displayed. When a signal that the projector is not preset to receive is received, "NOT REG." will be displayed. • The INPUT mode is not displayed when 27 03.2.4, 2:04 PM Downloaded from www.Manualslib.com manuals search engine - Sharp PG-A10S-SL | Operation Manual - Page 32
not want to turn off the power, wait until the confirmation message disappears. • The projector cannot be operated while a message "Shutting down. Please wait." is displayed. Info E_Print#p26_31.p65 28 Downloaded from www.Manualslib.com manuals search engine "Language" menu icon 03.2.4, 2:04 PM - Sharp PG-A10S-SL | Operation Manual - Page 33
Press . • You can also use on the projector. KEYSTONE button UNDO button 2 Press ', ", rection using the or but- tons on the projector. Compresses upper side. Note • Since the trapezoidal 3 Press . • You can also use on the projector. Compresses lower side. Note • You can use the - Sharp PG-A10S-SL | Operation Manual - Page 34
projector. I INPUT 1 Mode Main menu Picture Page 36 Fine Sync Page 38 Contrast −30 +30 Bright −30 +30 Color −30 +30 Tint −30 +30 Sharp Modes Signal Info Main menu Options Page 44 Language Page 28 Lamp Timer (Life) OSD Display [ON/OFF] Background Eco manuals search engine 03.2.4, 2:04 PM - Sharp PG-A10S-SL | Operation Manual - Page 35
9300 K 10500 K Standard Presentation Cinema Game Memory 1 Memory 5 Memory OFF Lamp Timer (Life) OSD Display [ON/OFF] Video System Background Eco Mode NTSC3.58 SECAM NTSC4.43 PAL-M PAL-N PAL-60 Sharp Blue None Center Upper Right Lower Right Upper Left Lower manuals search engine 31 03.2.4, 2:04 PM - Sharp PG-A10S-SL | Operation Manual - Page 36
Menu Screen The menu screens allow you to adjust the image and various projector settings. You can operate the menus from the remote control using the .p65 32 Downloaded from www.Manualslib.com manuals search engine ENTER button UNDO button MENU button ', ", \, | buttons Menu icons 03.2.4, 2:05 - Sharp PG-A10S-SL | Operation Manual - Page 37
the item selected. • The adjustment is stored. 5 Press . • The menu screen will disappear. Basic Operation A10X_A10S#E_Print#p32_39.p65 33 Downloaded from www.Manualslib.com manuals search engine 33 03.2.4, 2:05 PM - Sharp PG-A10S-SL | Operation Manual - Page 38
3. • For details on the menus, see the tree charts on pages 30 and 31. 34 A10X_A10S#E_Print#p32_39.p65 34 Downloaded from www.Manualslib.com manuals search engine 03.2.4, 2:05 PM - Sharp PG-A10S-SL | Operation Manual - Page 39
. • The item selected is set. 6 Press . • The menu screen will disappear. Sub menu Basic Operation A10X_A10S#E_Print#p32_39.p65 35 Downloaded from www.Manualslib.com manuals search engine 35 03.2.4, 2:05 PM - Sharp PG-A10S-SL | Operation Manual - Page 40
Picture Adjustment You can adjust the projector's picture to your preferences using skin tones purplish. for making skin tones greenish. Sharp for less sharpness. for more sharpness. Red for weaker red. for stronger red. Blue from www.Manualslib.com manuals search engine 03.2.4, 2:05 PM - Sharp PG-A10S-SL | Operation Manual - Page 41
stored settings after se- lecting the memory location for those settings. 37 A10X_A10S#E_Print#p32_39.p65 37 03.2.4, 2:05 PM Downloaded from www.Manualslib.com manuals search engine - Sharp PG-A10S-SL | Operation Manual - Page 42
it up or down. Note • You can automatically adjust the computer im- age by pressing on the projector or on the remote control. • To reset all adjustment items, select "Reset" and press . Special E_Print#p32_39.p65 38 Downloaded from www.Manualslib.com manuals search engine 03.2.4, 2:05 PM - Sharp PG-A10S-SL | Operation Manual - Page 43
Info (Checking the Input Signal) Select "Signal Info" on the "Fine Sync" menu to check the current input signal information. Note • The projector will display the number of scanned lines available from audio-visual equipment such as a DVD player or Digital Video. Basic Operation A10X_A10S#E_Print - Sharp PG-A10S-SL | Operation Manual - Page 44
960) SXGA+ (1400 × 1050) SXGA (1280 × 1024) 1280 × 720 NORMAL PG-A10X PG-A10S 1024 × 768 800 × 600 960 × 768 750 × 600 - - DOT BY DOT PG-A10X PG-A10S 800 × 600 - - 1024 × 768 1280 × 960 1280 × 960 1400 × 1050 40 Downloaded from www.Manualslib.com manuals search engine 03.2.4, 3:02 PM - Sharp PG-A10S-SL | Operation Manual - Page 45
aspect ratio - - • "STRETCH" is fixed when 720P or 1080I signals are entered. BORDER STRETCH PG-A10X PG-A10S PG-A10X PG-A10S 768 × 576 - 600 × 450 1024 × 576 800 × 450 - Input Signal DVD / Video #p40_50.p65 41 Downloaded from www.Manualslib.com manuals search engine 41 03.2.4, 2:06 PM - Sharp PG-A10S-SL | Operation Manual - Page 46
enlarges or reduces the projected image. Note ×1 ×2 ×3 ×4 ×9 ×16 ×36 ×64 42 A10X_A10S#E_Print#p40_50.p65 42 Downloaded from www.Manualslib.com manuals search engine • You can change the location of the enlarged image using ', ", \ and |. 2 Press to cancel the operation. • The magnification - Sharp PG-A10S-SL | Operation Manual - Page 47
3 seconds while the projector is being turned on. • You can take the keylock off by holding down on the projector for about 3 seconds while the projector is in standby mode. Easy to Use Functions A10X_A10S#E_Print#p40_50.p65 43 Downloaded from www.Manualslib.com manuals search engine 43 03 - Sharp PG-A10S-SL | Operation Manual - Page 48
with only " " (Standard mode) in "Eco Mode" Remaining lamp life 100% 5% about 4,500 hours 225 hours about 3,000 hours 150 hours OSD Display (Setting lamp be changed when the remaining lamp life becomes 5%. For lamp replacement, contact your nearest Sharp Authorized Projector Dealer or Service - Sharp PG-A10S-SL | Operation Manual - Page 49
projector's startup and when no signal is being sent to the projector. Sharp Blue None Description of Background Images Selectable settings Description Sharp SHARP AC 100V) Lamp life (Eco mode) 80% 190 W 4,500 hours (Standard mode) 100% 240 W 3,000 hours Note • Although lamp life and noise - Sharp PG-A10S-SL | Operation Manual - Page 50
) When no input signal is detected for more than 15 minutes, the projector will automatically power off if set to "ON". The Auto Power Off function . 46 A10X_A10S#E_Print#p40_50.p65 46 Downloaded from www.Manualslib.com manuals search engine Menu Color (Selecting the Menu Color) Select " " - Sharp PG-A10S-SL | Operation Manual - Page 51
"Anti-Theft" function is activated, you will need to contact your nearest Sharp Authorized Projector Dealer or Service Center (see page 65). You may need to bring your projector to them to restore the projector to original factory condition (password and keycode reset). A10X_A10S#E_Print#p40_50.p65 - Sharp PG-A10S-SL | Operation Manual - Page 52
function prevents unauthorized use of the projector. You can choose to use this each time the projector is turned on. Sharp Authorized Projector Dealer or Service Center (see page 65). You may need to bring your projector to them to restore the projector projector if the buttons on the projector are - Sharp PG-A10S-SL | Operation Manual - Page 53
can change the keycode. 1 Press the buttons on the remote control or the projector to enter the preset 4-digit keycode in "Old Code". 2 Press any button you like on the re Functions A10X_A10S#E_Print#p40_50.p65 49 Downloaded from www.Manualslib.com manuals search engine 49 03.2.4, 2:06 PM - Sharp PG-A10S-SL | Operation Manual - Page 54
for the reversed image and ceiling-mount setups. See page 25 for these setups. 50 A10X_A10S#E_Print#p40_50.p65 50 Downloaded from www.Manualslib.com manuals search engine 03.2.4, 2:06 PM - Sharp PG-A10S-SL | Operation Manual - Page 55
the lens and the projector. 4 Place the projector and the ac- projector. • Sending the projector in the carrying case as a parcel may cause damage to the projector. If you send the projector projector to direct sunlight, near heat sources, or leave them in a car. The carrying case or projector - Sharp PG-A10S-SL | Operation Manual - Page 56
the projector. Do not attach rubber or plastic items to the projector for the quality or finish of the projector. Cleaning the lens I Use projector. Strong cleaning detergents may discolor, warp or damage the coating on the projector. Make sure to test on a small, inconspicuous area on the projector - Sharp PG-A10S-SL | Operation Manual - Page 57
should be cleaned every 100 hours of use. Clean the filters more often when the projector is used in a dusty or smoky location. • Ask your nearest Sharp Authorized Projector Dealer or Service Center to exchange the filter (PFILDA008WJZZ) when it is no longer possible to clean. " Bottom view " Rear - Sharp PG-A10S-SL | Operation Manual - Page 58
tab (2) to close it. Then tighten the user service screw (3) to secure the filter/ lamp unit cover. Note • Be sure the filter/lamp unit cover is securely installed. The power will not #p51_62.p65 54 Downloaded from www.Manualslib.com manuals search engine User service screw 03.2.4, 2:07 PM - Sharp PG-A10S-SL | Operation Manual - Page 59
I The lamp life becomes 0%, when used for approximately 4,500 hours with projector to your nearest down Sharp Authorized Projector Dealer • Internal circuit failure or Service Center (see page 65) • Clogged air intake for repair. Lamp replacement indicator Green on Green blinks when the lamp - Sharp PG-A10S-SL | Operation Manual - Page 60
the above possible solutions and then wait until the projector has cooled down completely before plugging in the power cord and then turned on again, as during a brief test, the lamp replacement indicator may be triggered, preventing the power from going on. manuals search engine 03.2.4, 2:07 PM - Sharp PG-A10S-SL | Operation Manual - Page 61
carefully change the lamp by following the instructions described in this section. If you wish, you may have the lamp replaced at your nearest Sharp Authorized Projector Dealer or Service Center. Appendix A10X_A10S#E_Print#p51_62.p65 57 Downloaded from www.Manualslib.com manuals search engine - Sharp PG-A10S-SL | Operation Manual - Page 62
cover. • Turn the projector over. Loosen the user service screw (1) that secures the filter/lamp unit cover. Pressing the tab (2), remove the filter/lamp unit cover (3). 58 A10X_A10S#E_Print#p51_62.p65 58 Downloaded from www.Manualslib.com manuals search engine Lamp unit BQC-PGA10X//1 Power - Sharp PG-A10S-SL | Operation Manual - Page 63
installed, the power will not turn on, even if the power cord is connected to the projector. Securing screws 1 2 Handle 3 User service screw Appendix Resetting the Lamp Timer Reset the lamp timer after replacing the lamp. 1 Connect the power cord. • Plug the power cord into the AC socket of the - Sharp PG-A10S-SL | Operation Manual - Page 64
input (green/sync on green) 3. Video input (blue) 5 1 4. Not connected 10 6 5. Not connected 15 11 6. Earth (red) 7. Earth (green/sync on green) 8. the controlling device (e.g. PC). Projector Pin No. 4 5 6 PC Pin No. 4 5 6 60 A10X_A10S#E_Print#p51_62.p65 60 Downloaded - Sharp PG-A10S-SL | Operation Manual - Page 65
code format Normal response Parameter 4-digit Problem response (communication error or incorrect High, 2:Fan Err, 4:Filter Cover Err, 8:Lamp 100 hours, 16:Lamp Burnt-out, 32:Lamp Not Lit, 64:Temp Abnormally High T N A M _ _ _ 1 PROJECTOR NAME I M B K _ _ _ 0 manuals search engine Appendix - Sharp PG-A10S-SL | Operation Manual - Page 66
MHz • Compatible with sync on green and composite sync signals • SXGA+ and SXGA compatible in intelligent compression • Intelligent Compression and Expansion System resizing technology The following is a list of modes that conform to VESA. However, this projector supports other signals that are not - Sharp PG-A10S-SL | Operation Manual - Page 67
Troubleshooting Problem No picture and no sound or projector does not start. Check • Projector power cord is not when connecting notebook computer. • The filter/lamp unit cover is not installed correctly. • Cables incorrectly connected to the rear panel of the projector. • "Bright" is set to - Sharp PG-A10S-SL | Operation Manual - Page 68
Troubleshooting Problem Picture is green on INPUT 1 COMPONENT. Picture is pink (no green) on INPUT 1 RGB. Picture is dark. Picture is too bright and whitish. Check • Change the input signal type setting. • The lamp replacement indicator is illuminating in red. Replace the lamp. • Picture - Sharp PG-A10S-SL | Operation Manual - Page 69
If you encounter any problems during setup or operation of this projector, first refer to the "Troubleshooting" section on pages 63 and 64. If this operation manual does not answer your question, please contact the SHARP Service departments listed below. U.S.A. Sharp Electronics Corporation 1-888 - Sharp PG-A10S-SL | Operation Manual - Page 70
Operation manual (TINS-A505WJN1) This SHARP projector uses an LCD (Liquid Crystal Display) This unit has some inactive pixels within acceptable toler- panel. This very sophisticated panel contains 786,432 (PG- ances which may result in inactive dots on the picture screen. A10X) / 480,000 (PG-A10S - Sharp PG-A10S-SL | Operation Manual - Page 71
/64 (198.5) 7 3/32 (180) M4 13/64 (5) M4 5 55/64 (148.5) 7 11/16 (195) 67 A10X_A10S#E_Print#p63_70.p65 67 Downloaded from www.Manualslib.com manuals search engine 03.2.4, 2:07 PM Appendix - Sharp PG-A10S-SL | Operation Manual - Page 72
color temperature to suit the type of image input to the projector. Decrease the color temperature to create warmer, reddish images for area has been decided by the IEC, the color changes according to LCD features, so that the images are displayed in a natural tint based .com manuals search engine - Sharp PG-A10S-SL | Operation Manual - Page 73
50 Red 36 Remote control 12 Remote control sensor 13 Replacing the lamp 57 RESIZE button 40 RGB cable 16 RS-232C terminal 20 Sharp 36 Signal Info 39 Signal Type 37 Special Modes 38 sRGB #p63_70.p65 69 03.2.4, 2:07 PM Downloaded from www.Manualslib.com manuals search engine Appendix - Sharp PG-A10S-SL | Operation Manual - Page 74
MEMO 70 A10X_A10S#E_Print#p63_70.p65 70 Downloaded from www.Manualslib.com manuals search engine 03.2.4, 2:07 PM - Sharp PG-A10S-SL | Operation Manual - Page 75
Modifizierungen oder einen Rückruf benachrichtigt werden, die von SHARP aufgrund des Consumer Product Saftey Act von 1972 durchgef auf wichtige Anweisungen zu Bedienung und Wartung (Service) des Gerätes in der mitgelieferten Dokumentation www.Manualslib.com manuals search engine 03.2.4, 2:08 PM - Sharp PG-A10S-SL | Operation Manual - Page 76
, Heizern, Öfen oder anderen Geräten (einschließlich Verstärkern) aufgestellt werden, die Wärme produzieren. A10X_A10S#D_Print#p71_74.p65 72 Downloaded from www.Manualslib.com manuals search engine 03.2.4, 2:08 PM - Sharp PG-A10S-SL | Operation Manual - Page 77
I Wenn die Lampe zerspringt, kann es zu Verletzungen durch Glassplitter kommen. Falls die Lampe zerspringt, sollten Sie die Lampe von einem von SHARP autorisierten Händler für 73 Appendix A10X_A10S#D_Print#p71_74.p65 73 Downloaded from www.Manualslib.com manuals search engine 03.2.4, 2:08 PM - Sharp PG-A10S-SL | Operation Manual - Page 78
in das CD-ROM-Laufwerk einlegen. 2 Das Symbol "CD-ROM" doppelt anklicken. 3 Den "MANUALS"-Ordner doppelt anklicken. 4 Die einzusehende Sprache (Ordnername) doppelt anklicken. 5 Die PDF-Datei "A10" doppelt anklicken, um auf die Bedienungsanleitung des Projektors zuzugreifen. Hinweis • Wenn die gew - Sharp PG-A10S-SL | Operation Manual - Page 79
bénéficier pleinement des pièces et services attachés à la garantie aussitôt tout rappel en usine que SHARP serait tenu d'offrir dans le REMPLACER, À L'EXCLUSION DE LA LAMPE. CONFIER TOUTE RÉPARATION À UN produit, d'importantes instructions concernant son mode manuals search engine 75 03.2.4, 2:08 PM - Sharp PG-A10S-SL | Operation Manual - Page 80
support conseillés par le fabricant ou vendus avec l'appareil. La fixation de l'appareil à un accessoire doit être conforme aux instructions une pièce doit être remplacée, assurez-vous auprès du service de réparation que le remplacement sera effectué avec une piè manuals search engine 03.2.4, 2:08 PM - Sharp PG-A10S-SL | Operation Manual - Page 81
par les particules de verre en cas de rupture de la lampe. En cas de rupture, contactez le revendeur ou SAV agréé Sharp le plus proche pour effectuer son remplacement. Précautions concernant la #F_Print#p75_78.p65 77 Downloaded from www.Manualslib.com manuals search engine 03.2.4, 2:08 PM - Sharp PG-A10S-SL | Operation Manual - Page 82
utiliser. 6 Double-cliquez sur le programme d'installation et suivez les instructions qui s'affichent à l'écran. Sur Macintosh : 1 Placez le CD le dossier "MANUALS". 4 Double-cliquez sur la langue (nom du dossier) que vous souhaitez utiliser. 5 Double-cliquez sur le fichier pdf "A10" pour acc - Sharp PG-A10S-SL | Operation Manual - Page 83
viktiga anledningar till att snabbt registrera garantin för din SHARP-projektor med hjälp av registreringskortet som medföljer projektorn att du erhåller alla förmåner ifråga om reservdelar, service och arbete som garanteras för enheten vid inköpet. 2. SÄ manuals search engine 79 03.2.4, 2:08 PM - Sharp PG-A10S-SL | Operation Manual - Page 84
anordningar som inte specifikt rekommenderas av tillverkaren då sådana kan orsaka problem. 7. Vatten och fukt Använd inte enheten i närheten av har tappats eller på något sätt utsatts för skador. f. Service kan också behövas när bild- och ljudkvalitet skiljer sig manuals search engine 03.2.4, 2:08 PM - Sharp PG-A10S-SL | Operation Manual - Page 85
rengöring bör endast utföras av en auktoriserad Sharp-projektorhandlare eller en serviceverkstad. Placera inte projektorn på en och ventilationsöppningarna inte blockeras. I En skyddsanordning slår automatiskt av projektorlampan om kylfläkten blockeras. Detta manuals search engine 81 03.2.4, 2:08 PM - Sharp PG-A10S-SL | Operation Manual - Page 86
in CD-ROM-skivan i din CD-ROM-enhet. 2 Dubbelklicka på ikonen "CD-ROM". 3 Dubbelklicka på mappen "MANUALS". 4 Dubbelklicka på det språk (mappnamn) som du vill se. 5 Dubbelklicka på pdf-filen "A10" för att öppna projektorns bruksanvisningar. Anm • Om den önskade pdf-filen inte kan öppnas genom att - Sharp PG-A10S-SL | Operation Manual - Page 87
Antes de emplear el proyector, lea con atención este manual de manejo. Introducción ESPAÑOL Hay dos razones importantes por las que debe registrar rápidamente la garantía de su nuevo proyector SHARP, empleando para ello la TARJETA DE REGISTRO entregada con el proyector. 1. GARANTÍA Ésta es para - Sharp PG-A10S-SL | Operation Manual - Page 88
o al agua. d. Si el producto no funciona normalmente a pesar de haberse seguido las instrucciones de uso. Ajuste solamente los controles indicados en este manual de instrucciones, ya que un ajuste mal hecho en otros controles podría causar daños y tal vez requiera el trabajo laborioso de un técnico - Sharp PG-A10S-SL | Operation Manual - Page 89
interna sólo debe ser realizada por un centro de servicio o distribuidor Sharp autorizado. No instale el proyector en lugares expuestos a la luz directa conectar. I Para instrucciones sobre cómo hacer las conexiones, lea los manuales de manejo del proyector y del equipo que va a conectar. Uso del - Sharp PG-A10S-SL | Operation Manual - Page 90
". 4 Haga doble clic en el idioma (nombre de la carpeta) que desea ver. 5 Haga doble clic en el archivo "A10" en formato PDF para acceder a los manuales del proyector. Nota • Si no puede abrir el fichero PDF deseado haciendo doble clic con el ratón, inicie primero Acrobat Reader y luego especifique - Sharp PG-A10S-SL | Operation Manual - Page 91
Prima di utilizzare il proiettore, leggere con attenzione il presente manuale di istruzioni. Introduzione ITALIANO Vi sono due ragioni di rilievo per registrare rapidamente la garanzia del nuovo proiettore SHARP appena acquistato servendosi della CARTOLINA DI REGISTRAZIONE contenuta nella sua - Sharp PG-A10S-SL | Operation Manual - Page 92
sorgenti di calore come radiatori, riscaldatori, fornelli o altri prodotti (compresi gli amplificatori) che dissipano calore. A10X_A10S#It_Print#p87_90.p65 88 Downloaded from www.Manualslib.com manuals search engine 03.2.4, 2:09 PM - Sharp PG-A10S-SL | Operation Manual - Page 93
dell'unità. La pulizia interna va eseguita solo da un rivenditore autorizzato dalla Sharp o presso un centro di servizio. Non installate il proiettore in luoghi il proiettore e il componente da collegare. I Leggete il manuale di istruzioni del proiettore e del componente da collegare per ulteriori - Sharp PG-A10S-SL | Operation Manual - Page 94
CD-ROM. 2 Cliccate due volte sull'icona "CD-ROM". 3 Cliccate due volte sulla cartella "MANUALS". 4 Cliccate due volte sulla lingua (nome della cartella) da visualizzare. 5 Cliccate due volte sul file pdf "A10" per accedere ai manuali del proiettore. Nota • Se il file PDF desiderato non si apre - Sharp PG-A10S-SL | Operation Manual - Page 95
SHARP-projector onmiddellijk in orde te brengen met de REGISTRATIEKAART die verpakt zit bij de projector. 1. GARANTIE U komt meteen in aanmerking voor de volledige garantie op onderdelen, service #Nl_Print#p91_94.p65 91 Downloaded from www.Manualslib.com manuals search engine 91 03.2.4, 2:09 PM - Sharp PG-A10S-SL | Operation Manual - Page 96
acht te nemen bij de installatie, het gebruik en het onderhoud van de projector. 1. Lees de gebruiksaanwijzing Lees alle veiligheids- en bedieningsinstructies in de gebruiksaanwijzing voordat A10X_A10S#Nl_Print#p91_94.p65 92 Downloaded from www.Manualslib.com manuals search engine 03.2.4, 2:09 PM - Sharp PG-A10S-SL | Operation Manual - Page 97
lamp gesprongen is, neemt u contact op met de dichtstbijzijnde erkende Sharp projector dealer of servicecentrum om de lamp te laten vervangen. Voorzichtig bij het opstellen van de projector A10X_A10S#Nl_Print#p91_94.p65 93 Downloaded from www.Manualslib.com manuals search engine 03.2.4, 2:10 PM - Sharp PG-A10S-SL | Operation Manual - Page 98
-ROM-station. 2 Dubbelklik op het "CD-ROM"-pictogram. 3 Dubbelklik op de map "MANUALS". 4 Dubbelklik op de taal (naam van de map) die u wilt openen. 5 Dubbelklik op het PDF-bestand "A10" om de handleidingen van de projector te openen. Opmerking • Als u het gewenste PDF-bestand niet kunt openen door - Sharp PG-A10S-SL | Operation Manual - Page 99
Antes de utilizar este projetor, leia atentamente este Manual de Operação. INTRODUÇÃO PORTUGUÊS Existem duas boas razões para que você faça, sem demora, o registro de garantia do seu novo Projetor SHARP, usando o CARTÃO DE REGISTRO que acompanha o aparelho. 1. GARANTIA Para assegurar que você - Sharp PG-A10S-SL | Operation Manual - Page 100
na etiqueta. Se não tiver certeza acerca do tipo de alimentação na sua casa, consulte um revendedor autorizado ou a companhia elétrica local. Consulte o manual de instruções para aparelhos que irão funcionar com pilhas ou outras fontes de energia. 12. Aterramento ou polarização Este produto est - Sharp PG-A10S-SL | Operation Manual - Page 101
a lâmpada se quebre. Caso a lâmpada venha a quebrar, contatar um Revendedor Autorizado de Projetores Sharp ou um Centro de Assistência para trocar a lâmpada. Cuidados relativos à instalação do projetor P_Print#p95_98.p65 97 Downloaded from www.Manualslib.com manuals search engine 03.2.4, 2:10 PM - Sharp PG-A10S-SL | Operation Manual - Page 102
trabalhar com o projetor, mesmo que você não possua este manual. Para utilizar estes manuais, você precisará instalar Adobe Acrobat da pasta) que você deseja visualizar. 6 Dê um duplo clique no arquivo PDF "A10" para acessar os manuais do projetor. Para Macintosh: 1 Insira o CD-ROM no - Sharp PG-A10S-SL | Operation Manual - Page 103
MEMO 110 A10X_A10S#Memo_Print#p110.p65 110 Downloaded from www.Manualslib.com manuals search engine 03.2.4, 2:10 PM
-
 1
1 -
 2
2 -
 3
3 -
 4
4 -
 5
5 -
 6
6 -
 7
7 -
8
-
9
-
10
-
11
-
12
-
13
-
14
-
15
-
16
-
17
-
18
-
19
-
20
-
21
-
22
-
23
-
24
-
25
-
26
-
27
-
28
-
29
-
30
-
31
-
32
-
33
-
34
-
35
-
36
-
37
-
38
-
39
-
40
-
41
-
42
-
43
-
44
-
45
-
46
-
47
-
48
-
49
-
50
-
51
-
52
-
53
-
54
-
55
-
56
-
57
-
58
-
59
-
60
-
61
-
62
-
63
-
64
-
65
-
66
-
67
-
68
-
69
-
70
-
71
-
72
-
73
-
74
-
75
-
76
-
77
-
78
-
79
-
80
-
81
-
82
-
83
-
84
-
85
-
86
-
87
-
88
-
89
-
90
-
91
-
92
-
93
-
94
-
95
-
96
-
97
-
98
-
99
-
100
-
101
-
102
-
103
 |
 |

LCD PROJECTOR
MODEL
PG-A10X
PG-A10S
OPERATION MANUAL
Introduction
Connections and Setup
Basic Operation
Easy to Use Functions
Appendix
SHARP CORPORATION
Printed in Japan
TINS-A505WJN1
03P02-JWM
A10X_A10S#E_Print#H1+4.p65
03.2.4, 1:59 PM
1
Downloaded from
www.Manualslib.com
manuals search engine