Sharp PG-C45X PG-C45X Operation Manual
Sharp PG-C45X - Notevision XGA LCD Projector Manual
 |
UPC - 074000358690
View all Sharp PG-C45X manuals
Add to My Manuals
Save this manual to your list of manuals |
Sharp PG-C45X manual content summary:
- Sharp PG-C45X | PG-C45X Operation Manual - Page 1
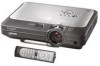
OPERATION MANUAL MODEL PG-C45X LCD PROJECTOR Introduction Connections and Setup Basic Operation Easy to Use Functions Appendix - Sharp PG-C45X | PG-C45X Operation Manual - Page 2
Number located on the bottom of the projector and retain this information. Before recycling the packaging, please be sure that you have checked the contents of the carton thoroughly against the list of "Supplied accessories" on page 14. Model No.: PG-C45X Serial No.: This equipment complies with - Sharp PG-C45X | PG-C45X Operation Manual - Page 3
rewireable (moulded) plug incorporating a 10A fuse. Should the fuse need to be replaced, a BSI or ASTA approved BS 1362 fuse marked or and of the same occur. To fit an appropriate plug to the mains lead, follow the instructions below: IMPORTANT: The wires in the mains lead are coloured in accordance - Sharp PG-C45X | PG-C45X Operation Manual - Page 4
, Dutch, Portuguese, Chinese (Traditional Chinese and Simplified Chinese), Korean and Arabic. Carefully read through the operation instructions before operating the projector. Die mitgelieferte CD-ROM enthält Bedienungsanleitungen in Englisch, Deutsch, Französisch, Schwedisch, Spanisch, Italienisch - Sharp PG-C45X | PG-C45X Operation Manual - Page 5
operation manual carefully. Introduction ENGLISH There are two important reasons for prompt warranty registration of your new SHARP Projector, using the REGISTRATION CARD packed with the projector. 1. WARRANTY This is to assure that you immediately receive the full benefit of the parts, service - Sharp PG-C45X | PG-C45X Operation Manual - Page 6
REPLACING THE LAMP. REPLACE WITH SAME SHARP LAMP UNIT TYPE BQC-XGC50X//1 ONLY. UV RADIATION : CAN CAUSE EYE DAMAGE. TURN OFF LAMP BEFORE SERVICING. MEDIUM PRESSURE LAMP : RISK OF EXPLOSION. POTENTIAL HAZARD OF GLASS PARTICLES IF LAMP HAS RUPTURED. HANDLE WITH CARE. SEE OPERATION MANUAL. PRECAUTIONS - Sharp PG-C45X | PG-C45X Operation Manual - Page 7
of terminals, color schemes as well as combined use of auto input and search. • Simple lens replacement Using an easy access lens cover and a new bayonnet mount configuration, the optional lens can be easily installed. 3. Superior PC Compatibility • Compatible with up to 200 Hz vertical refresh - Sharp PG-C45X | PG-C45X Operation Manual - Page 8
PDF Operation Manuals (Windows, Macintosh 9 Part Names 10 Projector (Front and Top View 10 Projector (Rear View 11 Remote Control (Front View 12 Remote Control (Top View 12 Using the Remote Control 13 Available Range of the Remote Control Color 61 Resetting User-Defined Video Digital Noise - Sharp PG-C45X | PG-C45X Operation Manual - Page 9
the Lamp 85 Replacing the Lamp 85 Removing and Installing the Lamp Unit 86 Resetting the Lamp Timer 87 Connecting Pin Assignments 88 (RS-232C) Specifications and Command Settings 89 Wired Remote Control Terminal Specifications 92 Computer Compatibility Chart 93 Troubleshooting 94 For SHARP - Sharp PG-C45X | PG-C45X Operation Manual - Page 10
servicing. 1. Read Instructions All the safety and operating instructions should be read before the product is operated. 2. Retain Instructions The safety and operating instructions Any mounting of the product should follow the manufacturer's instructions, and should use a mounting accessory - Sharp PG-C45X | PG-C45X Operation Manual - Page 11
instructions. Adjust only those controls that are covered by the operating instructions, as an improper adjustment of other controls service. 19. Replacement Parts When replacement parts are required, be sure the service technician has used replacement parts SHARP which Lineo supports.You may obtain - Sharp PG-C45X | PG-C45X Operation Manual - Page 12
hazard of glass particles if lamp ruptures. In case of lamp rupture, contact your nearest Sharp Authorized Projector Dealer or Service Center for a replacement. See "Replacing the Lamp" on page 85. Cautions concerning the setup of the projector I For minimal servicing and to maintain high image - Sharp PG-C45X | PG-C45X Operation Manual - Page 13
that you want to view. 6 Double click the installation program and follow the instructions on the screen. For Macintosh: 1 Insert the CD-ROM in the CD-ROM to view. 5 Double click the "C45X" pdf file to access the projector manuals. Note • If the desired pdf file cannot be opened by double clicking - Sharp PG-C45X | PG-C45X Operation Manual - Page 14
lens cap and attach it on the lens. Then release the buttons to lock it in place. • Press on the two buttons of the lens cap and remove it from the lens. 28 Zoom knob 28 Focus ring 80 Intake vent 13 Remote control sensor 81 Air filter/cooling fan (Intake vent) (on the bottom of the projector - Sharp PG-C45X | PG-C45X Operation Manual - Page 15
a computer using a USB cable. RS-232C terminal 23 For controlling projector using a computer. AUDIO for INPUT 1 and 2. 26 WIRED REMOTE control input terminal 20 INPUT 3 terminal For connecting instructions on how to use it to secure the projector. Carrying the projector Before carrying the projector - Sharp PG-C45X | PG-C45X Operation Manual - Page 16
Part Names Remote Control (Front View) KEYSTONE button 38 For adjusting Keystone or Digital connected to a computer using a USB cable. Same as the [Page Remote Control (Top View) Remote control signal transmitters 13 -12 26 WIRED R/C JACK For controlling the projector by connecting the remote control - Sharp PG-C45X | PG-C45X Operation Manual - Page 17
a cloth. • The batteries included with this projector may exhaust over a short period, depending on how they are kept. Be sure to replace them as soon as possible with new batteries. • Remove the batteries from the remote control if you will not be using the remote control for a long time. -13 - Sharp PG-C45X | PG-C45X Operation Manual - Page 18
Accessories Supplied accessories Remote control RRMCGA029WJSA Two R-6 batteries Projector manual and technical reference CD-ROM UDSKAA016WJZZ Lens cap (attached) PCAPHA003WJSA Extra air filter PFILDA005WJZZ Sharp Advanced Presentation Software CD-ROM UDSKAA017WJZZ Operation manual (this manual - Sharp PG-C45X | PG-C45X Operation Manual - Page 19
Connections and Setup Connections and Setup - Sharp PG-C45X | PG-C45X Operation Manual - Page 20
it is the last device to be turned on after all the connections are made. • Be sure to read the operation manuals of the devices to be connected before making connections. This projector can be connected to: A computer using: I An RGB cable and a computer audio cable (See page 18.) I A DIN-D-sub RS - Sharp PG-C45X | PG-C45X Operation Manual - Page 21
Connecting the Power Cord Plug in the supplied power cord into the AC socket on the rear of the projector. Supplied accessory Power code Connections and Setup -17 - Sharp PG-C45X | PG-C45X Operation Manual - Page 22
your nearest Sharp Authorized Projector Dealer or Service Center. • Depending on the computer you are using, an image may not be projected unless the signal output setting of the computer is switched to the external output. Refer to the computer operation manual - Sharp PG-C45X | PG-C45X Operation Manual - Page 23
Connections and Setup "Plug and Play" function (when connecting to a 15-pin terminal) I This projector is compatible with VESA-standard DDC 1/DDC 2B. The projector and a VESA DDC compatible computer will communicate their setting requirements, allowing for quick and easy setup. I Before using the " - Sharp PG-C45X | PG-C45X Operation Manual - Page 24
realize a higher-quality image. To view a higher-quality image, use a commercially available S-video cable to connect the INPUT 4 terminal on the projector and the S-video output terminal on the video equipment. • A ø3.5 mm stereo minijack to RCA audio cable (commercially available) is required for - Sharp PG-C45X | PG-C45X Operation Manual - Page 25
DTV* decoders. *DTV is the umbrella term used to describe the new digital television system in the United States. 1 Connect the projector to the video equipment using the 3 RCA to 15-pin D-sub cable. 2 Connect the projector to the video equipment using a ø3.5 mm stereo minijack to RCA audio cable - Sharp PG-C45X | PG-C45X Operation Manual - Page 26
Components Using a ø3.5 mm stereo minijack to RCA audio cable, an amplifier or other audio components can be connected to the AUDIO OUTPUT terminal. Connect the projector to the amplifier using a ø3.5 mm stereo minijack to RCA audio cable (commercially available). Info • Always turn off the - Sharp PG-C45X | PG-C45X Operation Manual - Page 27
the projector and the computer. Note • Do not connect or disconnect an RS-232C serial control cable to or from the computer while it is on. This may damage your computer. • The RS-232C function may not operate if your computer terminal is not correctly set up. Refer to the operation manual of - Sharp PG-C45X | PG-C45X Operation Manual - Page 28
and a separate monitor using two sets of an RGB cable. An RGB cable is supplied with this projector. You need to buy another RGB cable for connecting the projector to a monitor. 1 Connect the projector to the computer and monitor using RGB cables (one is supplied, the other is sold separately). 2 In - Sharp PG-C45X | PG-C45X Operation Manual - Page 29
Using the Wireless Presentation Function of the Remote Control The Wireless Presentation function on the projector works the same as the [Page Up function does not work with the following operation systems that do not support USB. • Versions earlier than Windows 95. • Versions earlier than Windows - Sharp PG-C45X | PG-C45X Operation Manual - Page 30
as a Wired Remote Control Connecting the Remote Control to the Projector When the remote control cannot be used due to the range or positioning of the projector (rear projection, etc.), connect a ø3.5 mm minijack cable (commercially available or available as Sharp service part QCNW4870CEZZ) from - Sharp PG-C45X | PG-C45X Operation Manual - Page 31
. Info • Do not press HEIGHT ADJUST when the adjustment foot is extended without firmly holding the projector. • Do not hold the lens when lifting or lowering the projector. • When lowering the projector, be careful not to get your finger caught in the area between the adjustment foot and the - Sharp PG-C45X | PG-C45X Operation Manual - Page 32
Setup Adjusting the Lens The image is focused and adjusted to the desired size using the focus ring or zoom knob on the projector. Focus ring Zoom knob 1 The focus is adjusted by rotat- ing the focus ring. 2 Zooming is adjusted by mov- ing the zoom knob. Zoom out Zoom in -28 - Sharp PG-C45X | PG-C45X Operation Manual - Page 33
cannot be used with this projector. An optional lens (AN-C12MZ) from Sharp is also available for specialized application. Contact your local Sharp Authorized Projector Dealer for details on the lens. (Refer to the lens installation manual when attaching a lens.) Throw Distance I The graph below - Sharp PG-C45X | PG-C45X Operation Manual - Page 34
Width Height Projection distance (L) Maximum (L1) Minimum (L2) Distance from the lens center to the bottom of the image (H) 300" (762 cm) 240 (Screen) size Diag. (X) Width Height Projection distance (L) Distance from the lens center Maximum (L1) Minimum (L2) to the bottom of the image (H) - Sharp PG-C45X | PG-C45X Operation Manual - Page 35
635 cm) 200" (508 cm) 150" (381 cm) Projection distance (L) Maximum (L1) Minimum (L2) 30' 5" (9.26 m) 24' 3" (7.38 m) 25' 4" (7.71 m) 20' 2" (6.14 m) Distance from the lens center to the bottom of the image (H) 17 3 / 4" (45.1 cm) 14 13 / 16" (37.6 cm) 200" (508 cm) 160" (406.4 cm) 120" (304.8 cm - Sharp PG-C45X | PG-C45X Operation Manual - Page 36
does not shine into the eyes of the audience. Ceiling-mount setup I It is recommended that you use the optional Sharp ceiling-mount bracket for this installation. Before mounting the projector, contact your nearest Sharp Authorized Projector Dealer or Service Center to obtain the recommended ceiling - Sharp PG-C45X | PG-C45X Operation Manual - Page 37
Basic Operation Basic Operation - Sharp PG-C45X | PG-C45X Operation Manual - Page 38
language, reset the language according to the procedure on page 36. Power indicator Lamp replacement indicator 1 Plug the power cord into the wall outlet. • The power indicator illuminates red, and the projector enters standby mode. 2 ON Press on the projector or on the remote control. • The - Sharp PG-C45X | PG-C45X Operation Manual - Page 39
to the SVIDEO input terminal. 4 Press or on the remote control to adjust the volume. Note • Pressing will lower the volume. Pressing will raise the volume. • On the projector, the volume can be adjusted by pressing or . • , on the projector operate as cursor buttons (\, |) when the menu screen is - Sharp PG-C45X | PG-C45X Operation Manual - Page 40
When connected to equipment such as an amplifier, be sure to turn off the power to the equipment connected first and then to the projector. Power (OFF) button ENTER button Power (ON) button MENU button ', ", \, | buttons MUTE button Selecting the On-screen Display Language • The on-screen display - Sharp PG-C45X | PG-C45X Operation Manual - Page 41
Basic Operation 3 Press ' or " to select the de- sired language, and then press . 4 Press . • The desired language will be set as the on-screen display. -37 - Sharp PG-C45X | PG-C45X Operation Manual - Page 42
angle of approximately ±35 degrees. 1 Press . • Pressing again while the BOR- DER, STRETCH or SMART STRETCH screen is displayed will start the Digital Shift function. See page 39. 2 Press ', ", \ and | to adjust the Keystone correction. • If you want to make more detailed cor- rections, press - Sharp PG-C45X | PG-C45X Operation Manual - Page 43
system in the United States. Press ' to move the projected image upwards. Press to reset the image. UNDO button Press " to move the projected image downwards. Press to reset the image. • The Digital Shift function works with BORDER, STRETCH or SMART STRETCH screen. For details, see page 53 - Sharp PG-C45X | PG-C45X Operation Manual - Page 44
Audio Out Speaker [ON/OFF] Auto Search [ON/OFF] DNR OSD Display Image Capture Background Startup Image Economy Mode Lamp Life PRJ Mode Keylock Level RS-232C Password Anti-Theft All Reset English Deutsch Español Nederlands Français Italiano Svenska Português FAO VAO OFF Level 1 Level 3 Normal Level - Sharp PG-C45X | PG-C45X Operation Manual - Page 45
NTSC3.58 PAL-M PAL-N Sharp Custom Blue None Sharp Custom None Power Save [ON/OFF] Mntr.out/RS232 [ON/OFF] Auto Power Off [ON/OFF] Main menu Options (2) Page 70 Language Page 36 Status Page 78 Sub menu Lamp Life PRJ Mode Keylock Level RS-232C Password Anti-Theft All Reset English Deutsch Español - Sharp PG-C45X | PG-C45X Operation Manual - Page 46
has two sets of menu screens that allow you to adjust the image and various projector settings. You can operate the menus from the projector or remote control using the following procedure. Menu screen for INPUT 1 or INPUT 2 RGB mode Menu screen for INPUT 3 or INPUT 4 Mode Menu Bar (Main - Sharp PG-C45X | PG-C45X Operation Manual - Page 47
Basic Operation 2 Press \ or | to select the menu you want to adjust. Note • For details on the menus, see the tree charts on pages 40 and 41. 3 Press ' or " to select the item you want to adjust. Note • To display a single adjustment item, press after selecting the item. Only the menu bar and the - Sharp PG-C45X | PG-C45X Operation Manual - Page 48
Using the Menu Screen Menu Selections (Settings) 1 Press . • The menu screen is displayed. Note • The "Picture" menu screen for the selected input mode is displayed. • The on-screen display shown on the lower right is displayed when INPUT 1 or 2 mode is selected. 2 Press \ or | to select the menu - Sharp PG-C45X | PG-C45X Operation Manual - Page 49
4 Press |. • The cursor shifts to the sub menu. 5 Press ' or " to select the set- ting of the item displayed in the sub menu. 6 Press . • The item selected is set. Note • Some adjustment items will display a confirmation message. When setting an item, press \ or | to select "Yes" or "OK" and then - Sharp PG-C45X | PG-C45X Operation Manual - Page 50
mode. • When the signal type in INPUT 1 or 2 has been set to Component, "Sharp" can be adjusted when 480I, 480P, 540P, 580I, 580P, 720P, 1035I or 1080I signals are connected. • To reset all adjustment items, select "Reset" and press . •"Red", "Blue" and "CLR Temp" cannot be adjusted when "Color - Sharp PG-C45X | PG-C45X Operation Manual - Page 51
) or two-two pull down (PAL50Hz and SECAM) enhancement to progressive mode images. * The film source is a digital video recording with the original encoded as is at 24 frames/second. The projector can convert this film source to progressive video at 60 frames/second with NTSC and PAL60Hz or at 50 - Sharp PG-C45X | PG-C45X Operation Manual - Page 52
, see pages 42 to 45. Note • Computer image adjustments can be made easily by pressing . See page 50 for details. Saving Adjustment Settings This projector allows you to store up to seven adjustment settings for use with various computers. Select "Save Setting" in the "Fine Sync" menu on the menu - Sharp PG-C45X | PG-C45X Operation Manual - Page 53
a stored adjustment setting with "Select Setting", you can set the projector in the stored adjustments. Basic Operation Special Mode Settings Ordinarily, the occur, making the image hard to see.) • When a DVD player or Digital Video is connected, select 480P as the input signal. • See "Checking - Sharp PG-C45X | PG-C45X Operation Manual - Page 54
to 45. Note When setting to " Normal" or " High Speed": • Auto Sync adjustment will occur when the projector is turned on or when the inputs are switched, when connected to a computer. Manual adjustments should be performed: • When the optimum image cannot be achieved with Auto Sync adjustment. See - Sharp PG-C45X | PG-C45X Operation Manual - Page 55
Easy to Use Functions Easy to Use Functions - Sharp PG-C45X | PG-C45X Operation Manual - Page 56
Selecting the Picture Display Mode This function allows you to modify or customize the picture display mode to enhance the input image. Depending on the input signal, you can choose "NORMAL", "FULL", "DOT BY DOT", "BORDER", "STRETCH" or "SMART STRETCH" image. Switching the Picture Display Using - Sharp PG-C45X | PG-C45X Operation Manual - Page 57
• "STRETCH" is fixed when 720P, 1035I or 1080I signals are entered. * The Digital Shift function can be used with these images. BORDER 768 × 576* - - STRETCH 1024 only the surrounding areas while keeping the aspect ratio in the middle part of the image at 4:3. 4:3 aspect ratio 480I, 480P, 580I, - Sharp PG-C45X | PG-C45X Operation Manual - Page 58
Displaying a Still Image This function allows you to instantly freeze a moving image. This is useful when you want to display a still image from a computer or video, giving you more time to explain the image to the audience. Freezing a Moving Image 1 Press . • The projected image is frozen. FREEZE - Sharp PG-C45X | PG-C45X Operation Manual - Page 59
Enlarging a Specific Portion of an Image This function allows you to enlarge a specific portion of an image. This is useful when you want to display a detailed portion of the image. Displaying an Enlarged Portion of an Image 1 Press . • Enlarges the image. • Pressing or enlarges or re- duces - Sharp PG-C45X | PG-C45X Operation Manual - Page 60
presentations. Gives greater depth to darker portions of image for a more exciting theater experience. Allows you to adjust gamma value using Sharp Advanced Presentation Software. Adjusting Gamma Correction 1 Press . • Each time is pressed, the gamma level toggles between the different types of - Sharp PG-C45X | PG-C45X Operation Manual - Page 61
INPUT 3 or 4 as an inset picture overlapping the main picture from INPUT 1 or 2. Displaying the Inset Picture 1 Press . 2 Press or on the remote control or on the projector to switch the image in the inset picture . 3 Press ', ", \ and | to set the position of the inset picture. • Press to stop the - Sharp PG-C45X | PG-C45X Operation Manual - Page 62
Black Screen Function This function can be used to display a black screen. Blacking out the Projected Image 1 Press . • The screen turns black and "BLACK SCREEN" is displayed on the screen. 2 To return to the original projected image, press again. " Projected Image BLACK SCREEN button 58 -58 - Sharp PG-C45X | PG-C45X Operation Manual - Page 63
break Note • Auto Power Off will be temporarily disabled during the break timer. When no input signal is detected for more than 15 minutes, the projector will automatically shut off if the break timer has elapsed. • The break timer will be displayed on the startup image. To change the screen - Sharp PG-C45X | PG-C45X Operation Manual - Page 64
" in the "C.M.S." menu on the menu screen. ➝ For operating the menu screen, see pages 42 to 45. -60 Selected item Standard Custom 1-3 sRGB Description Sharp default setting "Lightness", "Chroma" and "Hue" can be adjusted for each of the six colors. The mode changes to sRGB Red Yellow Green Cyan - Sharp PG-C45X | PG-C45X Operation Manual - Page 65
Setting the Brightness of the Target Color Select "Lightness" in the "C.M.S." menu on the menu screen. ➝ For operating the menu screen, see pages 42 to 45. Setting the Chromatic Value of the Target Color Select "Chroma" in the "C.M.S." menu on the menu screen. ➝ For operating the menu screen, see - Sharp PG-C45X | PG-C45X Operation Manual - Page 66
the menu screen, see pages 42 to 45. Selected item Reset (This Color) Reset (All Colors) Description "Lightness", "Chroma" and "Hue" of the color selected for "Target" are reset. "Lightness", "Chroma" and "Hue" of all colors are reset. Overview of All Color Settings Select "View Settings" in the - Sharp PG-C45X | PG-C45X Operation Manual - Page 67
output) Description Audio output that does not vary in strength with the volume level of the source projector. Audio output that varies in strength with the volume level of the source projector. Setting the Audio Output Type Select "Audio Out" in the "Options (1)" menu on the menu screen. ➝ For - Sharp PG-C45X | PG-C45X Operation Manual - Page 68
signals are being received, when turning on the projector or pressing on the projector. • OFF For switching input modes manually in order by pressing on the projector. • To stop searching for the input mode, press on the projector, or , , or on the remote control. Info • Even while this function is - Sharp PG-C45X | PG-C45X Operation Manual - Page 69
Noise Reduction (DNR) System Digital Noise Reduction (DNR) provides high quality images with Displays displayed when the KEYSTONE button is pressed, and warning displays (Power off/Temp./Change The Lamp., etc.)) Turning Off the On-screen Display Select "OSD Display" in the "Options (1)" menu - Sharp PG-C45X | PG-C45X Operation Manual - Page 70
Setting the Video System The video input system mode is preset to "Auto"; however, a clear picture from the connected audio-visual equipment may not be received, depending on the video signal difference. In that case, switch the video signal. Setting the Video System Select "Video System" in the " - Sharp PG-C45X | PG-C45X Operation Manual - Page 71
Saving Projected Images • This projector allows you to capture projected images (RGB signals) and set them as a startup image, or background image when no signals are being received. • You can - Sharp PG-C45X | PG-C45X Operation Manual - Page 72
a Background Image This function allows you to select the image displayed when no signal is being sent to the projector. Selected Item Description Sharp SHARP default image Custom *1 User customized image (e.g. company logo) Blue Blue screen None Black screen *2 *1 You can set a captured - Sharp PG-C45X | PG-C45X Operation Manual - Page 73
Monitor Out/RS-232C connection is set to "OFF". Note • Set "Mntr.out/RS232" to "ON" when using the Sharp Advanced Presentation Software. Status ON (Low power mode) OFF (Standard mode) Brightness 80% 100% Power consumption 290 W 340 W Lamp Life 2,000 hours 1,500 hours -69 Easy to Use Functions - Sharp PG-C45X | PG-C45X Operation Manual - Page 74
the menu screen, see pages 42 to 45. Note • It is recommended that the lamp be changed when the remaining lamp life becomes 6%. For lamp replacement, contact your nearest Sharp Authorized Projector Dealer or Service Center. • The table at the right indicates rough estimates in the case of using - Sharp PG-C45X | PG-C45X Operation Manual - Page 75
selecting the "PRJ Mode". • This function is used for the reversed image and ceiling-mount setups. See page 32 for these setups. Front Ceiling+Front Rear Ceiling+Rear Locking the Operation Buttons on the Projector This function can be used to lock the use of certain operation buttons on the - Sharp PG-C45X | PG-C45X Operation Manual - Page 76
to 45. Note • When a password has been set, and "RS- 232C" is selected, the password input box will be displayed. • Make sure that both the projector and computer are set for the same baud rate. Refer to the computer's operation manual for instructions for setting the computer's baud rate. -72 - Sharp PG-C45X | PG-C45X Operation Manual - Page 77
. ➝ For operating the menu screen, see pages 42 to 45. 1 Press ' or " to select the de- sired number and then press |. 2 Enter the 3 remaining digits and press . 3 Enter the password again in "Reconfirm" and press . Note • When a password is set, you need to enter the password to change "PRJ Mode - Sharp PG-C45X | PG-C45X Operation Manual - Page 78
to 45. 1 Press ', " and | to enter the password in "Old Password" and press . 2 Press ', " and | to set the new password and press . 3 Enter the new 4-digit password again in "Reconfirm" and press . Note • If you do not want to set a password, leave the fields in procedures 2 and 3 blank and press - Sharp PG-C45X | PG-C45X Operation Manual - Page 79
your nearest Sharp Authorized Projector Dealer or Service Center (see page 96). You may need to bring your projector to them to restore the projector to original factory condition (password and keycode reset). 1 Press any button you like on the remote control or projector to set the first digit in - Sharp PG-C45X | PG-C45X Operation Manual - Page 80
pages 42 to 45. 1 Press the buttons on the re- mote control or the projector to enter the preset 4-digit keycode in "Old Code". 2 Press any button you like on the remote control or the projector to enter the new keycode. 3 Enter the same 4-digit keycode in "Reconfirm". Note • If you do not want to - Sharp PG-C45X | PG-C45X Operation Manual - Page 81
to initialize the settings you have made in the projector. Returning to the Default Settings Select "All Reset" in the "Options (2)" menu on the menu C.M.S. menu. • Fine Sync • Special Modes • Signal Info • Options • Lamp Life • Anti-Theft • Language • Image stored using "Image Capture" -77 Easy - Sharp PG-C45X | PG-C45X Operation Manual - Page 82
Displaying the Adjustment Settings This function can be used to display all the adjusted settings as a list on the screen. Overview of All Menu Settings Select the "Status" menu on the menu screen and press . ➝ For operating the menu screen, see pages 42 to 45. -78 - Sharp PG-C45X | PG-C45X Operation Manual - Page 83
Appendix Appendix - Sharp PG-C45X | PG-C45X Operation Manual - Page 84
of the agents in the plastic may cause damage to the quality or finish of the projector. Cleaning the lens I Use a commercially available blower or lens cleaning paper (for glasses and camera lenses) for cleaning the lens. Do not use any liquid type cleaning agents, as they may wear off the coating - Sharp PG-C45X | PG-C45X Operation Manual - Page 85
is used in a dusty or smoky location. • Ask your nearest Sharp Authorized Projector Dealer or Service Center to exchange the filter (PFILDA005WJZZ) when it is no longer possible to clean. Cleaning and replacing the bottom air filter 1 Turn off the power and discon- nect the power cord. • Press - Sharp PG-C45X | PG-C45X Operation Manual - Page 86
cover with a vacuum cleaner extension hose. 5 Replace the air filter. • Place the air filter underneath the tabs on the filter cover. 6 Replace the filter cover. • Slide the filter cover in the direction of the arrow to close it. Note • Be sure the filter cover is securely installed. The power will - Sharp PG-C45X | PG-C45X Operation Manual - Page 87
change Red on the lamp Red on/ The lamp does Power off not illuminate. • Remaining lamp life becomes 6% or under. • Burnt-out lamp • Lamp circuit failure • Carefully replace the lamp. (See page 86) • Take the projector to your nearest Sharp Authorized Projector Dealer or Service Center (see page - Sharp PG-C45X | PG-C45X Operation Manual - Page 88
solutions and then wait until the projector has cooled down completely before plugging in the power cord and turning the power back on. (At least 5 minutes.) • If the power is turned off and then turned on again, as during a brief test, the lamp replacement indicator may be triggered, preventing the - Sharp PG-C45X | PG-C45X Operation Manual - Page 89
. The lamp life (percentage) can be checked with the on-screen display. See page 70. I For lamp replacement, please consult your nearest Sharp Authorized Projector Dealer or Service Center. IMPORTANT NOTE TO U.S. CUSTOMERS: The lamp included with this projector is backed by a 90-day parts and - Sharp PG-C45X | PG-C45X Operation Manual - Page 90
follow the steps below. • Do not loosen other screws except for the lamp unit cover and lamp unit. (Only the silver screws are loosened). • Please refer to the installation manual included with the lamp unit. 1 Press on the projector to turn off the power. • Wait until the cooling fan stops - Sharp PG-C45X | PG-C45X Operation Manual - Page 91
cover are not correctly installed, the power will not turn on, even if the power cord is connected to the projector. Securing screw User service screw Resetting the Lamp Timer Reset the lamp timer after replacing the lamp. 1 Connect the power cord. • Plug the power cord into the AC socket of the - Sharp PG-C45X | PG-C45X Operation Manual - Page 92
the system layout, it is necessary to connect Pin 4 and Pin 6 on the controlling device (e.g. PC). Projector Pin No. 4 5 6 PC Pin No. 4 5 6 USB Terminal: 4 pin B-type USB connector Pin No. Signal 1 VCC 2 1 2 USB- 3 USB+ 3 4 4 SG Name USB power USB data- USB data+ Signal Ground -88 - Sharp PG-C45X | PG-C45X Operation Manual - Page 93
1 image adjustment is set to -10. Computer RABR _ - 1 0 → ← Projector OK BUTTONS & REMOTE CONTROL KEY BUTTONS & REMOTE CONTROL KEY CONTROL CONTENTS POWER ON POWER OFF VOLUME (0 - 60) MUTE ON MUTE OFF KEYSTONE (-127 - +127) DIGITAL SHIFT (-96 - +96) COMMAND PARAMETER RETURN P O W R _ _ _ 1 OK - Sharp PG-C45X | PG-C45X Operation Manual - Page 94
Specifications and Command Settings BUTTONS & REMOTE CONTROL KEY CONTROL CONTENTS INPUT 1 RESIZE : NORMAL INPUT CONTROL CONTENTS INPUT 3 BLUE (-30 - +30) INPUT 3 COLOR (-30 - +30) INPUT 3 TINT (-30 - +30) INPUT 3 SHARP (-30 - +30) INPUT 3 CLR TEMP (-3 - +3) INPUT 3 DISPLAY INPUT 3 ADJUSTMENT RESET - Sharp PG-C45X | PG-C45X Operation Manual - Page 95
OK OR ERR LANGUAGE OPTIONS (2) CONTROL CONTENTS LAMP LIFE (PERCENTAGE) LAMP STATUS PRJ MODE : REVERSE MODEL NAME CHECK SERIAL NO. CHECK *2 PROJECTOR NAME SETTING 1 (First four characters) PROJECTOR NAME SETTING 2 (Middle four characters) PROJECTOR NAME SETTING 3 (Last four characters) PROJECTOR - Sharp PG-C45X | PG-C45X Operation Manual - Page 96
are fixed at "10110". • Codes C14 and C15 are reverse confirmation bits, with "10" indicating "Front" and "01" indicating "Rear". Sharp remote control signal format Transmission format: 15-bit format D D D D D D D D D D D D D 67.5 ms 67.5 ms Wave form of output signal: Output using - Sharp PG-C45X | PG-C45X Operation Manual - Page 97
of modes that conform to VESA. However, this projector supports other signals that are not VESA standards. PC/ manual. • When this projector receives 640 × 350 VESA format VGA signals, "640 × 400" appears on the screen. • When receiving 1,600 × 1,200 VESA format signals, sampling occurs and part - Sharp PG-C45X | PG-C45X Operation Manual - Page 98
input mode is wrong. • Cables incorrectly connected to rear panel of the projector. • Remote control batteries have run out. • External output has not been set when connecting notebook computer. • The cover of the lamp unit is not installed correctly. • Cables incorrectly connected to the rear panel - Sharp PG-C45X | PG-C45X Operation Manual - Page 99
the input signal type setting. • The lamp replacement indicator is blinking in red. Replace the lamp. • Picture adjustments are incorrectly set. The VOLUME buttons do not work when: (try the VOL+/- on the remote control) • when the menu is displayed • when the lens menu is displayed • when Pict in - Sharp PG-C45X | PG-C45X Operation Manual - Page 100
If you encounter any problems during setup or operation of this projector, first refer to the "Troubleshooting" section on pages 94 and 95. If this operation manual does not answer your question, please contact the SHARP Service departments listed below. U.S.A. Sharp Electronics Corporation 1-888 - Sharp PG-C45X | PG-C45X Operation Manual - Page 101
15 cm), Extra air filter, Lens cap (attached), Projector manual and technical reference CD-ROM, Sharp Advanced Presentation Software CD-ROM, Operation manual, Quick reference label Replacement parts Lamp unit (Lamp/cage module) (BQC-XGC50X//1), Remote control (RRMCGA029WJSA), Two R-6 batteries ("AA - Sharp PG-C45X | PG-C45X Operation Manual - Page 102
Dimensions Units: inches (mm) Side View Rear View Top View Side View 1/8 (4) 11 9/16 (294) 8 7/16 (213.3) 3/16 (5.2) 1/16 (1.5) Front View Bottom View -98 4 1/8 (104) 4 15/16 (124.5) 5/16 (7.5) 9/16 (15) 3 15/16 (99) 2 1/8 1 3/4 (54.5) (44.5) 15 3/8 (390) 5 (126.5) 1/16 (1.5) 3 1/8 ( - Sharp PG-C45X | PG-C45X Operation Manual - Page 103
digitally correct a distorted image when the projector is set up at an angle, smoothens out jaggies on keystone images and compresses the image not only horizontally but vertically keeping the 4:3 aspect ratio. Notevision Lock Down A new ceiling mounting middle part of according to LCD features, so - Sharp PG-C45X | PG-C45X Operation Manual - Page 104
(INPUT 1, 2) terminal 69 Password 73 PDF 9 Phase 48 Pict in Pict 57 PinP button 57 Power buttons 34 Power cord 17 Power indicator 34 Power Save 69 PRJ mode 71 Progressive Mode 47 Remote control 12 Remote control sensor 13 Replacing the lamp 85 RESIZE button 52 Reversing/Inverting - Sharp PG-C45X | PG-C45X Operation Manual - Page 105
78 STRETCH 53 Supplied accessories 14 Target 60 Temperature warning indicator 83 UNDO button 39 USB cable 25 USB terminal 25 VAO 63 Video System 66 VOLUME buttons 35 WIRED R/C JACK 26 WIRED REMOTE control input terminal 26 Wireless Presentation Function 25 Zoom knob 28 -101 Appendix - Sharp PG-C45X | PG-C45X Operation Manual - Page 106
SHARP CORPORATION
-
 1
1 -
 2
2 -
 3
3 -
 4
4 -
 5
5 -
 6
6 -
 7
7 -
8
-
9
-
10
-
11
-
12
-
13
-
14
-
15
-
16
-
17
-
18
-
19
-
20
-
21
-
22
-
23
-
24
-
25
-
26
-
27
-
28
-
29
-
30
-
31
-
32
-
33
-
34
-
35
-
36
-
37
-
38
-
39
-
40
-
41
-
42
-
43
-
44
-
45
-
46
-
47
-
48
-
49
-
50
-
51
-
52
-
53
-
54
-
55
-
56
-
57
-
58
-
59
-
60
-
61
-
62
-
63
-
64
-
65
-
66
-
67
-
68
-
69
-
70
-
71
-
72
-
73
-
74
-
75
-
76
-
77
-
78
-
79
-
80
-
81
-
82
-
83
-
84
-
85
-
86
-
87
-
88
-
89
-
90
-
91
-
92
-
93
-
94
-
95
-
96
-
97
-
98
-
99
-
100
-
101
-
102
-
103
-
104
-
105
-
106
 |
 |

LCD PROJECTOR
MODEL
PG-C45X
OPERATION MANUAL
Introduction
Connections and Setup
Basic Operation
Easy to Use Functions
Appendix