Sharp PN-R903 Operation Manual - Page 18
Basic Operation
 |
View all Sharp PN-R903 manuals
Add to My Manuals
Save this manual to your list of manuals |
Page 18 highlights
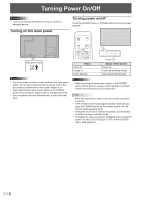
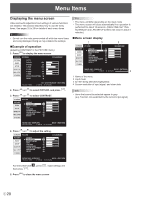
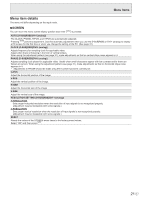
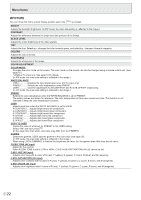
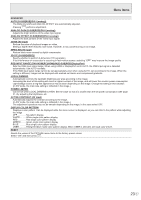
Basic Operation 1 2 3 4 5 6 7 9 8 10 1. INPUT (Input mode selection) The menu is displayed. Press or to select the input mode, and press ENTER to enter. * You can select the input terminal by pressing the input switch of the monitor. Input mode Video Audio DVI-I DVI-I input terminal DisplayPort DisplayPort input terminal HDMI1[PC] HDMI1[AV] HDMI2[PC] HDMI2[AV] PC/AV HDMI1 input terminal*1 PC/AV HDMI2 input *4 terminal*2 D-SUB[RGB] D-SUB[COMPONENT] PC/AV D-sub input terminal*3 D-SUB[VIDEO] *1 Select the terminal to be used in HDMI1 of INPUT SELECT. (See page 24.) *2 Select the terminal to be used in HDMI2 of INPUT SELECT. (See page 24.) *3 Select the terminal to be used in D-SUB of INPUT SELECT. (See page 24.) *4 Select the terminal for AUDIO SELECT which is used for audio input. (See page 24.) 2. MUTE Turns off the volume temporarily. Press the MUTE button again to turn the sound back to the previous level. 3. MENU Displays and turns off the menu screen. (see page 20.) 4. VOL +/- (Volume adjustment) Pressing or displays the VOLUME menu when the menu screen is not displayed. VOLUME 15 Press or to adjust the volume of the sound. * If you do not press any buttons for about 4 seconds, the VOLUME menu automatically disappears. 5. BRIGHT +/- (Brightness adjustment) Pressing or displays the BRIGHT menu when the menu screen is not displayed. BRIGHT 15 Press or to adjust the brightness. * If you do not press any buttons for about 4 seconds, the BRIGHT menu automatically disappears. 6. ENTER Confirms the setting. 7. RETURN Returns to the previous screen. 8. SIZE (Screen size selection) The menu is displayed. Press or to select the screen size. (See page 19.) 9. DISPLAY Displays monitor information. The display changes from INFORMATION1 → INFORMATION2 → clear display, and so on every time you press this button. • The display disappears automatically after about 15 seconds. • LAN is displayed during LAN communication. • If LAN is displayed in red, there is a duplicate IP address. 10. MODE (Color mode selection) Each time you press this button, the color mode changes in the following order: STD (Standard) → VIVID → sRGB → HIGH ILLUMINANCE → STD... • HIGH ILLUMINANCE is a display with colors suited to bright locations. • sRGB applies to PC input only. sRGB is international standard of color representation specified by IEC (International Electrotechnical Commission). Color conversion is made in taking account of liquid crystal's characteristics and represents color tone close to its original image. E 18
-
 1
1 -
2
-
3
-
4
-
5
-
6
-
7
-
8
-
9
-
10
-
11
-
12
-
 13
13 -
 14
14 -
 15
15 -
 16
16 -
 17
17 -
 18
18 -
 19
19 -
 20
20 -
 21
21 -
 22
22 -
 23
23 -
24
-
25
-
26
-
27
-
28
-
29
-
30
-
31
-
32
-
33
-
34
-
35
-
36
-
37
-
38
-
39
-
40
-
41
-
42
-
43
-
44
-
45
-
46
-
47
-
48
-
49
-
50
-
51
-
52
-
53
-
54
-
55
-
56
-
57
-
58
-
59
-
60
-
61
-
62
 |
 |
