Sharp UP-820F UP-810F UP-820F Operation Manual - Page 270
Installing and Removing a Paper Roll
 |
View all Sharp UP-820F manuals
Add to My Manuals
Save this manual to your list of manuals |
Page 270 highlights
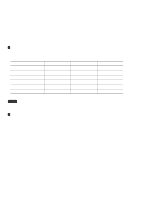
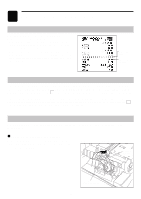
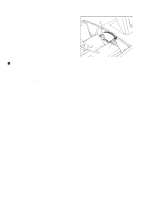
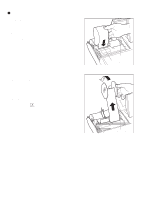
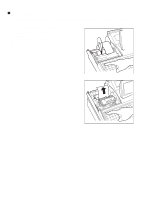
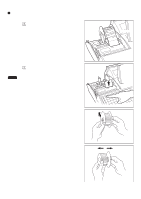
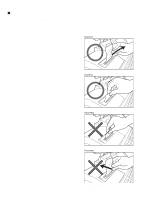
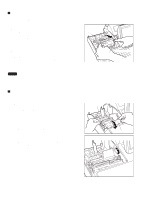
Installing and Removing a Paper Roll Recording paper specifications Be sure to use paper rolls as specified by SHARP. The use of any paper rolls other than specified could cause paper jamming, resulting in a POS terminal malfunction. Paper specification Paper width: UP-810F: 3.13 ± 0.02 in. (79.5 ± 0.5 mm) UP-820F: 2.26 ± 0.02 in. (57.5 ± 0.5 mm) Max. outside diameter: 3.15 in. (80 mm) Quality: Thermal paper Paper tube: 0.71 in. (18 mm) • Be sure to set paper roll(s) prior to using your machine. Otherwise it may cause a malfunction. Install the paper roll in the printer. Be careful to set the roll and cut the paper end correctly. NOTE If the leading end of the paper roll is fixed with paste or tape, the paper's color development ability may be lost in the pasted or taped area due to deterioration of the heat-sensitive color development component of the paper surface. As a result, nothing may be printed in this area. Therefore, when setting a new paper roll in the machine, be sure to cut off approximately one revolution (approx. 25 cm long). (How to set the paper roll) (How to cut the paper end) To the printer Incorrect To the printer Correct Correct Incorrect Installing a paper roll (UP-810F) Installing the receipt paper roll 1. Select the "REG" mode with the AC cord connected. 2. Remove the printer cover. 3. Confirm that the print head release lever is in its printing position. 4. Set the paper correctly in the receipt paper holder of the printer as shown on the right. 5. Insert the end of the paper into the paper chute as shown on the right. It will automatically be fed through the printer. 6. Cut off the excess paper that comes out of the printer with the manual cutter. 7. Replace the printer cover. In the case of the UP-810F Printing position Paper slot guide - 268 -
-
 1
1 -
2
-
3
-
4
-
5
-
6
-
7
-
8
-
9
-
10
-
11
-
12
-
13
-
14
-
15
-
16
-
17
-
18
-
19
-
20
-
21
-
22
-
23
-
24
-
25
-
26
-
27
-
28
-
29
-
30
-
31
-
32
-
33
-
34
-
35
-
36
-
37
-
38
-
39
-
40
-
41
-
42
-
43
-
44
-
45
-
46
-
47
-
48
-
49
-
50
-
51
-
52
-
53
-
54
-
55
-
56
-
57
-
58
-
59
-
60
-
61
-
62
-
63
-
64
-
65
-
66
-
67
-
68
-
69
-
70
-
71
-
72
-
73
-
74
-
75
-
76
-
77
-
78
-
79
-
80
-
81
-
82
-
83
-
84
-
85
-
86
-
87
-
88
-
89
-
90
-
91
-
92
-
93
-
94
-
95
-
96
-
97
-
98
-
99
-
100
-
101
-
102
-
103
-
104
-
105
-
106
-
107
-
108
-
109
-
110
-
111
-
112
-
113
-
114
-
115
-
116
-
117
-
118
-
119
-
120
-
121
-
122
-
123
-
124
-
125
-
126
-
127
-
128
-
129
-
130
-
131
-
132
-
133
-
134
-
135
-
136
-
137
-
138
-
139
-
140
-
141
-
142
-
143
-
144
-
145
-
146
-
147
-
148
-
149
-
150
-
151
-
152
-
153
-
154
-
155
-
156
-
157
-
158
-
159
-
160
-
161
-
162
-
163
-
164
-
165
-
166
-
167
-
168
-
169
-
170
-
171
-
172
-
173
-
174
-
175
-
176
-
177
-
178
-
179
-
180
-
181
-
182
-
183
-
184
-
185
-
186
-
187
-
188
-
189
-
190
-
191
-
192
-
193
-
194
-
195
-
196
-
197
-
198
-
199
-
200
-
201
-
202
-
203
-
204
-
205
-
206
-
207
-
208
-
209
-
210
-
211
-
212
-
213
-
214
-
215
-
216
-
217
-
218
-
219
-
220
-
221
-
222
-
223
-
224
-
225
-
226
-
227
-
228
-
229
-
230
-
231
-
232
-
233
-
234
-
235
-
236
-
237
-
238
-
239
-
240
-
241
-
242
-
243
-
244
-
245
-
246
-
247
-
248
-
249
-
250
-
251
-
252
-
253
-
254
-
255
-
256
-
257
-
258
-
259
-
260
-
261
-
262
-
263
-
264
-
 265
265 -
 266
266 -
 267
267 -
 268
268 -
 269
269 -
 270
270 -
 271
271 -
 272
272 -
 273
273 -
 274
274 -
 275
275 -
276
-
277
-
278
-
279
-
280
-
281
-
282
 |
 |