Sharp XL-DH229N XL-DH229N Operation Manual - Page 4
General control, tenin, to the iPod - remote
 |
UPC - 074000369603
View all Sharp XL-DH229N manuals
Add to My Manuals
Save this manual to your list of manuals |
Page 4 highlights
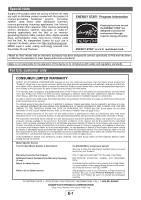
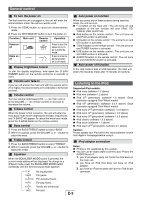
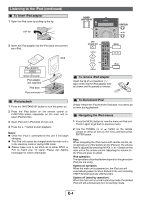
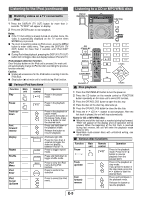
General control To turn the power on Auto power on function The first time the unit is plugged in, the unit will enter the demonstration mode. You will see words scroll. 1 Press the DEMO button to cancel the demonstration mode. 2 Press the ON/STAND-BY button to turn the power on. Function Main unit Power on / off POWER ON/STAND-BY Demo on / off ____ Remote control Operation Press to turn the power on or to go to stand-by mode. Press to enter to demonstration on or off mode. Display brightness control To dim the display brightness, hold down the CLEAR/ DIMMER button on the remote control for 2 seconds or more. When you press any of these buttons during stand-by mode, the unit turns on. ● / button on the main unit : The unit turns on and playback of the last function will start (iPod, CD, TUNER, USB, AUDIO IN). ● iPod button on the remote control : The unit turns on and iPod function is activated. ● CD button on the remote control : The unit turns on and CD function is activated. ● TUNER button on the remote control : The unit turns on and TUNER function is activated. ● USB button on the remote control : The unit turns on and USB function is activated. ● AUDIO IN button on the remote control : The unit turns on and AUDIO IN function is activated. Auto power off function In the stop mode of disc or USB operation, the main unit enters the stand-by mode after 15 minutes of inactivity. Volume auto fade-in If you turn off and on the main unit with the volume set to 27 or higher, the volume starts at 16 and fades in to the last set level. Volume control Turn the volume knob toward VOL +/- (on main unit) or press VOLUME +/- (on remote control) to increase or decrease the volume. X-Bass control When the power is first turned on, the unit will enter the extra bass mode which emphasizes the bass frequencies, and "X-BASS" will appear. To cancel the extra bass mode, press the X-BASS button on the remote control. Bass control 1 Press the BASS/TREBLE button to select "BASS". 2 Within 5 seconds, press the VOLUME (+ or -) button to adjust the bass. Listening to the iPod Supported iPod models: ● iPod nano (software 1.2 above) ● iPod mini (software 1.2 above) ● iPod (5th generation) (software 1.3 above) (Dock connector equipped Click Wheel model) ● iPod (4th generation) (software 3.0.2 above) (Dock connector equipped Click Wheel model) ● iPod nano (2nd generation) (software 1.0.0 above) ● iPod nano (3rd generation) (software 1.0.3 above) ● iPod nano (4th generation) (software 1.0.3 above) ● iPod classic (software 1.0.3 above) ● iPod touch (software 1.1 above) ● iPod touch (2nd generation) (software 2.1 above) Caution: Please update your iPod unit to the latest software version from Apple's homepage before using it. Treble control 1 Press the BASS/TREBLE button to select "TREBLE". 2 Within 5 seconds, press the VOLUME (+ or -) button to adjust the treble. Equalizer When the EQUALIZER MODE button is pressed, the current mode setting will be displayed. To change to a different mode, press the EQUALIZER MODE button repeatedly until the desired sound mode appears. FLAT NNooeqeuqauliazalitzioanti.on. iPod adaptor connection Notes: ● iPhone is not supported by this system. ● You can use an audio cable to connect your iPod to the AUDIO IN jack if: 1. your iPod adaptor does not fit into the iPod dock on the main unit. 2. you have an iPod that does not have an iPod adaptor. 3. you have an iPod that does not have an iPod 30 pin connector. GAME FFoor rogcakmmeu.sic. CLASSIC FFoor rclcalsassicsailcmalumsicu.sic. POPS FFoor rpoppomp umsiucs. ic. VOCAL VVoocaclaslsareareenheannhcaend.ced. JAZZ FFoor rjajzazz.z. E-3
-
 1
1 -
 2
2 -
 3
3 -
 4
4 -
 5
5 -
 6
6 -
 7
7 -
 8
8 -
 9
9 -
 10
10 -
11
-
12
-
13
-
14
-
15
-
16
 |
 |