Sharp XR-41X Service Manual - Page 11
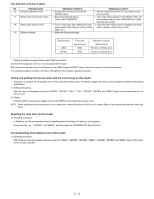
XR-40X/XR-41X/XG-F260X, In the VGA, SVGA, XGA and SXGA modes, make
 |
View all Sharp XR-41X manuals
Add to My Manuals
Save this manual to your list of manuals |
Page 11 highlights
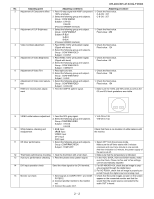
XR-40X/XR-41X/XG-F260X No. Adjusting point Adjusting conditions Adjusting procedure 2 Adjustment of Component offset 1. Feed 10-step signal with 480P component 1. Check the fixed value. 100% amplitude. C-R-OS : 257 2. Select the following group and subjects. C-B-OS : 257 Group : CONFIRM/AD Subject : C-R-OS C-B-OS (Process GAMMA interlock) 3 Adjustment of DLP Brightness 1. Select the following group and subject. 1. Check the fixed value. Group : CONFIRM/DLP Fixed value : 256 Subject :R-BLK G-BLK B-BLK (Process GAMMA interlock) 4 Video Contrast adjustment 1. Feed NTSC 100% wind pattern signal. 1. Check the fixed value. (Signal with burst) Fixed value : 124 2. Select the following group and subjects. Group : CONFIRM/VIDEO Subject : V-CONT 5 Adjustment of Video Brightness 1. Feed NTSC 100% wind pattern signal. 1. Check the fixed value. (Signal with burst) 2. Select the following group and subject. Fixed value : 68 Group : CONFIRM/VIDEO Subject : V-BRIGHT 6 Adjustment of Video Tint 1. Feed split color bar. 1. Check the fixed value. 2. Select the following group and subject. Fixed value : 128 Group : CONFIRM/VIDEO Subject : V-HUE 7 Adjustment of Video color satura- 1. Select the following group and subject. 1. Check the fixed value. tion Group : CONFIRM/VIDEO Fixed value : 154 Subject : V-COLOR 8 RGB tone reproduction adjust- 1. Feed the SMPTE pattern signal. 1. Make sure the 100% and 95% white as well as the ment 0% and 5% black gradations are visible. 9 VIDEO white balance adjustment 1. Feed the 50% gray signal. 1. V-R-OS is 132. 2. Select the following group and subjects. V-B-OS is 132. Group :CONFIRM/VIDEO Subject : V-R-OS V-B-OS 10 White balance checking and 1. RGB Input Check that there is no deviation of white balance with readjustment sRGB Input the monitor. VIDEO Input DTV Input DVD Input 11 Off-timer performance 1. Select the following group and subjects. 1. Select OFF from the process mode. Group :CONFIRM/CHECK Subject : TEMP-OFF Make sure the off-timer starts with 5 minutes onscreen and count one minute in one second. And then indication is 0 minute, the power supply of the set is cut off. 12 Thermistor performance checking 1. Heat the thermistor with a hair dryer. 1. Make sure that the temperature is indicated. 13 Auto sync performance checking 1. Feed the phase check pattern signal. 1. In the VGA, SVGA, XGA and SXGA modes, make sure the Clock, Phase, H-Pos and V-Pos settings can be automatically adjusted. 14 DVI input operation check Send the video signal to the DVI terminal. 1. For XR-40X/XR-41X, check that an image is prop- erly projected through the digital input. 2. For XG-F260X, check that an image is properly pro jected through the digital input and analog input. 15 Monitor out check 1. Send signals to COMPUTER 1 and COM- 1. Check that the same images as seen on the screen PUTER 2. appear on the connected monitor and that the 2. Connect another monitor to the monitor out. sound from the sound source connected to the audio OUT is heard. 3. Connect the audio OUT. 2 - 2
-
 1
1 -
2
-
3
-
4
-
5
-
 6
6 -
 7
7 -
 8
8 -
 9
9 -
 10
10 -
 11
11 -
 12
12 -
 13
13 -
 14
14 -
 15
15 -
 16
16 -
17
-
18
-
19
-
20
-
21
-
22
-
23
-
24
 |
 |
