Singer 191D-20 Instruction Manual - Page 16
Thread, Take-Up Spring, Adjustment
 |
View all Singer 191D-20 manuals
Add to My Manuals
Save this manual to your list of manuals |
Page 16 highlights
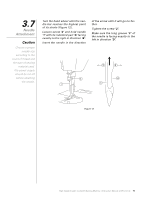
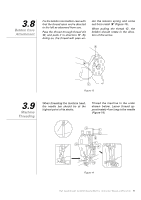
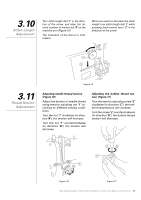
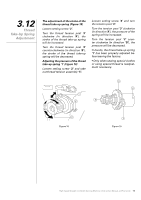
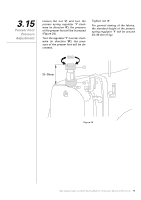
3.12 Thread Take-Up Spring Adjustment The adjustment of the stroke of the thread take-up spring (Figure 18) Loosen setting screw '2'. Turn the thread tension post '3' clockwise (in direction 'A'), the stroke of the thread take-up spring will be increased. Turn the thread tension post '3' counter-clockwise (in direction 'B'), the stroke of the thread take-up spring will be decreased. Adjusting the pressure of the thread take-up spring '1' (Figure 19) Loosen setting screw '2' and take out thread tension assembly '5'. Loosen setting screw '4' and turn the tension post '3'. Turn the tension post '3' clockwise (in direction 'A'), the pressure of the spring will be increased. Turn the tension post '3' counter clockwise (in direction 'B'), the pressure will be decreased. • Usually, the thread take-up spring '1' has been properly adjusted before leaving the factory. • Only when sewing special clothes or using special thread is readjustment necessary. Figure 18 Figure 19 High Speed Straight Lockstitch Sewing Machine | Instruction Manual and Parts List 13
-
 1
1 -
2
-
3
-
4
-
5
-
6
-
7
-
8
-
9
-
10
-
 11
11 -
 12
12 -
 13
13 -
 14
14 -
 15
15 -
 16
16 -
 17
17 -
 18
18 -
 19
19 -
 20
20 -
 21
21 -
22
-
23
-
24
-
25
-
26
-
27
-
28
-
29
-
30
-
31
-
32
-
33
-
34
-
35
-
36
-
37
-
38
-
39
-
40
-
41
-
42
-
43
-
44
-
45
 |
 |
