Singer 191D-20 Instruction Manual - Page 18
Presser Foot, Pressure, Adjustment
 |
View all Singer 191D-20 manuals
Add to My Manuals
Save this manual to your list of manuals |
Page 18 highlights
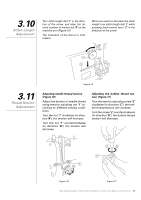
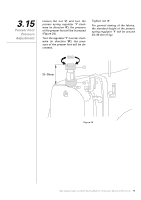
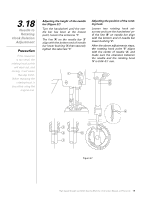
3.15 Presser Foot Pressure Adjustment Loosen the nut '2', and turn the presser spring regulator '1' clockwise (in direction 'A'), the pressure of the presser foot will be increased (Figure 24). Turn the regulator '1' counter clockwise (in direction 'B'), the pressure of the presser foot will be decreased. Tighten nut '2'. For general sewing of the fabrics, the standard height of the presser spring regulator '1' will be around 33~36 mm (5 kg). ˜ 33 36mm Figure 24 High Speed Straight Lockstitch Sewing Machine | Instruction Manual and Parts List 15
-
 1
1 -
2
-
3
-
4
-
5
-
6
-
7
-
8
-
9
-
10
-
11
-
12
-
 13
13 -
 14
14 -
 15
15 -
 16
16 -
 17
17 -
 18
18 -
 19
19 -
 20
20 -
 21
21 -
 22
22 -
 23
23 -
24
-
25
-
26
-
27
-
28
-
29
-
30
-
31
-
32
-
33
-
34
-
35
-
36
-
37
-
38
-
39
-
40
-
41
-
42
-
43
-
44
-
45
 |
 |

15
High Speed Straight Lockstitch Sewing Machine
|
Instruction Manual and Parts List
3.15
Presser Foot
Pressure
Adjustment
Loosen the nut
’2’,
and turn the
presser spring regulator
‘1’
clock-
wise (in direction
‘A’
), the pressure
of the presser foot will be increased
(Figure 24).
Turn the regulator
‘1’
counter clock-
wise (in direction
‘B’
), the pres-
sure of the presser foot will be de-
creased.
Tighten nut
‘2’
.
For general sewing of the fabrics,
the standard height of the presser
spring regulator
‘1’
will be around
33~36 mm (5 kg).
Figure 24
33
36mm
˜