Singer 191D-20 Instruction Manual - Page 21
Needle to, Rotating, Hook Relation, Adjustment
 |
View all Singer 191D-20 manuals
Add to My Manuals
Save this manual to your list of manuals |
Page 21 highlights
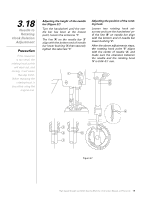
3.18 Needle to Rotating Hook Relation Adjustment Precaution If the clearance is too small, the rotating hook points will wear out, and too big, it will cause the skip stitch. When replacing the rotating hook, it should be using the original one. Adjusting the height of the needle bar (Figure 27) Turn the handwheel until the needle bar has been at the lowest point, loosen the setscrew '1'. The line 'A' on the needle bar '2' align with the bottom end of needle bar lower bushing '3', then securely tighten the setscrew '1'. Adjusting the position of the rotating hook Loosen two rotating hook setscrews and turn the handwheel until the line 'B' on needle bar align with the bottom end of needle bar lower bushing '3'. After the above adjustments steps, the rotating hook point '5' aligns with the center of needle '4', and make sure the clearance between the needle and the rotating hook '5' is 0.04~0.1 mm. Figure 27 High Speed Straight Lockstitch Sewing Machine | Instruction Manual and Parts List 18
-
 1
1 -
2
-
3
-
4
-
5
-
6
-
7
-
8
-
9
-
10
-
11
-
12
-
13
-
14
-
15
-
 16
16 -
 17
17 -
 18
18 -
 19
19 -
 20
20 -
 21
21 -
 22
22 -
 23
23 -
 24
24 -
 25
25 -
 26
26 -
27
-
28
-
29
-
30
-
31
-
32
-
33
-
34
-
35
-
36
-
37
-
38
-
39
-
40
-
41
-
42
-
43
-
44
-
45
 |
 |
