Singer C440 LEGACY Instruction Manual and Troubleshooting Guide - Page 31
Stitch, around, Zipper, QUILTING, Joining, Pieces, Fabric, Quilting
 |
View all Singer C440 LEGACY manuals
Add to My Manuals
Save this manual to your list of manuals |
Page 31 highlights
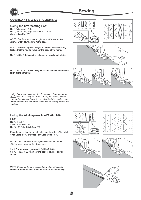
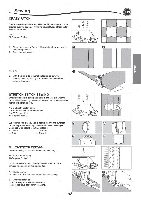
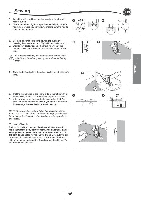
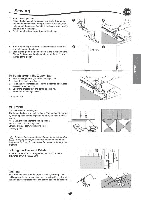
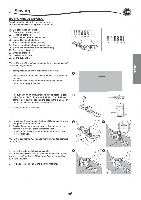
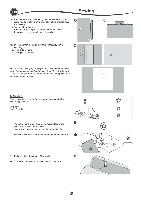
Sewing 3. Attach the Zipper Foot. Attach the left side of the presser foot pin to the presser foot holder when sewing the right side of the zipper, and right side of the presser foot pin to the holder when sewing the left side of the zipper. 4. Stitch the left side of zipper from bottom to top. 5. Turn the fabric right side out. Stitch across the lower end and right side of the zipper. 6. Stop stitching with the needle down in the fabric when the Zipper Foot reaches the zipper tab, about 5 cm (2") from the top of the zipper. To Stitch around the Zipper Tab: 1. Stop stitching before you reach the zipper tab. 2. Lower the needle into fabric. 3. Raise the presser foot and slide the zipper tab backwards to clear the Zipper Foot. 4. Lower the presser foot and continue stitching. 5. Remove the basting stitches. a. Zipper tab QUILTING, A quilt consists of three layers: The topper, batting, and backing fabric. The top layer is formed by shaped pieces of fabrics joined together, creating the quilt topper. No. 0 Straight stitch (center needle position) No. 160 Hand look quilting stitch Straight stitch / Patchwork Quilting Foot Quilting guide A To prevent accidents, do not change the needle position. Changing needle position could cause the needle hit the presser foot, which could break the needle or damage the machine. Joining the Pieces of Fabric Join the pieces of fabric using pattern No. 0 with a seam allowance of 1/4 inch (6.3 mm). Quilting Sew three layers of material (topper, batting, backing). Use quilting guide to sew successive rows. Insert quilting guide into the hole of presser foot holder and set the spacing as desired. • EN 0 7-10 mm V a GI• _:__ , , , - - - 1 1 ---i • , I :____ t ---.L.- , , , . r I I I ; ---- 0-- --I C -- -;-' 1 1 ,f ;'..... ; %:..• I '• % I • , • .....' I • ;: :1 • , `..... 11 ,.• 414 1 i ll 11 3 2 ->: 1 1/4' 0
-
 1
1 -
2
-
3
-
4
-
5
-
6
-
7
-
8
-
9
-
10
-
11
-
12
-
13
-
14
-
15
-
16
-
17
-
18
-
19
-
20
-
21
-
22
-
23
-
24
-
25
-
 26
26 -
 27
27 -
 28
28 -
 29
29 -
 30
30 -
 31
31 -
 32
32 -
 33
33 -
 34
34 -
 35
35 -
 36
36 -
37
-
38
-
39
-
40
-
41
-
42
-
43
-
44
-
45
-
46
-
47
-
48
-
49
-
50
-
51
-
52
-
53
-
54
-
55
-
56
-
57
-
58
-
59
-
60
-
61
-
62
-
63
-
64
-
65
-
66
-
67
-
68
-
69
-
70
-
71
-
72
-
73
-
74
-
75
-
76
-
77
-
78
-
79
-
80
-
81
-
82
-
83
-
84
-
85
-
86
-
87
-
88
-
89
-
90
-
91
-
92
-
93
-
94
-
95
-
96
-
97
-
98
-
99
-
100
-
101
-
102
-
103
-
104
-
105
-
106
-
107
-
108
-
109
-
110
-
111
-
112
-
113
-
114
-
115
-
116
-
117
-
118
-
119
-
120
-
121
-
122
-
123
-
124
-
125
-
126
-
127
-
128
-
129
-
130
-
131
-
132
-
133
-
134
-
135
-
136
-
137
-
138
-
139
-
140
 |
 |
