Singer H74 Instruction Manual 2 - Page 81
Problem, Cause, Correction, Reference
 |
View all Singer H74 manuals
Add to My Manuals
Save this manual to your list of manuals |
Page 81 highlights
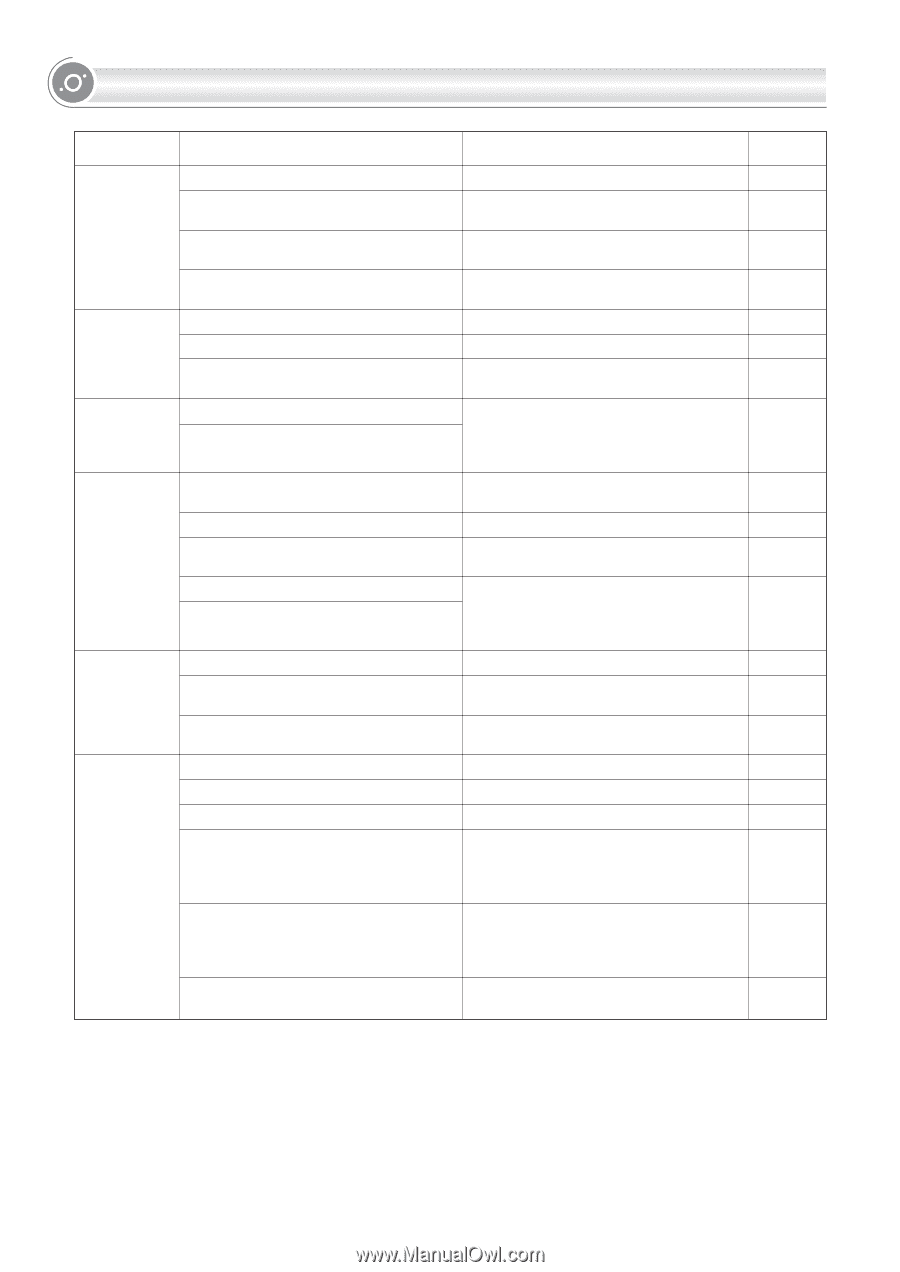
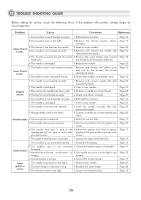
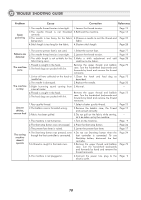
TROUBLE SHOOTING GUIDE Problem Seam puckering Cause Correction Reference 1.The needle thread tension is too tight. 1.Loosen the thread tension. 2.The needle thread is not threaded 2.Rethread the machine. correctly. 3.The needle is too heavy for the fabric 3.Choose a needle to suit the thread and being sewn. fabric. 4.Stitch length is too long for the fabric. 4.Shorten stitch length Page 19 Page 13 Page 22 Page 28 Patterns are distorted The machine jams The machine is noisy Uneven stitches, uneven feed The sewing machine doesn't operate 1.The correct presser foot is not used. 1.Select the correct foot. 2.The needle thread tension is too tight. 2.Loosen the thread tension. 3.The stitch length is not suitable for the 3.Make a stitch adjustment and add fabric being sewn. stabilizer to the fabric. 1.Thread is caught in the hook. 2.The feed dogs are packed with lint. Remove the upper thread and bobbin case. Turn the handwheel backwards and forwards by hand and remove the thread remnants. 1.Lint or oil have collected on the hook or 1.Clean the hook and feed dog as needle bar. described. 2.The needle is damaged. 2.Replace the needle. 3.Slight humming sound coming from 3.Normal. internal motor. 4.Thread is caught in the hook. 5.The feed dogs are packed with lint. Remove the upper thread and bobbin case. Turn the handwheel backwards and forwards by hand and remove the thread remnants. 1.Poor quality thread. 1.Select a better quality thread. 2.The bobbin case is threaded wrong. 2.Remove the bobbin case, the thread and reinsert correctly. 3.Fabric has been pulled. 1.The machine is not turned on. 3.Do not pull on the fabric while sewing, let it be taken up by the machine. 1.Turn on the machine. 2.The Start/stop button was not pressed. 2.Press the Start/stop button. 3.The presser foot lever is raised. 3.Lower the presser foot lever. 4.The Start/stop button was pressed, even 4.Do not use Start/stop button when the though the foot controller is connected. foot controller is connected. To use Start/stop button, disconnect the foot controller. 5.A thread is caught in the hook race. 5.Remove the upper thread and bobbin case. Turn the handwheel backwards and forwards by hand and remove the thread remnants. 6.The machine is not plugged in. 6.Connect the power line plug to the electric outlet. Page 77 Page 19 Page 28 Page 73 Page 73 Page 23 -Page 73 Page 22 Page 12 -Page 9 Page 24 Page 17 Page 24 Page 73 Page 9 76
-
 1
1 -
2
-
3
-
4
-
5
-
6
-
7
-
8
-
9
-
10
-
11
-
12
-
13
-
14
-
15
-
16
-
17
-
18
-
19
-
20
-
21
-
22
-
23
-
24
-
25
-
26
-
27
-
28
-
29
-
30
-
31
-
32
-
33
-
34
-
35
-
36
-
37
-
38
-
39
-
40
-
41
-
42
-
43
-
44
-
45
-
46
-
47
-
48
-
49
-
50
-
51
-
52
-
53
-
54
-
55
-
56
-
57
-
58
-
59
-
60
-
61
-
62
-
63
-
64
-
65
-
66
-
67
-
68
-
69
-
70
-
71
-
72
-
73
-
74
-
75
-
 76
76 -
 77
77 -
 78
78 -
 79
79 -
 80
80 -
 81
81 -
 82
82 -
 83
83 -
 84
84 -
 85
85 -
 86
86
 |
 |