Singer One Instruction Manual 4 - Page 68
instruction
 |
View all Singer One manuals
Add to My Manuals
Save this manual to your list of manuals |
Page 68 highlights
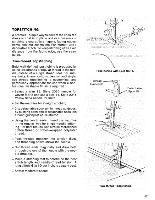
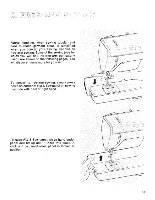
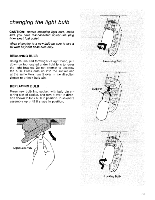
BUTTONS Sewing buttons on a cuff or neckband is no longer a task when the free-arm surface is used. Cuffs slip around the sewing surface without being pulled out of shape, so you can handle the stitching area easily. Button sewing instruction is given on page 34. SLEEVES Free-arm sewing takes the difficulty out of stitching a sleeve. The armhole rotates smoothly under the needle so that you can place stitching accurately. The extra control afforded by the free arm is especially helpful for topstitching flat-fell seams. 62
-
 1
1 -
2
-
3
-
4
-
5
-
6
-
7
-
8
-
9
-
10
-
11
-
12
-
13
-
14
-
15
-
16
-
17
-
18
-
19
-
20
-
21
-
22
-
23
-
24
-
25
-
26
-
27
-
28
-
29
-
30
-
31
-
32
-
33
-
34
-
35
-
36
-
37
-
38
-
39
-
40
-
41
-
42
-
43
-
44
-
45
-
46
-
47
-
48
-
49
-
50
-
51
-
52
-
53
-
54
-
55
-
56
-
57
-
58
-
59
-
60
-
61
-
62
-
 63
63 -
 64
64 -
 65
65 -
 66
66 -
 67
67 -
 68
68 -
 69
69 -
 70
70 -
 71
71 -
 72
72 -
 73
73 -
74
-
75
-
76
-
77
 |
 |

BUTTONS
Sewing
buttons
on
a
cuff
or
neckband
is
no
longer
a
task
when
the
free
-arm
surface
is
used.
Cuffs
slip
around
the
sewing
surface
without
being
pulled
out
of
shape,
so
you
can
handle
the
stitching
area
easily.
Button
sewing
instruction
is
given
on
page
34.
SLEEVES
Free
-arm
sewing
takes
the
difficulty
out
of
stitching
a
sleeve.
The
armhole
rotates
smoothly
under
the
needle
so
that
you
can
place
stitching
accurately.
The
extra
control
afforded
by
the
free
arm
is
especially
helpful
for
topstitching
flat
-fell
seams.
62