Singer One Instruction Manual 7 - Page 37
CARING, MACHINE, Cleaning, Changing, light, CUIDE, MAQUINA, Limpiar, transportador, lanzadera,
 |
View all Singer One manuals
Add to My Manuals
Save this manual to your list of manuals |
Page 37 highlights
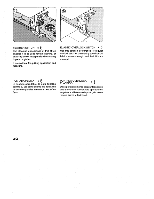
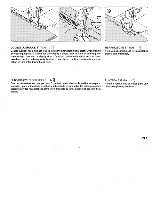
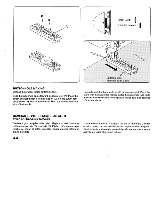
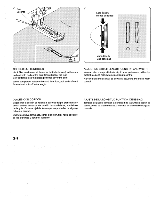
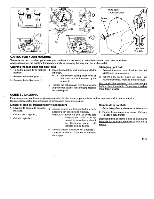
1\ (1) ■ (4) 3) Face cover Cubierta frontal O Screw Guia x (2) le QS 0 Light bulb Bombilla CARING FOR YOUR MACHINE To ensure the best possible operation of your machine, it is necessary to keep the essential parts clean at all times. Always disconnect the machine from power supply by removing the plug from the socket-outlet. Cleaning the feed dogs and hook area 1. Raise the needle to its highest 4. Clean the feed dogs and hook area with the position. lint brush. 2. Remove the needle plate (1). 3. Remove the bobbin case (2). NOTE : Put a drop of sewing machine oil on the hook race as indicated by the arrows A. 5. Replace the bobbin case with the projection (3) positioned against the spring (4). Replace the needle plate. Changing light bulb 1. Remove the face cover. Push up the bulb slightly and turn clockwise. 2. Insert new bulb, push up and turn counterclockwise. Replace the face cover. Disconnect the machine from power supply before changing a bulb. Do not use a bulb of more than 15 watts. CUIDE SU MAQUINA Es necesario que mantenga las piezas esenciales limpias siempre, para obtener un funcionamiento eficaz de su maquina. Siempre desconectar desenchufando el cord6n de la corriente electrica. Limpiar el area del transportador y la lanzadera 1. Levanter la aguja a la posicion 4. Limpiar el area del transportador y de la mas alta. lanzadera con el cepillo de hilachas. 2. Quite la placa aguja (1) ATENCION : Echar una gota de aceite para 3. Quite la capsula (2) maquina de coser por el eje central de lanzadera y el carril de lanzadera como esta indicado con las fiechas. Cambio de la bombilla 1. Quitar la tapa frontal, desenroscar la bombilla. 2. Roscar firmemente una nueva. Volver a colocar la tapa frontal. Desenchufar la corriente antes de cambiar la bombilla. No usar una bombilla de mas de 15 watios. 5. Vuelva a colocar la capsule con el resalte (3) contra el muelle (4). Coloque de nuevo la placa aguja. 35
-
 1
1 -
2
-
3
-
4
-
5
-
6
-
7
-
8
-
9
-
10
-
11
-
12
-
13
-
14
-
15
-
16
-
17
-
18
-
19
-
20
-
21
-
22
-
23
-
24
-
25
-
26
-
27
-
28
-
29
-
30
-
31
-
 32
32 -
 33
33 -
 34
34 -
 35
35 -
 36
36 -
 37
37 -
 38
38 -
 39
39 -
 40
40
 |
 |
