Singer One Instruction Manual 7 - Page 7
Adjusting, Thread, Tension, Presser, Lever, Stitch, Width/needle, Position, Control, Selector,
 |
View all Singer One manuals
Add to My Manuals
Save this manual to your list of manuals |
Page 7 highlights
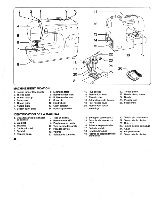
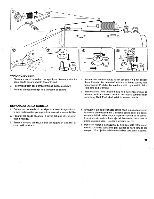
A 3 3 4 • 3 T 4 • 3 2 1. ADJUSTING TOP THREAD TENSION Decrease or increase the tension of the top thread by using this control. The higher the number, the tighter the tension. 2. PRESSER FOOT LEVER There are three positions for your presser foot. 1. Lower the presser foot to sew. 2. Raise the lever to the middle position to insert or remove fabric. 3. Lift it to its highest position to change the presser foot or to remove thick fabric. 3. STITCH WIDTH/NEEDLE POSITION CONTROL The width of all the stitches produced on this machine can be made narrower or wider by adjusting the stitch width control. When sewing straight stitching, you can select one of three needle positions - left, middle or right - with the same control dial. 4. STITCH SELECTOR AND INDICATOR 1. To select a stitch, be sure needle is out of fabric at its highest position. 2. Then turn the selector until the required stitch is indicated on the indicator panel. 5. STITCH LENGTH/SUPER (STRETCH) STITCH CONTROL Stitch length can be selected easily according to thickness and type of fabric. Super (stretch) stitch patterns can be selected by turning the same dial to S mark where fine adjustment can be made. 6. REVERSE STITCH LEVER It is recommended to begin, or end seams with several stitches in reverse for reinforcement. As long as you are pressing down this lever while sewing, the machine will continue to feed the fabric backwards.
-
 1
1 -
 2
2 -
 3
3 -
 4
4 -
 5
5 -
 6
6 -
 7
7 -
 8
8 -
 9
9 -
 10
10 -
 11
11 -
 12
12 -
13
-
14
-
15
-
16
-
17
-
18
-
19
-
20
-
21
-
22
-
23
-
24
-
25
-
26
-
27
-
28
-
29
-
30
-
31
-
32
-
33
-
34
-
35
-
36
-
37
-
38
-
39
-
40
 |
 |
