Singer The SINGER 160 Instruction Manual 2 - Page 6
Flower Stitch Attachment
 |
View all Singer The SINGER 160 manuals
Add to My Manuals
Save this manual to your list of manuals |
Page 6 highlights
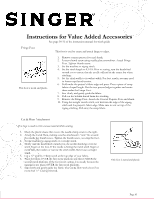
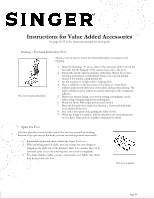
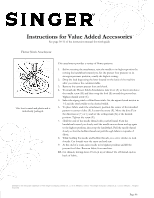
Instructions for Value Added Accessories See page 30-31 of the instruction manual for stitch guide Flower Stitch Attachment This foot is metal and plastic and is individually packaged. This attachment provides a variety of flower patterns. 1. Before securing the attachment, raise the needle to its highest position by turning the handwheel toward you. Set the presser foot pressure to its strongest pressure position, usually the highest setting. 2. Drop the feed dogs using the lever located on the back of the machine after you remove the extension table. 3. Remove the current presser foot and shank. 4. To attach the Flower Stitch Attachment, raise lever (A) so that it sits above the needle screw (D) and then wrap the fork (B) around the presser bar. Tighten thumb screw (C). 5. Select the zigzag stitch or blind hem stitch. Set the upper thread tension to 1-2 and the stitch width to the desired width. 6. To place fabric under the attachment, position the center of the intended pattern to center of disc (F). Loosen the screw (E). Move the disc (F) in the direction or (+) or (-) and set the setting mark (G) at the desired position. Tighten the screw (E). 7. Hold the end of the needle thread with your left hand. Turn the handwheel toward you slowly until the needle moves down and up again to the highest position, then stop the handwheel. Pull the needle thread slowly so that the bobbin thread can pull through fabric to topside of fabric. 8. While holding the needle and bobbin threads, sew a few stitches to lock threads. Cut threads near the seam end and sew. 9. At the end of a seam, raise needle to its highest position and lift the presser foot lifter. Remove fabric from machine. 10. Cut threads, leaving about 15 cm (6 in) of thread. Tie off thread ends at back of fabric. SINGER is the exclusive trademark of The Singer Company Limited S.à. r.l. or its Affiliates. ©2011 The Singer Company Limited S.à. r.l. or its Affiliates. All rights reserved. Page 06
-
 1
1 -
 2
2 -
 3
3 -
 4
4 -
 5
5 -
 6
6
 |
 |