Sony CDX-565MXRF Installation/Connection Instructions - Page 2
Installation - remote
 |
UPC - 840356508238
View all Sony CDX-565MXRF manuals
Add to My Manuals
Save this manual to your list of manuals |
Page 2 highlights
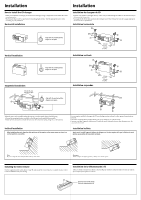
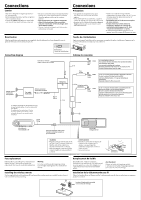
Installation Installation How to install the CD changer •When you install the CD changer, be careful not to damage wiring or equipment on the other side of the mounting surface. •The brackets 1 provide two positions for mounting, high and low. Use the appropriate screw holes according to your preference. Horizontal installation 1 HORIZONTAL Align with the marked position. Alignez sur le repère. Installation du changeur de CD •Quand vous installez le changeur de CD, veillez à ne pas endommager les câbles ou les instruments qui se trouvent de l'autre côté. •Les supports 1 offrent deux positions de montage, haut et bas. Utilisez les trous de vissage appropriés en fonction de vos préférences. Installation horizontale 2 3 2 1 1 ø 3.5 mm (5/32 in.) ø 3,5 mm (5/32 po.) 3 2 Vertical installation 1 VERTICAL Align with the marked position. Alignez sur le repère. Suspended installation 1 ø 3.5 mm (5/32 in.) ø 3,5 mm (5/32 po.) 1 2 HORIZONTAL Align with the marked position. Alignez sur le repère. Installation verticale 2 3 2 1 Installation suspendue 2 1 ø 3.5 mm (5/32 in.) ø 3,5 mm (5/32 po.) 3 2 2 1 3 3 When the unit is to be installed under the rear tray or in the trunk, observe the following. •Choose the mounting location carefully so that the unit can be installed horizontally. •Make sure the unit does not hinder the action of the torsion bar spring, hinge, etc. of the deck lid. Si vous comptez installer le changeur de CD sous la plage arrière ou dans le coffre, prenez les précautions suivantes. • Choisissez soigneusement l'emplacement pour que le changeur soit à l'horizontale. • Assurez-vous que l'appareil n'entrave pas l'action du ressort à barre de torsion, des charnières, etc., du couvercle de la malle. Inclined installation After installing the unit, align the dials with one of the marks so the arrow comes as close to a vertical position as possible. Installation inclinée Après avoir installé l'appareil, alignez les disques sur l'un des repères afin que la flèche soit aussi proche que possible de la position verticale. HORIZONTAL VERTICAL HORIZONTAL HORIZONTAL VERTICAL VERTICAL Note Be sure to align the left and right dials with the same mark. Remarque Veillez à aligner les disques gauche et droite sur le même repère. Installing the wired remote Use the supplied double-sided adhesive tape 4, and mount the wired remote in a suitable location where it will not interfere with your driving. Installation de la télécommande à fil Utilisez la bande à double face adhésive fournie 4 pour installer la télécommande à fil dans un endroit qui ne risque pas de gêner la conduite. 4 The back of the wired remote Dos de la télécommande à fil
-
 1
1 -
 2
2 -
 3
3 -
 4
4
 |
 |