Sony CDX-FW700 Operating Instructions - Page 21
Changing the sound and display settings, — Menu - image
 |
View all Sony CDX-FW700 manuals
Add to My Manuals
Save this manual to your list of manuals |
Page 21 highlights
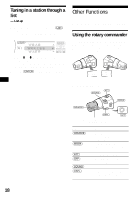
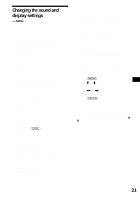
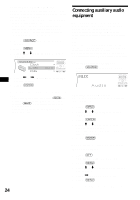
Changing the sound and display settings - Menu The following items can be set: Setup • Clock Adjust (page 10) • Beep - to turn the beeps on or off. • RM (Rotary Commander) - to change the operative direction of the controls of the rotary commander. - Select "Normal" to use the rotary commander at the factory-set position. - Select "Reverse" when you mount the rotary commander on the right side of the steering column. • AUX-A (page 24) - to turn the AUX source display on or off. Display • Clock (Clock Information) - to display the clock and the play mode at the same time (on). • A.IMG (Auto Image) (page 24) - to step through the display images of one or all display modes. • Demo (Demonstration) - to turn the demonstration display on or off. - Select "on" to activate demonstration display. - Select "off" to deactivate the demonstration mode. • Info (Display Information) - to display the display items (depending on the source, etc.) at the bottom of the display while a display image is displayed: - Select "on" to display the display items, and by pressing (DSPL), the display item will change. - Select "off" to not display any display items. • Dimmer - to change the brightness of the display. - Select "Auto" to dim the display only when you turn the lights on. - Select "on" to dim the display. - Select "off" to deactivate the Dimmer. • A.Scroll (Auto Scroll) - Select "on" to scroll automatically displayed names exceeding 12 characters. - When the Auto scroll function is set to "off" and the disc/album/track is changed, the disc/album/track name or ID3 tag does not scroll. Sound • EQ7 Tune (page 22) - to adjust the equalizer curve. • HPF (High pass filter) - to select the cut-off frequency to "78Hz," "125Hz" or "off." • LPF (Low pass filter) - to select the cut-off frequency to "78Hz," "125Hz" or "off." • Loudness - to enjoy bass and treble even at low volumes. The bass and treble will be reinforced. • AUX Level (page 24) - to adjust the volume level of connected auxiliary equipment. Receive Mode • Local on/off (Local seek mode) (page 16) - Select "on" to only tune into stations with stronger signals. • Mono on/off (Monaural mode) (page 16) - Select "on" to hear FM stereo broadcast in monaural. - Select "off" to return to normal mode. • IF Auto/Wide (page 16) 1 Press (MENU). 2 Press M or m repeatedly until the desired item appears. 3 Press < or , to select the desired setting (Example: "on" or "off"). 4 Press (ENTER). After the mode setting is complete, the display returns to normal play mode. Note The displayed item will differ depending on the source. Tip You can easily switch among categories by pressing M or m for 2 seconds. 21
-
 1
1 -
2
-
3
-
4
-
5
-
6
-
7
-
8
-
9
-
10
-
11
-
12
-
13
-
14
-
15
-
 16
16 -
 17
17 -
 18
18 -
 19
19 -
 20
20 -
 21
21 -
 22
22 -
 23
23 -
 24
24 -
 25
25 -
 26
26 -
27
-
28
-
29
-
30
-
31
-
32
-
33
-
34
-
35
-
36
-
37
-
38
-
39
-
40
-
41
-
42
-
43
-
44
-
45
-
46
-
47
-
48
-
49
-
50
-
51
-
52
-
53
-
54
-
55
-
56
-
57
-
58
-
59
-
60
 |
 |