Sony CDX-GT500 Operating Instructions
Sony CDX-GT500 - Fm/am Compact Disc Player Manual
 |
View all Sony CDX-GT500 manuals
Add to My Manuals
Save this manual to your list of manuals |
Sony CDX-GT500 manual content summary:
- Sony CDX-GT500 | Operating Instructions - Page 1
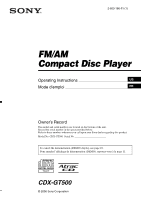
Player Operating Instructions US Mode d'emploi FR Owner's Record The model and serial numbers are located on the bottom of the unit. Record the serial number in the space provided below. Refer to these numbers whenever you call upon your Sony dealer regarding this product. Model No. CDX-GT500 - Sony CDX-GT500 | Operating Instructions - Page 2
control optional CD/MD changers and optional Sony portable devices in addition to playing with this unit. * A CD TEXT disc is a CD-DA that includes information such as disc, artist and track name. For installation and connections, see the supplied installation/connections manual. 2 Warning This - Sony CDX-GT500 | Operating Instructions - Page 3
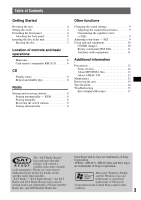
Ejecting the disc 5 Location of controls and basic operations Main unit 6 Card remote commander RM-X151 6 CD Display items 8 Repeat and shuffle play 8 Radio Storing and receiving stations 8 Storing automatically - BTM 8 Storing manually 8 Receiving the stored stations 8 Tuning automatically - Sony CDX-GT500 | Operating Instructions - Page 4
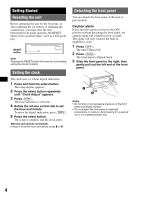
, or after replacing the car battery or changing the connections, you must reset the unit. Detach the front panel remote commander In step 4, to set the hour and minute, press M or m. Detaching the front panel You can detach the front panel of this unit to prevent theft. Caution alarm If you turn - Sony CDX-GT500 | Operating Instructions - Page 5
front panel Place the hole A of the front panel onto the spindle B on the unit, then lightly push the left side in. Press (SOURCE) on the unit (or insert a disc) to operate the unit. Inserting the disc in the unit 1 Press (OPEN). 2 Insert the disc (label side up). A B x 3 Close the front panel - Sony CDX-GT500 | Operating Instructions - Page 6
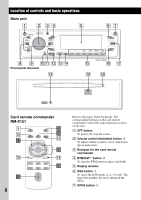
Location of controls and basic operations Main unit Front panel removed qk CDX-GT500 ql w; RESET Card remote commander RM-X151 6 Refer to the pages listed for details. The corresponding buttons on the card remote commander control the same functions as those on the unit. A OFF button To power - Sony CDX-GT500 | Operating Instructions - Page 7
10. *5 When an MD changer is connected. *6 When a CD/MD changer is connected. *7 When playing back on this unit. Note If the unit is turned off and the display disappears, it cannot be operated with the card remote commander unless (SOURCE) on the unit is pressed, or a disc is inserted to activate - Sony CDX-GT500 | Operating Instructions - Page 8
unit receives a station. Repeat this procedure until the desired station is received. Tip If you know the frequency of the station you want to listen to, press and hold (SEEK) -/+ to locate the approximate frequency, then press (SEEK) -/+ repeatedly to fine adjust to the desired frequency (manual - Sony CDX-GT500 | Operating Instructions - Page 9
be adjusted up to 20 steps. *3 When AUX source is activated (page 11). 2 Rotate the volume control dial to adjust the selected item. After 3 seconds, the setting is complete and the display returns to normal play/reception mode. With the card remote commander In step 2, to adjust the selected item - Sony CDX-GT500 | Operating Instructions - Page 10
"off" (z), "125Hz" or " 78Hz." * When the unit is turned off. Using optional equipment CD/MD changer Selecting the changer 1 Press (SOURCE) repeatedly until "CD" or "MD" appears. 10 2 Press (MODE) repeatedly until the desired changer appears. Unit number, MP3 indication*1 LP2/LP4 indication*2 Disc - Sony CDX-GT500 | Operating Instructions - Page 11
MODE DSPL DSPL MODE SEL Location of controls The corresponding buttons on the rotary commander control the same functions as those on this unit. ATT SEL PRESET/ DISC MODE Auxiliary audio equipment You can connect optional Sony portable devices to the BUS AUDIO IN/AUX IN terminal on the unit. - Sony CDX-GT500 | Operating Instructions - Page 12
• Do not subject discs to heat/high temperature. Avoid leaving them in a parked car or on a dashboard/rear tray. • Do not attach labels, or use discs with standard. It compresses audio CD data to approximately 1/22* of its original size. * only for 64 kbps • The unit is compatible with the ISO 9660 - Sony CDX-GT500 | Operating Instructions - Page 13
problems concerning your unit that are not covered in this manual, consult your nearest Sony dealer. Maintenance Replacing the lithium battery of the card remote commander Under normal conditions, the battery will last approximately 1 year. (The service correct polarity when installing the battery. - Sony CDX-GT500 | Operating Instructions - Page 14
keys to remove the protection collar. 2 Remove the unit. 1 Insert both release keys simultaneously until they click. Hook facing inwards. 2 Pull the release keys to unseat the unit. Main unit Back of the front panel Notes • For safety, turn off the ignition before cleaning the connectors, and - Sony CDX-GT500 | Operating Instructions - Page 15
lb 11 oz) Supplied accessories: Card remote commander: RM-X151 Parts for installation and connections (1 set) Optional accessories/equipment: Rotary commander: RM-X4S BUS cable (supplied with an RCA pin cord): RC-61 (1 m), RC-62 (2 m) CD changer (10 discs): CDX-757MX CD changer (6 discs): CDX-T69 MD - Sony CDX-GT500 | Operating Instructions - Page 16
" is set to "off." t Set "Auto Scroll on" (page 10) or press (SCRL). 16 The sound skips. • Installation is not correct. t Install the unit at an angle of less than 45° in a sturdy part of the car. • Defective or dirty disc. The operation buttons do not function. The disc will not eject. Press the - Sony CDX-GT500 | Operating Instructions - Page 17
. *2 The disc number of the disc causing the error appears in the display. If these solutions do not help improve the situation, consult your nearest Sony dealer. If you take the unit to be repaired because of CD playback trouble, bring the disc that was used at the time the problem began. 17 - Sony CDX-GT500 | Operating Instructions - Page 18
CD-DA En ce qui concerne l'installation et les connexions, consulter le manuel d'installation . MP3 WMA CD ATRAC • Réception , même s'ils sont installés dans la partie inférieure . - Mode Space Producer CD/MD en option ou des appareils portables Sony en option. * Un disque CD TEXT est un CD éé Sony le - Sony CDX-GT500 | Operating Instructions - Page 19
l'appareil 4 Réglage de l'horloge 4 Retrait de la façade 4 Installation de la façade 5 Insertion du disque dans le lecteur 5 Éjection de configuration - SET 10 Avec un équipement en option 11 Changeur CD/MD 11 Satellite de commande RM-X4S 12 Raccordement d'appareils audio auxiliaires - Sony CDX-GT500 | Operating Instructions - Page 20
Préparation Réinitialisation de l'appareil Avant la première mise en service de l'appareil, après avoir remplacé la batterie du véhicule ou modifié les raccordements, vous devez réinitialiser l'appareil. Retirez la façade, puis appuyez sur la - Sony CDX-GT500 | Operating Instructions - Page 21
Installation de la façade Placez l'orifice A de la façade sur la tige B de l'appareil, puis poussez doucement sur le côté gauche pour Éjection du disque x 1 Appuyez sur (OPEN). 2 Appuyez sur Z. Le disque est éjecté. 3 Fermez la façade. Remarque Ne posez rien sur la face interne de la façade. 5 - Sony CDX-GT500 | Operating Instructions - Page 22
Emplacement des commandes et opérations de base Appareil principal Sans la façade qk CDX-GT500 ql w; RESET Mini-télécommande RM-X151 6 Pour plus de détails, reportez-vous aux numéros de pages indiqués. Les touches correspondantes de la mini-télécommande pilotent les mêmes fonctions que celles - Sony CDX-GT500 | Operating Instructions - Page 23
source (radio/CD/MD*5/AUX/SAT*1). M Touche MODE 9, 11 Sé Xplod, Vocal, Edge, Cruise, Space, Gravity, Custom ou Off). Q Touche IMAGE 2 Sélection du motif d'affichage. Mode Movie 1-3 t Mode Spectrum analyzer (Analyseur de spectre) 1-5 t Mode Space Producer t Mode Wall paper (Papier peint) 1-3 t Mode - Sony CDX-GT500 | Operating Instructions - Page 24
dans un ordre aléatoire. un disque dans un ordre aléatoire. *1 Lors de la lecture d'un disque MP3/WMA. *2 Lors de la lecture d'un CD ATRAC. Pour revenir au mode de lecture normal, sélectionnez « Repeat off » ou « Shuffle off ». 8 - Sony CDX-GT500 | Operating Instructions - Page 25
d'éviter tout accident. Mémorisation automatique - BTM 1 Appuyez plusieurs fois sur (SOURCE) jusqu'à ce que l'indication « TUNER » apparaisse. Appuyez plusieurs fois sur (MODE) pour changer de bande. Vous pouvez sélectionner FM1, FM2, FM3, AM1 ou AM2. 2 Appuyez sur la touche (BTM) et maintenez-la - Sony CDX-GT500 | Operating Instructions - Page 26
bas et peut être réglé par incréments de 20. *3 Lorsque la source AUX est activée (page 12). 2 Tournez la molette de réglage du volume pour régler la enfoncée. Le réglage est terminé, la fenêtre d'affichage revient au mode de lecture/de réception normal. Remarque Les paramètres affichés varient selon - Sony CDX-GT500 | Operating Instructions - Page 27
les rubriques. AUX-Audio* Pour régler l'affichage de la source AUX à « on désactive le régulateur de luminosité. Demo* (Démonstration) Pour régler le bip CD/MD Sélection du changeur 1 Appuyez plusieurs fois sur (SOURCE) jusqu'à ce que « CD » ou « MD » apparaisse. 2 Appuyez plusieurs fois sur (MODE - Sony CDX-GT500 | Operating Instructions - Page 28
mode de lecture normal, sélectionnez « Repeat off » ou « Shuffle off ». Conseil La fonction « Shuffle All » ne passe pas de façon aléatoire des plages de lecteurs CD aux plages de changeurs MD. Satellite de commande RM-X4S Installation portable Sony en option à la borne BUS AUDIO IN/AUX IN de - Sony CDX-GT500 | Operating Instructions - Page 29
un volume modéré. 4 Réglez votre niveau d'écoute habituel sur l'appareil. 5 Appuyez plusieurs fois sur la touche de sélection jusqu'à ce que « AUX Level » apparaisse, puis tournez la molette de réglage du volume pour régler le niveau d'entrée (± 6 dB). Informations complémentaires Précautions • Si - Sony CDX-GT500 | Operating Instructions - Page 30
le commerce ou des vaporisateurs antistatiques destinés aux disques analogiques. Remarques sur les disques CD-R et CD-RW • En fonction de l'appareil utilis des données de CD audio à environ 1/22* de leur taille d'origine. * uniquement pour 64 kbit/s 14 • L'appareil est compatible avec le format ISO - Sony CDX-GT500 | Operating Instructions - Page 31
le CD ATRAC à l'aide d'un logiciel autorisé SonicStage version 2.0 ou ultérieure, ou SonicStage Simple Burner 1.0 ou 1.1. Si vous avez des questions ou des problèmes concernant cet appareil qui ne sont pas abordés dans ce mode d'emploi, communiquez avec votre détaillant Sony. Entretien Remplacement - Sony CDX-GT500 | Operating Instructions - Page 32
2 Tirez sur les clés de déblocage pour dégager l'appareil. Caractéristiques techniques Lecteur CD Rapport signal/bruit : 120 dB Réponse en fréquence : 10 à 20 000 Hz Borne d'entrée de commande BUS Borne d'entrée audio BUS/AUX IN Borne d'entrée de télécommande Borne d'entrée de l'antenne 3 Faites glisser - Sony CDX-GT500 | Operating Instructions - Page 33
installation et aux raccordements (1 jeu) Accessoires de commande/équipement en option : Satellite de commande : RM-X4S Câble BUS (fourni avec un câble à broche RCA) : RC-61 (1 m), RC-62 (2 m) Changeur CD (10 disques) : CDX-757MX Changeur CD (6 disques) : CDX galiseur compatible avec le système Sony - Sony CDX-GT500 | Operating Instructions - Page 34
sale. • Les CD-R ou CD-RW ne sont pas destinés à un usage audio (page 14). Impossible de lire des fichiers MP3/WMA. Le disque n'est pas compatible SCRL). Le son saute. • L'appareil est mal installé. t Installez l'appareil suivant un angle de moins de • Le réglage du mode de recherche locale est - Sony CDX-GT500 | Operating Instructions - Page 35
t Reportez-vous au guide d'installation de cet appareil et soit terminé. Local Seek +/- Le mode de recherche locale est activé en Insérez un CD audio dans cet appareil ou dans le changeur compatible MP3. NO Sony le plus proche. Read L'appareil lit toutes les informations relatives aux plages et aux - Sony CDX-GT500 | Operating Instructions - Page 36
If you have any questions/problems regarding this product, try the following: 1 Read Troubleshooting in these Operating Instructions. 2 Reset the unit. Note: Stored data may be erased. 3 Please contact (U.S.A. only); Call 1-800-222-7669 URL http://www.SONY.com Sony Corporation Printed in Thailand
-
 1
1 -
 2
2 -
 3
3 -
 4
4 -
 5
5 -
 6
6 -
 7
7 -
8
-
9
-
10
-
11
-
12
-
13
-
14
-
15
-
16
-
17
-
18
-
19
-
20
-
21
-
22
-
23
-
24
-
25
-
26
-
27
-
28
-
29
-
30
-
31
-
32
-
33
-
34
-
35
-
36
 |
 |
Owner’s Record
The model and serial numbers are located on the bottom of the unit.
Record the serial number in the space provided below.
Refer to these numbers whenever you call upon your Sony dealer regarding this product.
Model No. CDX-GT500
Serial No.
CDX-GT500
To cancel the demonstration (DEMO) display, see page 10.
Pour annuler l’affichage de démonstration (DEMO), reportez-vous à la page 11.
Operating Instructions
Mode d’emploi
2-663-186-
11
(1)
US
FR
© 2006 Sony Corporation
FM
/
AM
Compact Disc Player