Sony CDX-H910UI Operating Instructions - Page 9
BACK/MODE button, SELECT/ENTER button - xplod
 |
UPC - 027242746596
View all Sony CDX-H910UI manuals
Add to My Manuals
Save this manual to your list of manuals |
Page 9 highlights
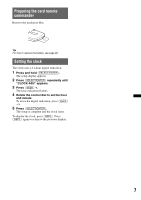
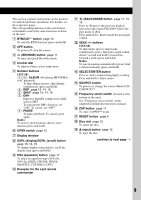
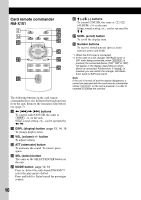
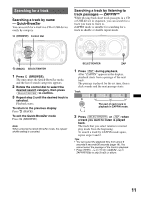
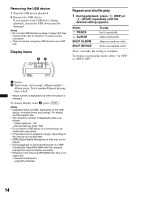
This section contains instructions on the location of controls and basic operations. For details, see the respective pages. The corresponding buttons on the card remote commander control the same functions as those on the unit. A BTM/CAT*1 button page 12 To start the BTM function (press and hold). B OFF button To power off; stop the source. C (BROWSE) button page 11 To enter the Quick-BrowZer mode. D Control dial To adjust volume; select setup items. E Number buttons CD/USB: (1)/(2): ALBUM -/+ (during MP3/WMA/ AAC playback) To skip albums (press); skip albums continuously (press and hold). (3): REP page 13, 14, 16 (4): SHUF page 13, 14, 16 (5): DM+ Improves digitally compressed sound, such as MP3. To activate the DM+ function, set "ON." To cancel, set "OFF." (6): PAUSE To pause playback. To cancel, press again. Radio: To receive stored stations (press); store stations (press and hold). F OPEN switch page 12 G Display window H DSPL (display)/SCRL (scroll) button page 13, 14, 16 To change display items (press); scroll the display item (press and hold). I EQ3 (equalizer) button page 17 To select an equalizer type (XPLOD, VOCAL, EDGE, CRUISE, SPACE, GRAVITY, CUSTOM or OFF). J Receptor for the card remote commander K (BACK)/MODE button page 11, 12, 16 Press to: Return to the previous display/ select the radio band (FM/AM)*2/select the play mode of iPod. Press and hold to: Enter/cancel the passenger control. L SEEK -/+ buttons CD/USB: To skip tracks (press); skip tracks continuously (press, then press again within about 1 second and hold); reverse/fastforward a track (press and hold). Radio: To tune in stations automatically (press); find a station manually (press and hold). M SELECT/ENTER button Press to: Enter sound setting/apply a setting. Press and hold to: Enter menu. N SOURCE button To power on; change the source (Radio/CD/ USB/AUX)*2. O Frequency select switch (located on the bottom of the unit) See "Frequency select switch" in the supplied installation/connections manual. P ZAP button page 11 To enter ZAPPIN™ mode. Q RESET button page 6 R Disc slot page 12 To insert the disc. S Z (eject) button page 12 To eject the disc. continue to next page t 9
-
 1
1 -
2
-
3
-
 4
4 -
 5
5 -
 6
6 -
 7
7 -
 8
8 -
 9
9 -
 10
10 -
 11
11 -
 12
12 -
 13
13 -
 14
14 -
15
-
16
-
17
-
18
-
19
-
20
-
21
-
22
-
23
-
24
-
25
-
26
-
27
-
28
-
29
-
30
-
31
-
32
-
33
-
34
-
35
-
36
-
37
-
38
-
39
-
40
-
41
-
42
-
43
-
44
-
45
-
46
-
47
-
48
-
49
-
50
-
51
-
52
-
53
-
54
-
55
-
56
-
57
-
58
-
59
-
60
-
61
-
62
-
63
-
64
-
65
-
66
-
67
-
68
-
69
-
70
-
71
-
72
-
73
-
74
-
75
-
76
-
77
-
78
-
79
-
80
-
81
-
82
-
83
-
84
-
85
-
86
-
87
-
88
-
89
-
90
-
91
-
92
-
93
-
94
-
95
-
96
-
97
-
98
-
99
-
100
-
101
-
102
-
103
-
104
-
105
-
106
-
107
-
108
-
109
-
110
-
111
-
112
-
113
-
114
-
115
-
116
-
117
-
118
-
119
-
120
-
121
-
122
-
123
-
124
-
125
-
126
-
127
-
128
-
129
-
130
-
131
-
132
 |
 |