Sony CDX-M30 Operating Instructions - Page 17
Using optional equipment, Auxiliary audio equipment - stereo
 |
UPC - 027242718739
View all Sony CDX-M30 manuals
Add to My Manuals
Save this manual to your list of manuals |
Page 17 highlights
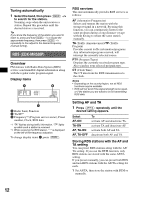
M.DSPL (Motion Display) To select the Motion Display mode. - "M.DSPL-SA" (z): to show moving patterns and spectrum analyzer. - "M.DSPL-ON": to show moving patterns. - "M.DSPL-OFF": to deactivate the Motion Display. A.SCRL (Auto Scroll) To scroll long displayed item automatically when the disc/album/track is changed. - "A.SCRL-ON" (z): to scroll. - "A.SCRL-OFF": to not scroll. LOCAL (Local Seek Mode) - "LOCAL-ON" : to only tune into stations with stronger signals. - "LOCAL-OFF" (z): to tune normal reception. MONO*3 (Monaural Mode) To improve poor FM reception, select monaural reception mode. - "MONO-ON" : to hear stereo broadcast in monaural. - "MONO-OFF" (z): to hear stereo broadcast in stereo. REG*1*3 (Regional) To set "REG-ON" (z) or "REG-OFF" (page 13). LPF*4 (Low Pass Filter) To select the subwoofer cut-off frequency: "LPF OFF" (z), "LPF125Hz" or "LPF 78Hz." LOUD (Loudness) To allow you to listen clearly at low volume levels. - "LOUD-ON" : to reinforce bass and treble. - "LOUD-OFF" (z): to not reinforce bass and treble. BTM (page 11) *1 CDX-MR50IP only *2 When the unit is turned off. *3 When FM is received. *4 When the audio output is set to "SUB." Using optional equipment Auxiliary audio equipment By connecting an optional portable audio device to the AUX input jack (stereo mini jack) on the unit and then simply selecting the source, you can listen on your boat's speakers. The volume level is adjustable for any difference between the unit and the portable audio device. Follow the procedure below: Connecting the portable audio device 1 Turn off the portable audio device. 2 Turn down the volume on the unit. 3 Connect to the unit. AUX AUX Connecting cord* (not supplied) * Be sure to use a straight type plug. Adjust the volume level Be sure to adjust the volume for each connected audio device before playback. 1 Turn down the volume on the unit. 2 Press (SOURCE) repeatedly until "AUX" appears. "AUX FRONT IN" appears. 3 Start playback of the portable audio device at a moderate volume. 4 Set your usual listening volume on the unit. 5 Adjust the input level (page 15). 17
-
 1
1 -
2
-
3
-
4
-
5
-
6
-
7
-
8
-
9
-
10
-
11
-
 12
12 -
 13
13 -
 14
14 -
 15
15 -
 16
16 -
 17
17 -
 18
18 -
 19
19 -
 20
20 -
 21
21 -
 22
22 -
23
-
24
-
25
-
26
-
27
-
28
-
29
-
30
-
31
-
32
-
33
-
34
-
35
-
36
-
37
-
38
-
39
-
40
-
41
-
42
-
43
-
44
-
45
-
46
-
47
-
48
-
49
-
50
-
51
-
52
-
53
-
54
-
55
-
56
-
57
-
58
-
59
-
60
-
61
-
62
-
63
-
64
-
65
-
66
-
67
-
68
-
69
-
70
-
71
-
72
-
73
-
74
-
75
-
76
-
77
-
78
-
79
-
80
-
81
-
82
-
83
-
84
-
85
-
86
-
87
-
88
-
89
-
90
-
91
-
92
-
93
-
94
-
95
-
96
-
97
-
98
-
99
-
100
-
101
-
102
-
103
-
104
-
105
-
106
-
107
-
108
-
109
-
110
-
111
-
112
-
113
-
114
-
115
-
116
-
117
-
118
-
119
-
120
-
121
-
122
-
123
-
124
-
125
-
126
-
127
-
128
-
129
-
130
-
131
-
132
-
133
-
134
-
135
-
136
-
137
-
138
-
139
-
140
-
141
-
142
-
143
-
144
-
145
-
146
-
147
-
148
 |
 |
