Sony CDX-M30 Operating Instructions - Page 9
BTM/CAT button CDX-M50IP/M30, Program Type button CDX-MR50IP - cd changer manual
 |
UPC - 027242718739
View all Sony CDX-M30 manuals
Add to My Manuals
Save this manual to your list of manuals |
Page 9 highlights
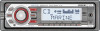
This section contains instructions on the location of controls and basic operations. For details, see the respective pages. For iPod operation, see "iPod (CDX-M50IP/ MR50IP)" on page 14, or for optional device (CD/MD changer, etc.,) operation, see "Using optional equipment" on page 17. The corresponding buttons on the card remote commander control the same functions as those on the unit. A OFF button To power off; stop the source. B Volume control dial/select button page 15 To adjust volume (rotate); select setup items (press and rotate). C SOURCE button To power on; change the source (Radio/CD/ AUX/PD*1)*2. D Display window E AUX input jack page 17 To connect a portable audio device. F OPEN button page 7 G ALBM +/- buttons (during MP3/WMA/ AAC playback) To skip albums (press); skip albums continuously (press and hold). H Receptor for the card remote commander I SEEK -/+ buttons CD/PD*1: To skip tracks (press); skip tracks continuously (press, then press again within about 1 second and hold); reverse/fastforward a track (press and hold). Radio: To tune in stations automatically (press); find a station manually (press and hold). J MODE button page 11 To select the radio band*2; select the play mode of iPod*1. K BTM/CAT button (CDX-M50IP/M30) page 11 To start the BTM function (press and hold). AF (Alternative Frequencies)/TA (Traffic Announcement)/PTY (Program Type) button (CDX-MR50IP) page 12 To set AF and TA (press); select PTY (press and hold) in RDS. L Frequency select switch (CDX-M50IP/ M30 only) (located on the bottom of the unit) See "Frequency select switch" in the supplied installation/connections manual. M Number buttons CD/PD*1: (3): REP page 11 (4): SHUF page 11 (6): PAUSE To pause playback of a CD on this unit. To cancel, press again. Radio: To receive stored stations (press); store stations (press and hold). N DSPL (display)/SCRL (scroll) button page 11 To change display items (press); scroll the display item (press and hold). O RESET button page 6 P Z (eject) button page 7 To eject the disc. Q Disc slot page 7 To insert the disc. continue to next page t 9
-
 1
1 -
2
-
3
-
 4
4 -
 5
5 -
 6
6 -
 7
7 -
 8
8 -
 9
9 -
 10
10 -
 11
11 -
 12
12 -
 13
13 -
 14
14 -
15
-
16
-
17
-
18
-
19
-
20
-
21
-
22
-
23
-
24
-
25
-
26
-
27
-
28
-
29
-
30
-
31
-
32
-
33
-
34
-
35
-
36
-
37
-
38
-
39
-
40
-
41
-
42
-
43
-
44
-
45
-
46
-
47
-
48
-
49
-
50
-
51
-
52
-
53
-
54
-
55
-
56
-
57
-
58
-
59
-
60
-
61
-
62
-
63
-
64
-
65
-
66
-
67
-
68
-
69
-
70
-
71
-
72
-
73
-
74
-
75
-
76
-
77
-
78
-
79
-
80
-
81
-
82
-
83
-
84
-
85
-
86
-
87
-
88
-
89
-
90
-
91
-
92
-
93
-
94
-
95
-
96
-
97
-
98
-
99
-
100
-
101
-
102
-
103
-
104
-
105
-
106
-
107
-
108
-
109
-
110
-
111
-
112
-
113
-
114
-
115
-
116
-
117
-
118
-
119
-
120
-
121
-
122
-
123
-
124
-
125
-
126
-
127
-
128
-
129
-
130
-
131
-
132
-
133
-
134
-
135
-
136
-
137
-
138
-
139
-
140
-
141
-
142
-
143
-
144
-
145
-
146
-
147
-
148
 |
 |
