Sony DAV-DZ100 Operating Instructions - Page 24
Step 4: Other Component Hookup, Connecting the system and the other component - satellite receiver
 |
View all Sony DAV-DZ100 manuals
Add to My Manuals
Save this manual to your list of manuals |
Page 24 highlights
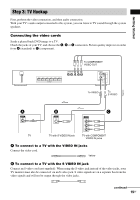
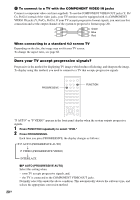
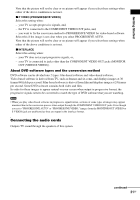
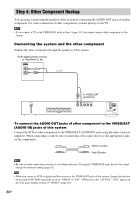
Step 4: Other Component Hookup You can enjoy sound using the speakers of this system by connecting the AUDIO OUT jacks of another component. For video connection of other components, connect directly to the TV. Note • If you connect a TV to the VIDEO/SAT jacks in Step 3 (page 19), you cannot connect other components to the system. Connecting the system and the other component Outputs the other component through the speakers of this system. VCR, digital satellite receiver, or PlayStation 2, etc. AUDIO OUT L R FRONT R FRONT L SURR R SURR L CENTER WOOFER SPEAKER To VIDEO/SAT (AUDIO IN) VIDEO/SAT R AUDIO IN L COMPONENT VIDEO OUT DVD ONLY Y PB/CB PR/CR S VIDEO (DVD ONLY) AM VIDEO MONITOR OUT COAXIAL FM 75 To connect the AUDIO OUT jacks of other component to the VIDEO/SAT (AUDIO IN) jacks of this system Connect the VCR or other components to the VIDEO/SAT (AUDIO IN) jacks using the audio cord (not supplied). When connecting a cord, be sure to match the color-coded sleeves to the appropriate jacks on the components. White (L/audio) Red (R/audio) Note • Be sure to make connections securely to avoid hum and noise. If using the VIDEO/SAT jacks distorts the sound, change the attenuate setting (page 62). Tip • When you connect a VCR or digital satellite receiver to the VIDEO/SAT jacks of this system, change the function by pressing FUNCTION repeatedly to select "VIDEO" or "SAT." (When you select "ATT ON," "SAT" appears in the front panel display instead of "VIDEO." (page 62)) 24GB
-
 1
1 -
2
-
3
-
4
-
5
-
6
-
7
-
8
-
9
-
10
-
11
-
12
-
13
-
14
-
15
-
16
-
17
-
18
-
 19
19 -
 20
20 -
 21
21 -
 22
22 -
 23
23 -
 24
24 -
 25
25 -
 26
26 -
 27
27 -
 28
28 -
 29
29 -
30
-
31
-
32
-
33
-
34
-
35
-
36
-
37
-
38
-
39
-
40
-
41
-
42
-
43
-
44
-
45
-
46
-
47
-
48
-
49
-
50
-
51
-
52
-
53
-
54
-
55
-
56
-
57
-
58
-
59
-
60
-
61
-
62
-
63
-
64
-
65
-
66
-
67
-
68
-
69
-
70
-
71
-
72
-
73
-
74
-
75
-
76
-
77
-
78
-
79
-
80
-
81
-
82
-
83
-
84
-
85
-
86
-
87
-
88
-
89
-
90
-
91
-
92
 |
 |
