Sony DCR-IP1 Computer Applications Guide - Page 32
Step 2: Connecting your camcorder to a computer - mac
 |
UPC - 027242637665
View all Sony DCR-IP1 manuals
Add to My Manuals
Save this manual to your list of manuals |
Page 32 highlights
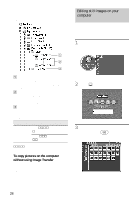
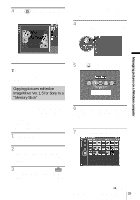
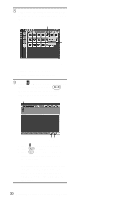
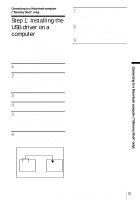
Step 2: Connecting your camcorder to a computer You must have the USB driver installed on your computer before starting the following operation (p. 31). However, the installation is not required for Mac OS 9.1/9.2 or Mac OS X (v10.0/v10.1/v10.2). 1 Insert the "Memory Stick" into your camcorder. 2 Prepare the power source for your camcorder, then slide the POWER switch repeatedly to select the PLAY/ EDIT mode. Use the supplied AC Adaptor as the power source. For details, refer to the separate Camera Operations Guide supplied with your camcorder. 3 Touch [P-MENU], [MENU], [ (STANDARD SET)] and [USB-PLY/ EDT], then touch to select [STD-USB]. For details, refer to the separate Camera Operations Guide supplied with your camcorder. 4 Connect the USB cable (supplied) to the USB jack on your camcorder. The location of the USB jack varies depending on the model. Refer to the separate Camera Operations Guide supplied with your camcorder for the location. For the model that is supplied with the Handycam Station, connect the USB cable to the USB jack on the Handycam Station, then set the USB ON/OFF switch to ON. b Note • When you connect your camcorder to a computer, make sure you insert the connector in the correct direction. If you insert the connector forcibly, it may be damaged, and causes a malfunction of your camcorder. 5 Connect the other end of the USB cable to the USB jack on your computer. [USB MODE] appears on the LCD screen of your camcorder, and a "Memory Stick" icon appears on the desktop. For details on connecting your camcorder to a computer, see "Connecting with the USB cable (supplied)" (p. 14). To disconnect the USB cable/ To turn off the camcorder/To eject the "Memory Stick" For Mac OS X (v10.0) Turn off your computer, disconnect the USB cable, then remove the "Memory Stick" from the camcorder. For Mac OS 8.5.1/8.6/9.0/9.1/9.2 or Mac OS X (v10.1/v10.2) 1 Quit all applications running on the computer. 2 Drag and drop the "Memory Stick" or drive icon on the desktop onto the [Trash] icon. 32 Connecting to a Macintosh computer ("Memory Stick" only)
-
 1
1 -
2
-
3
-
4
-
5
-
6
-
7
-
8
-
9
-
10
-
11
-
12
-
13
-
14
-
15
-
16
-
17
-
18
-
19
-
20
-
21
-
22
-
23
-
24
-
25
-
26
-
 27
27 -
 28
28 -
 29
29 -
 30
30 -
 31
31 -
 32
32 -
 33
33 -
 34
34 -
 35
35 -
 36
36 -
 37
37 -
38
-
39
-
40
-
41
-
42
-
43
-
44
-
45
-
46
-
47
-
48
 |
 |