Sony DCR-IP1 Computer Applications Guide - Page 38
Capture using DV Cam.] in [DVC, STANDARD SET]and [A/V
 |
UPC - 027242637665
View all Sony DCR-IP1 manuals
Add to My Manuals
Save this manual to your list of manuals |
Page 38 highlights
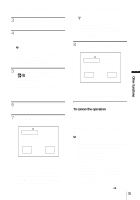
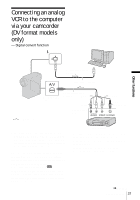
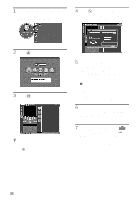
1 Start up the computer, and double- click [ImageMixer Ver.1.5 for Sony] displayed on the desktop. 4 Click (Preference), check [Capture using DV Cam.] in [DVC Capture settings], then click [OK]. 2 Click (Capture Environment). 3 Click (DV Camcorder Capture Mode). z Tip • You can also use the USB cable to connect your camcorder and computer for converting signals. Click (USB Device Capture Mode) in this case. 5 Connect your camcorder to the computer using an i.LINK cable (optional), then connect it to a VCR (analog equipment) using the A/V connecting cable (supplied). b Note • When you connect your camcorder to a computer, make sure you insert the connector in the correct direction. If you insert the connector forcibly, it may be damaged, and causes a malfunction of your camcorder. 6 Prepare the power source for your camcorder, then slide the POWER switch repeatedly to select the PLAY/ EDIT mode. 7 Touch [P-MENU], [MENU], [ (STANDARD SET)]and [A/VtDV OUT], then touch to select [ON]. For details, refer to the separate Camera Operations Guide supplied with your camcorder. 38 Other functions
-
 1
1 -
2
-
3
-
4
-
5
-
6
-
7
-
8
-
9
-
10
-
11
-
12
-
13
-
14
-
15
-
16
-
17
-
18
-
19
-
20
-
21
-
22
-
23
-
24
-
25
-
26
-
27
-
28
-
29
-
30
-
31
-
32
-
 33
33 -
 34
34 -
 35
35 -
 36
36 -
 37
37 -
 38
38 -
 39
39 -
 40
40 -
 41
41 -
 42
42 -
 43
43 -
44
-
45
-
46
-
47
-
48
 |
 |
