Sony DCR-PC350 Camera Operations Guide - Page 29
Recording in mirror mode, Using the self-timer
 |
View all Sony DCR-PC350 manuals
Add to My Manuals
Save this manual to your list of manuals |
Page 29 highlights
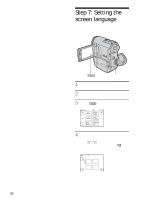
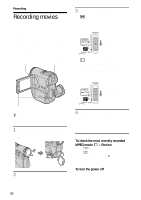
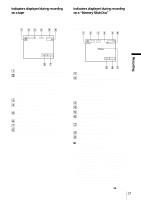
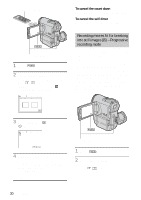
Recording Recording in mirror mode 1 cm (approx. 1/2 inch)* You can turn the LCD panel towards the subject so that you and your subject can share the image being recorded. You can also utilize this function when recording yourself, to keep the attention of small children attracted to the camcorder while you record them. 80 cm (approx. 2 5/8 feet)* * The minimum distance required between your camcorder and the subject to get a sharp focus in that position of the lever. Move the power zoom lever slightly for a slower zoom. Move it further for a faster zoom. To record wider range of view Move the power zoom lever towards W. The subject appears farther away (Wide angle). To record closer view Move the power zoom lever towards T. The subject appears closer (Telephoto). To use the zoom buttons on LCD frame Keep W pressed to record wider range of view, and keep T pressed to record closer view. b Note • You cannot change the zoom speed with the zoom buttons on LCD frame. • To press the zoom buttons on LCD frame, support the LCD panel with your hand. Open the LCD panel 90 degrees to the camcorder, then rotate it 180 degrees towards the subject. A mirror-image of the subject appears on the LCD screen, but the picture will be normal when recorded. Using the self-timer With the self-timer, you can start recording after a delay of about 10 seconds. ,continued Recording 29
-
 1
1 -
2
-
3
-
4
-
5
-
6
-
7
-
8
-
9
-
10
-
11
-
12
-
13
-
14
-
15
-
16
-
17
-
18
-
19
-
20
-
21
-
22
-
23
-
 24
24 -
 25
25 -
 26
26 -
 27
27 -
 28
28 -
 29
29 -
 30
30 -
 31
31 -
 32
32 -
 33
33 -
 34
34 -
35
-
36
-
37
-
38
-
39
-
40
-
41
-
42
-
43
-
44
-
45
-
46
-
47
-
48
-
49
-
50
-
51
-
52
-
53
-
54
-
55
-
56
-
57
-
58
-
59
-
60
-
61
-
62
-
63
-
64
-
65
-
66
-
67
-
68
-
69
-
70
-
71
-
72
-
73
-
74
-
75
-
76
-
77
-
78
-
79
-
80
-
81
-
82
-
83
-
84
-
85
-
86
-
87
-
88
-
89
-
90
-
91
-
92
-
93
-
94
-
95
-
96
-
97
-
98
-
99
-
100
-
101
-
102
-
103
-
104
-
105
-
106
-
107
-
108
-
109
-
110
-
111
-
112
-
113
-
114
-
115
-
116
-
117
-
118
-
119
-
120
-
121
-
122
-
123
-
124
-
125
-
126
-
127
-
128
-
129
-
130
-
131
-
132
-
133
-
134
-
135
-
136
-
137
-
138
-
139
-
140
-
141
-
142
-
143
-
144
-
145
-
146
-
147
-
148
-
149
-
150
-
151
-
152
 |
 |
