Sony DCR-SR65 Handycam® Handbook - Page 34
Playing the image on a TV - handycam camcorder manual
 |
View all Sony DCR-SR65 manuals
Add to My Manuals
Save this manual to your list of manuals |
Page 34 highlights
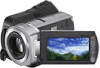
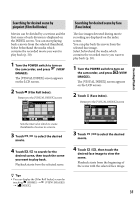
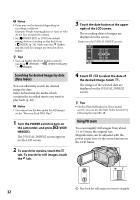
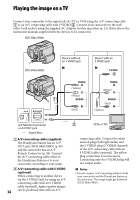
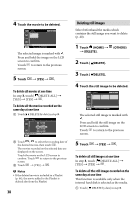
Playing the image on a TV Connect your camcorder to the input jack of a TV or VCR using the A/V connecting cable or an A/V connecting cable with S VIDEO . Connect your camcorder to the wall outlet (wall socket) using the supplied AC Adaptor for this operation (p. 13). Refer also to the instruction manuals supplied with the devices to be connected. DCR-SR45/SR46: DCR-SR65/SR85: Device without an S VIDEO jack Device with an S VIDEO jack (Yellow) (White) (Red) (White) (Red) (Yellow) A/V Remote Connector or A/V OUT jack : Signal flow A/V connecting cable (supplied) The Handycam Station has an A/V OUT jack (DCR-SR65/SR85) (p. 99) and the camcorder has an A/V Remote Connector (p. 96). Connect the A/V connecting cable either to the Handycam Station or to your camcorder, according to your setup. A/V connecting cable with S VIDEO (optional) When connecting to another device via the S VIDEO jack, by using an A/V connecting cable with an S VIDEO cable (optional), higher quality images 34 can be produced than with an A/V VCRs or TVs connecting cable. Connect the white and red plugs (left/right audio) and the S VIDEO plug (S VIDEO channel) of the A/V connecting cable with an S VIDEO cable (optional). The yellow plug connection is not necessary. Connecting only the S VIDEO plug will not output audio. Notes Do not connect A/V connecting cables to both your camcorder and the Handycam Station at the same time. The image might get disturbed (DCR-SR65/SR85).
-
 1
1 -
2
-
3
-
4
-
5
-
6
-
7
-
8
-
9
-
10
-
11
-
12
-
13
-
14
-
15
-
16
-
17
-
18
-
19
-
20
-
21
-
22
-
23
-
24
-
25
-
26
-
27
-
28
-
 29
29 -
 30
30 -
 31
31 -
 32
32 -
 33
33 -
 34
34 -
 35
35 -
 36
36 -
 37
37 -
 38
38 -
 39
39 -
40
-
41
-
42
-
43
-
44
-
45
-
46
-
47
-
48
-
49
-
50
-
51
-
52
-
53
-
54
-
55
-
56
-
57
-
58
-
59
-
60
-
61
-
62
-
63
-
64
-
65
-
66
-
67
-
68
-
69
-
70
-
71
-
72
-
73
-
74
-
75
-
76
-
77
-
78
-
79
-
80
-
81
-
82
-
83
-
84
-
85
-
86
-
87
-
88
-
89
-
90
-
91
-
92
-
93
-
94
-
95
-
96
-
97
-
98
-
99
-
100
-
101
-
102
-
103
-
104
-
105
-
106
-
107
-
108
 |
 |
