Sony DCR-TRV6 Operating Instructions - Page 55
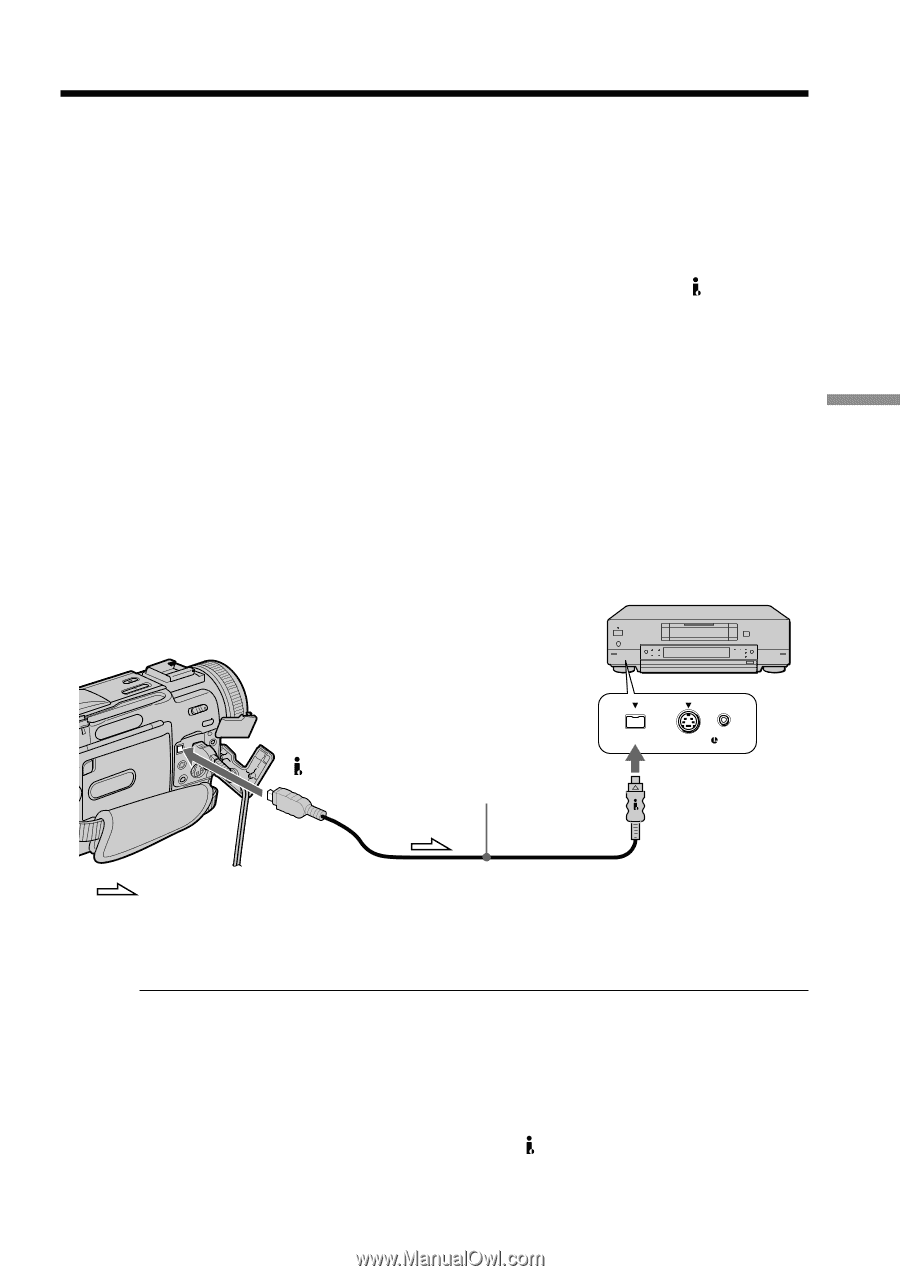
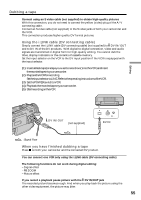
Using the i.LINK cable DV connecting cable, When you have finished dubbing a tape, DV IN/OUT jack
 |
View all Sony DCR-TRV6 manuals
Add to My Manuals
Save this manual to your list of manuals |
Page 55 highlights
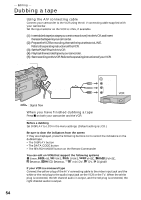
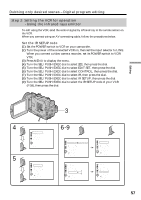
Dubbing a tape Connect using an S video cable (not supplied) to obtain high-quality pictures With this connection, you do not need to connect the yellow (video) plug of the A/V connecting cable. Connect an S video cable (not supplied) to the S video jacks of both your camcorder and the VCR. This connection produces higher quality DV format pictures. Using the i.LINK cable (DV connecting cable) Simply connect the i.LINK cable (DV connecting cable) (not supplied) to DV IN/OUT and to DV IN of the DV products. With digital-to-digital connection, video and audio signals are transmitted in digital form for high-quality editing. You cannot dub the titles, display indicators or the contents of cassette memory. Set the input selector on the VCR to the DV input position if the VCR is equipped with the input selector. (1) Insertablanktape(oratapeyouwanttorecordover)intotheVCR,andinsert the recorded tape into your camcorder. (2) PreparetheVCRforrecording. Set the input selector to LINE. Refer to the operating instructions of the VCR. (3) SetthePOWERswitchtoVCR. (4) Playbacktherecordedtapeonyourcamcorder. (5) StartrecordingontheVCR. Editing DV IN/OUT (not supplied) DV S VIDEO LANC DV IN : Signal flow When you have finished dubbing a tape Press x on both your camcorder and the connected DV product. You can connect one VCR only using the i.LINK cable (DV connecting cable) The following functions do not work during digital editing: - Digital effect - PB ZOOM - Picture effect If you record a playback pause picture with the DV IN/OUT jack The recorded picture becomes rough. And when you play back the picture using the other video equipment, the picture may jitter. 55
-
 1
1 -
2
-
3
-
4
-
5
-
6
-
7
-
8
-
9
-
10
-
11
-
12
-
13
-
14
-
15
-
16
-
17
-
18
-
19
-
20
-
21
-
22
-
23
-
24
-
25
-
26
-
27
-
28
-
29
-
30
-
31
-
32
-
33
-
34
-
35
-
36
-
37
-
38
-
39
-
40
-
41
-
42
-
43
-
44
-
45
-
46
-
47
-
48
-
49
-
 50
50 -
 51
51 -
 52
52 -
 53
53 -
 54
54 -
 55
55 -
 56
56 -
 57
57 -
 58
58 -
 59
59 -
 60
60 -
61
-
62
-
63
-
64
-
65
-
66
-
67
-
68
-
69
-
70
-
71
-
72
-
73
-
74
-
75
-
76
-
77
-
78
-
79
-
80
-
81
-
82
-
83
-
84
-
85
-
86
-
87
-
88
-
89
-
90
-
91
-
92
-
93
-
94
-
95
-
96
-
97
-
98
-
99
-
100
-
101
-
102
-
103
-
104
-
105
-
106
-
107
-
108
-
109
-
110
-
111
-
112
-
113
-
114
-
115
-
116
-
117
-
118
-
119
-
120
-
121
-
122
-
123
-
124
-
125
-
126
-
127
-
128
-
129
-
130
-
131
-
132
-
133
-
134
-
135
-
136
-
137
-
138
-
139
-
140
-
141
-
142
-
143
-
144
-
145
-
146
-
147
-
148
-
149
-
150
-
151
-
152
 |
 |