Sony DSC H10B Instruction Manual - Page 16
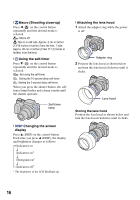
Macro Shooting close-up, Using the self-timer, Changing the screen, display, Attaching the lens hood
 |
UPC - 027242739871
View all Sony DSC H10B manuals
Add to My Manuals
Save this manual to your list of manuals |
Page 16 highlights
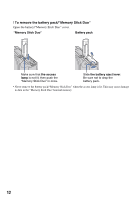
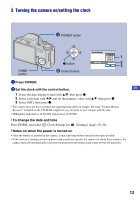
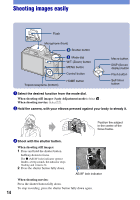
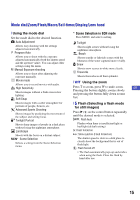
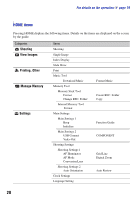
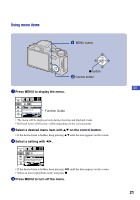
[ Macro (Shooting close-up) Press b ( ) on the control button repeatedly until the desired mode is selected. : Macro off : Macro on (W side: Approx. 2 cm or farther (13/16 inches or farther) from the lens, T side: Approx. 90 cm or farther (2 feet 11 1/2 inches or farther) from the lens) [ Using the self-timer Press V ( ) on the control button repeatedly until the desired mode is selected. : Not using the self-timer : Setting the 10-second delay self-timer : Setting the 2-second delay self-timer When you press the shutter button, the selftimer lamp flashes and a beep sounds until the shutter operates. Self-timer lamp [ DISP Changing the screen display Press v (DISP) on the control button. Each time you press v (DISP), the display and brightness changes as follows: Indicators on r Indicators on* r Histogram on* r Indicators off* * The brightness of the LCD Backlight up. [ Attaching the lens hood 1 Attach the adaptor ring while the power is off. Adaptor ring 2 Position the lens hood as shown below and turn the lens hood clockwise until it clicks. Lens hood Storing the lens hood Position the lens hood as shown below and turn the lens hood clockwise until it clicks. 16
-
 1
1 -
2
-
3
-
4
-
5
-
6
-
7
-
8
-
9
-
10
-
 11
11 -
 12
12 -
 13
13 -
 14
14 -
 15
15 -
 16
16 -
 17
17 -
 18
18 -
 19
19 -
 20
20 -
 21
21 -
22
-
23
-
24
-
25
-
26
-
27
-
28
-
29
-
30
-
31
-
32
-
33
-
34
-
35
-
36
-
37
-
38
-
39
-
40
-
41
-
42
-
43
-
44
-
45
-
46
-
47
-
48
-
49
-
50
-
51
-
52
-
53
-
54
-
55
-
56
-
57
-
58
-
59
-
60
-
61
-
62
-
63
-
64
-
65
-
66
-
67
-
68
 |
 |
