Sony DSC H10B Instruction Manual - Page 18
To view an index screen, To delete images in index mode, To play back a series of images Slide Show - h series -
 |
UPC - 027242739871
View all Sony DSC H10B manuals
Add to My Manuals
Save this manual to your list of manuals |
Page 18 highlights
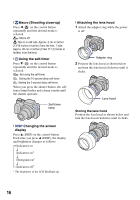
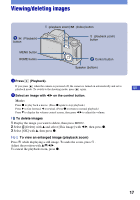
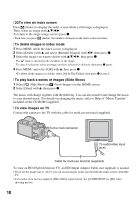
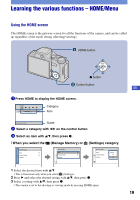
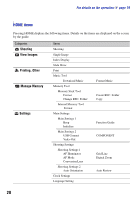
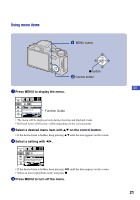
[ To view an index screen Press (Index) to display the index screen while a still image is displayed. Then, select an image with v/V/b/B. To return to the single image screen, press z. • Each time you press (Index), the number of images on the index screen increases. [ To delete images in index mode 1 Press MENU while the index screen is displayed. 2 Select [Delete] with v and select [Multiple Images] with b/B, then press z. 3 Select the image you want to delete with v/V/b/B, then press z. The mark is checked in the checkbox of the image. To cancel a selection, select an image you have selected for deletion, then press z again. 4 Press MENU and select [OK] with v, then press z. •To delete all the images in a folder, select [All In This Folder], then press z in step 2. [ To play back a series of images (Slide Show) 1 Select [ Slide Show] in (View Images) on the HOME screen. 2 Select [Start] with v, then press z. The music will change together with the [Effects]. You can also transfer and change the music to your desired music. For details on changing the music, refer to Help of "Music Transfer" included on the CD-ROM (supplied). [ To view images on TV Connect the camera to the TV with the cable for multi-use terminal (supplied). To the multi connector To audio/video input jacks Cable for multi-use terminal (supplied) To view on HD (High Definition) TV, an HD Output Adaptor Cable (not supplied) is needed. • If you set the image size to [16:9], you can record images in the size that fills the entire screen of the HD TV. • You cannot view movies output in [HD (1080i)] signal format. Set [COMPONENT] to [SD] when shooting movies. 18
-
 1
1 -
2
-
3
-
4
-
5
-
6
-
7
-
8
-
9
-
10
-
11
-
12
-
 13
13 -
 14
14 -
 15
15 -
 16
16 -
 17
17 -
 18
18 -
 19
19 -
 20
20 -
 21
21 -
 22
22 -
 23
23 -
24
-
25
-
26
-
27
-
28
-
29
-
30
-
31
-
32
-
33
-
34
-
35
-
36
-
37
-
38
-
39
-
40
-
41
-
42
-
43
-
44
-
45
-
46
-
47
-
48
-
49
-
50
-
51
-
52
-
53
-
54
-
55
-
56
-
57
-
58
-
59
-
60
-
61
-
62
-
63
-
64
-
65
-
66
-
67
-
68
 |
 |
