Sony DSC S70 Operating Instructions - Page 17
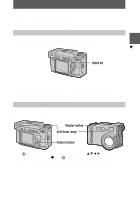
Finder adjustment, LCD ON/OFF, Recording lamp, AE lock lamp, Strobe charge lamp - digital camera
 |
UPC - 027242571433
View all Sony DSC S70 manuals
Add to My Manuals
Save this manual to your list of manuals |
Page 17 highlights
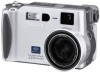
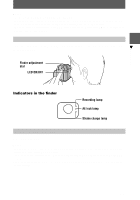
B Recording Notes • Do not touch the lens portion while it is operating. • While the image is being recorded on the "Memory Stick," do not shake or strike the camera. Also, do not turn the power off, or remove the battery pack or "Memory Stick." • When recording a bright subject, the LCD screen color may change after AE lock, but this does not affect the recorded image. Recording images with the finder Turn the finder adjustment dial until the image appears clearly within the finder, then record the image. Finder adjustment dial LCD ON/OFF Indicators in the finder Recording lamp AE lock lamp Strobe charge lamp To turn off the LCD screen Press LCD ON/OFF. Notes • When you record a subject closer than 3 1/4 feet (1 m), the positions of the finder and the lens differ, so record using the LCD screen. • You cannot view digitally zoomed images with the finder. Check these images using the LCD screen. • You cannot turn off the LCD screen when [DEMO] or [CONVERSION] are set to [ON] in the menu settings. 17
-
 1
1 -
2
-
3
-
4
-
5
-
6
-
7
-
8
-
9
-
10
-
11
-
 12
12 -
 13
13 -
 14
14 -
 15
15 -
 16
16 -
 17
17 -
 18
18 -
 19
19 -
 20
20 -
 21
21 -
 22
22 -
23
-
24
-
25
-
26
-
27
-
28
-
29
-
30
-
31
-
32
-
33
-
34
-
35
-
36
-
37
-
38
-
39
-
40
-
41
-
42
-
43
-
44
-
45
-
46
-
47
-
48
-
49
-
50
-
51
-
52
-
53
-
54
-
55
-
56
-
57
-
58
-
59
-
60
-
61
-
62
-
63
-
64
-
65
-
66
-
67
-
68
 |
 |