Sony HDR CX100 Operating Guide - Page 42
Making good use of your camcorder, Deleting movies and photos - memory stick
 |
UPC - 027242765023
View all Sony HDR CX100 manuals
Add to My Manuals
Save this manual to your list of manuals |
Page 42 highlights
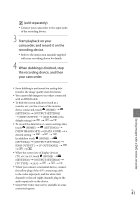
Making good use of your camcorder Deleting movies and photos You can free media space by deleting movies and photos from recording media. Select the recording medium that contains the movies and photos you want to delete before starting the operation (p. 43). For movies, select the image quality (p. 48). 1 Touch (HOME) [DELETE]. (OTHERS) Formatting the recording media Formatting deletes all the movies and photos to recover recordable free space. Connect your camcorder to the wall outlet (wall socket) using the AC Adaptor supplied for this operation (p. 14). To avoid the loss of important images, you should save them (p. 26) before formatting the recording media. Protected movies and photos will also be deleted. 2 To delete movies, touch [ DELETE] [ DELETE] or [ DELETE]. Touch (HOME) (MANAGE MEDIA) [MEDIA FORMAT]. To delete photos, touch [ DELETE] [ DELETE]. 3 Touch and display the mark on the movies or photos to be deleted. Touch the recording media to be formatted ([INT. MEMORY] or [MEMORY STICK]). Touch [YES] [YES] . 4 Touch [YES] . While [Executing...] is displayed, do not close the LCD screen, oprate the buttons on the camcorder, disconnect the AC Adaptor, or eject the "Memory Stick PRO Duo" media from your camcorder. (The access lamp is lit or flashing while formatting the medium.) To delete all movies at one time In step 2, touch [ DELETE] [ DELETE ALL]/[ DELETE ALL] [YES] [YES] . To delete all photos at one time In step 2, touch [ DELETE] [ DELETE ALL] [YES] [YES] . US 42
-
 1
1 -
2
-
3
-
4
-
5
-
6
-
7
-
8
-
9
-
10
-
11
-
12
-
13
-
14
-
15
-
16
-
17
-
18
-
19
-
20
-
21
-
22
-
23
-
24
-
25
-
26
-
27
-
28
-
29
-
30
-
31
-
32
-
33
-
34
-
35
-
36
-
 37
37 -
 38
38 -
 39
39 -
 40
40 -
 41
41 -
 42
42 -
 43
43 -
 44
44 -
 45
45 -
 46
46 -
 47
47 -
48
-
49
-
50
-
51
-
52
-
53
-
54
-
55
-
56
-
57
-
58
-
59
-
60
-
61
-
62
-
63
-
64
-
65
-
66
-
67
-
68
-
69
-
70
-
71
-
72
-
73
-
74
-
75
-
76
-
77
-
78
-
79
-
80
-
81
-
82
-
83
-
84
-
85
-
86
-
87
-
88
-
89
-
90
-
91
-
92
-
93
-
94
-
95
-
96
-
97
-
98
-
99
-
100
-
101
-
102
-
103
-
104
-
105
-
106
-
107
-
108
-
109
-
110
-
111
-
112
-
113
-
114
-
115
-
116
-
117
-
118
-
119
-
120
-
121
-
122
-
123
-
124
 |
 |