Sony HDR UX10 Operating Guide - Page 66
Playing the Playlist, Creating the Playlist Continued
 |
UPC - 027242727748
View all Sony HDR UX10 manuals
Add to My Manuals
Save this manual to your list of manuals |
Page 66 highlights
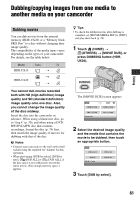
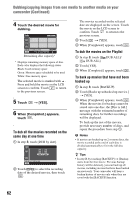
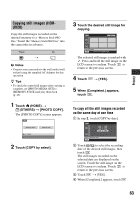
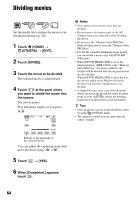
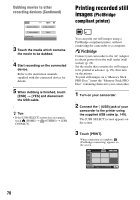
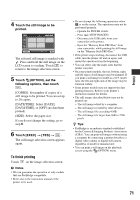
Creating the Playlist (Continued) 2 Touch / to select the recording date of the desired movies, then touch . The movies recorded on the selected date are displayed on the LCD screen. Touch the movie on the LCD screen to confirm. Touch to return to the previous screen. 3 Touch t [YES]. 4 When [Completed.] appears, touch . b Notes • Do not remove the battery pack or the AC Adaptor from your camcorder while adding a movie to the Playlist. • Do not eject the "Memory Stick PRO Duo" from your camcorder while adding a movie to the Playlist on the "Memory Stick PRO Duo." • You cannot add still images to a Playlist. • You can create the Playlist only with DVD-RW (VR mode) for the SD (standard definition) image quality. • To create a Playlist on a disc with HD (high definition) image quality, you cannot contain movies recorded with both the "1920 × 1080/ 60i" standard and the "1440 × 1080/60i" standard in the Playlist. z Tips • You can add a movie on the playback screen by using (OPTION) menu. • You can save the Playlist to a disc on your computer by using the supplied software. Playing the Playlist Set the desired media for creating/playback/ editing a Playlist in advance (p. 28). b Notes • For the SD (standard definition) image quality, you can edit a movie only with DVD-RW (VR mode). 66 1 Touch (HOME) t (VIEW IMAGES) t [PLAYLIST]. The Playlist screen appears. 2 Touch the movie from which you want to play back. The Playlist is played back from the selected movie to the end, then the screen returns to the Playlist screen. To erase unnecessary movies from the Playlist 1 Touch (HOME) t (OTHERS) t [PLAYLIST EDIT]. 2 Touch [ ERASE]/[ ERASE]/ [ ERASE]. To erase all the movies from the Playlist, touch [ ERASE ALL]/ [ ERASE ALL]/[ ERASE ALL] t [YES] t [YES]. When [Completed.] appears, touch . 3 Touch the movie to be erased from the list. The selected movie is marked with . Press and hold the movie on the LCD screen to confirm. Touch to return to the previous screen.
-
 1
1 -
2
-
3
-
4
-
5
-
6
-
7
-
8
-
9
-
10
-
11
-
12
-
13
-
14
-
15
-
16
-
17
-
18
-
19
-
20
-
21
-
22
-
23
-
24
-
25
-
26
-
27
-
28
-
29
-
30
-
31
-
32
-
33
-
34
-
35
-
36
-
37
-
38
-
39
-
40
-
41
-
42
-
43
-
44
-
45
-
46
-
47
-
48
-
49
-
50
-
51
-
52
-
53
-
54
-
55
-
56
-
57
-
58
-
59
-
60
-
 61
61 -
 62
62 -
 63
63 -
 64
64 -
 65
65 -
 66
66 -
 67
67 -
 68
68 -
 69
69 -
 70
70 -
 71
71 -
72
-
73
-
74
-
75
-
76
-
77
-
78
-
79
-
80
-
81
-
82
-
83
-
84
-
85
-
86
-
87
-
88
-
89
-
90
-
91
-
92
-
93
-
94
-
95
-
96
-
97
-
98
-
99
-
100
-
101
-
102
-
103
-
104
-
105
-
106
-
107
-
108
-
109
-
110
-
111
-
112
-
113
-
114
-
115
-
116
-
117
-
118
-
119
-
120
-
121
-
122
-
123
-
124
-
125
-
126
-
127
-
128
-
129
-
130
-
131
-
132
-
133
-
134
-
135
-
136
-
137
-
138
-
139
-
140
-
141
-
142
-
143
-
144
-
145
-
146
-
147
-
148
-
149
-
150
-
151
-
152
-
153
-
154
-
155
-
156
-
157
-
158
-
159
-
160
-
161
-
162
-
163
-
164
-
165
-
166
-
167
-
168
-
169
-
170
-
171
-
172
 |
 |
