Sony HDR-XR150 Operating Guide - Page 37
When using a Macintosh
 |
UPC - 027242788787
View all Sony HDR-XR150 manuals
Add to My Manuals
Save this manual to your list of manuals |
Page 37 highlights
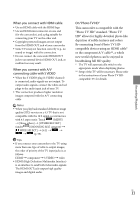
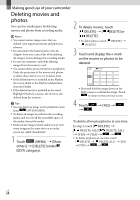
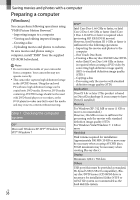
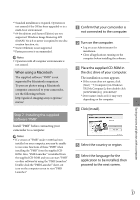
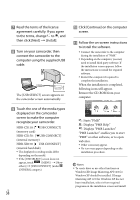
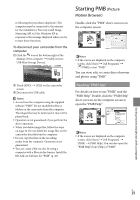
*1 Standard installation is required. Operation is not assured if the OS has been upgraded or in a multi-boot environment. *2 64-bit editions and Starter (Edition) are not supported. Windows Image Mastering API (IMAPI) Ver.2.0 or newer is required to use disc creation function, etc. *3 Starter (Edition) is not supported. *4 Faster processor is recommended. Notes Operation with all computer environments is not assured. When using a Macintosh The supplied software "PMB" is not supported by Macintosh computers. To process photos using a Macintosh computer connected to your camcorder, see the following website. http://guide.d-imaging.sony.co.jp/mac/ ms/us/ Step 2 Installing the supplied software "PMB" Install "PMB" before connecting your camcorder to a computer. Notes If a version of "PMB" under 5.0.00 has been installed on your computer, you may be unable to use some functions of those "PMB" when installing the "PMB" from the supplied CDROM. Also, "PMB Launcher" is installed from the supplied CD-ROM and you can start "PMB" or other software by using the "PMB Launcher." Double-click the "PMB Launcher" short-cut icon on the computer screen to start "PMB Launcher." Confirm that your camcorder is not connected to the computer. Turn on the computer. Log on as an Administrator for installation. Close all applications running on the computer before installing the software. Place the supplied CD-ROM in the disc drive of your computer. The installation screen appears. If the screen does not appear, click [Start] [Computer] (in Windows XP, [My Computer]), then double-click [SONYPMB (E:)] (CD-ROM)*. * Drive names (such as (E:)) may vary depending on the computer. Click [Install]. Select the country or region. Select the language for the application to be installed, then proceed to the next screen. Saving movies and photos with a computer US 37
-
 1
1 -
2
-
3
-
4
-
5
-
6
-
7
-
8
-
9
-
10
-
11
-
12
-
13
-
14
-
15
-
16
-
17
-
18
-
19
-
20
-
21
-
22
-
23
-
24
-
25
-
26
-
27
-
28
-
29
-
30
-
31
-
 32
32 -
 33
33 -
 34
34 -
 35
35 -
 36
36 -
 37
37 -
 38
38 -
 39
39 -
 40
40 -
 41
41 -
 42
42 -
43
-
44
-
45
-
46
-
47
-
48
-
49
-
50
-
51
-
52
-
53
-
54
-
55
-
56
-
57
-
58
-
59
-
60
-
61
-
62
-
63
-
64
-
65
-
66
-
67
-
68
-
69
-
70
-
71
-
72
-
73
-
74
-
75
-
76
-
77
-
78
-
79
-
80
-
81
-
82
-
83
-
84
-
85
-
86
-
87
-
88
-
89
-
90
-
91
-
92
-
93
-
94
-
95
-
96
-
97
-
98
-
99
-
100
-
101
-
102
-
103
-
104
-
105
-
106
-
107
-
108
-
109
-
110
-
111
-
112
-
113
-
114
-
115
-
116
-
117
-
118
-
119
-
120
-
121
-
122
-
123
-
124
-
125
-
126
-
127
-
128
-
129
-
130
-
131
-
132
-
133
-
134
-
135
-
136
-
137
-
138
-
139
-
140
-
141
-
142
-
143
-
144
-
145
-
146
-
147
-
148
-
149
-
150
-
151
 |
 |