Sony HDWD1800 Operation Manual - Page 76
To recall the BANK4 settings menu item
 |
View all Sony HDWD1800 manuals
Add to My Manuals
Save this manual to your list of manuals |
Page 76 highlights
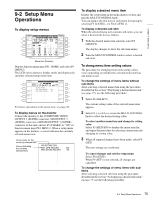
Chapter 9 Setup Menus 1 Select F6 (SELECT). The cursor moves to the setting value of the selected sub-item. 2 Select F3 (-) or F4 (+), or turn the MULTI CONTROL knob to select a desired setting value. To select another sub-item and change its setting value Select F5 (RETURN) to move the cursor to a sub-item name and repeat the procedure for selecting a desired sub-item and changing its setting value. To select another menu item and change its setting value Select F5 (RETURN) twice in succession to display the menu item list, and repeat the procedure for selecting a desired menu item and changing its setting value. 3 When all required changes have been made, select F9 (SET). The new settings are confirmed. To cancel changes and exit from the setup menu Select F10 (EXIT). When F9 (SET) is not selected, all changes are cancelled. To reset the menu settings to their factory default values (menu item B20) Use the following procedure. 1 Carry out steps 1 to 3 of the procedure described in the section "To change the settings of menu items without sub-items" on page 75 to set menu item B20 "RESET SETUP" to "ON". The message "Push SET button!" appears. 2 Select F9 (SET). 3 Select F9 (SET) again. The menu settings are saved. To recall the BANK4 settings (menu item B20) To set the current menu settings to the BANK4 settings, carry out the following operation. 1 Carry out steps 1 to 3 of the procedure described in "To change the settings of menu items without subitems" (page 75), then set menu item B20 "RESET SETUP" to "bank-4". The message "Push SET button!" appears. 2 Select F9 (SET). The display returns to the menu item list. The current menu settings are set to the settings in BANK4. 3 Select F9 (SET) again. The settings are saved, exiting from the setup menu. To switch the system frequency (menu item 013) To switch the system frequency among 59.94i, 50i, 29.97PsF, 25PsF, 24PsF and 23.98PsF, proceed as follows. Notes • Before carrying out this operation, consult the person responsible for system installation. • When this unit enters 24PsF or 23.98PsF mode, SDI (D1) and composite signals are not output. 1 Carry out steps 1 to 3 of the procedure described in "To change the settings of menu items without subitems" (page 75) to set menu item 013 "SYSTEM FREQUENCY SELECT" to "ON". The menu display changes to allow switching of the system frequency among 59.94i, 50i, 29.97PsF, 25PsF, 24PsF and 23.98PsF. 2 Switch the setting, then select F9 (SET). 3 Turn the unit off. Next time the unit is powered on, it will operate in the selected mode. To switch the line conversion function (menu item 018) To change the setting for line conversion (OFF TAPE or 720P) when the unit is equipped with an optional HKDW104 Pull-down/720P Board and is in a mode other than 24PsF, 23.98PsF, 24PD, and 23.98PD2, carry out the operation described below. Note Consult with the administrator responsible for system installation before carrying out the following procedure. 1 Perform steps 1 to 3 of the procedure described in the section "To change the settings of menu items without 76 9-2 Setup Menu Operations
-
 1
1 -
2
-
3
-
4
-
5
-
6
-
7
-
8
-
9
-
10
-
11
-
12
-
13
-
14
-
15
-
16
-
17
-
18
-
19
-
20
-
21
-
22
-
23
-
24
-
25
-
26
-
27
-
28
-
29
-
30
-
31
-
32
-
33
-
34
-
35
-
36
-
37
-
38
-
39
-
40
-
41
-
42
-
43
-
44
-
45
-
46
-
47
-
48
-
49
-
50
-
51
-
52
-
53
-
54
-
55
-
56
-
57
-
58
-
59
-
60
-
61
-
62
-
63
-
64
-
65
-
66
-
67
-
68
-
69
-
70
-
 71
71 -
 72
72 -
 73
73 -
 74
74 -
 75
75 -
 76
76 -
 77
77 -
 78
78 -
 79
79 -
 80
80 -
 81
81 -
82
-
83
-
84
-
85
-
86
-
87
-
88
-
89
-
90
-
91
-
92
-
93
-
94
-
95
-
96
-
97
-
98
-
99
-
100
-
101
-
102
-
103
-
104
-
105
-
106
-
107
-
108
-
109
-
110
-
111
-
112
-
113
-
114
-
115
-
116
-
117
-
118
-
119
-
120
-
121
 |
 |