Sony HVRMRC1K Operating Instructions - Page 6
Using in VIDEO mode, Connecting this unit to a camcorder, Inserting/removing optional memory media - memory recording unit
 |
UPC - 027242746770
View all Sony HVRMRC1K manuals
Add to My Manuals
Save this manual to your list of manuals |
Page 6 highlights
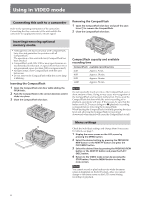
Using in VIDEO mode Connecting this unit to a camcorder Refer to the operating instructions of the camcorder. Connecting the shoe connector of the unit enables the camcorder to supply power and a stream signal. Removing the CompactFlash 1 Open the CompactFlash slot door and push the eject lever 1 to remove the CompactFlash. 2 Close the CompactFlash slot door. Inserting/removing optional memory media • Although this unit has been tested with CompactFlash, Sony does not guarantee its operation with all CompactFlash. The operation of this unit with Sony CompactFlash has been checked. • CompactFlash with 133x 2GB or more specifications are recommended for this unit. (A speed of less than 133x is not guaranteed; space less than 2GB is not guaranteed.) • Always format a new CompactFlash with this unit before use. • Do not remove the CompactFlash while the access lamp is blinking. Inserting the CompactFlash 1 Open the CompactFlash slot door while sliding the OPEN latch. 2 Push the CompactFlash in the correct direction until it clicks into place. 3 Close the CompactFlash slot door. 1 1 1 CompactFlash capacity and available recording time CompactFlash available recording time 2GB Approx. 9 min. 4GB Approx. 18 min. 8GB Approx. 36 min. 16GB Approx. 72 min. Notes Do not repeatedly insert or remove the CompactFlash over a short amount of time. Doing so may cause mis-recognition of the CompactFlash and memory malfunction. If you open the CompactFlash slot door while the unit is recording or in playback, operations will stop. If that occurs, be sure that the status on the LCD screen changes to x (playback/recording is stopped) before removing the CompactFlash. When ejecting the CompactFlash, forcefully pressing the eject lever and allowing the CompactFlash to be pointed downward when ejected will cause the CompactFlash to fall. 3 2 Menu settings Check the individual settings and change them if necessary. For details, see page 7. 1 Display the menu screen on the LCD screen by pressing the MENU button. 2 Select the desired setting by pressing the PREVIOUS/ REW button or the NEXT/FF button and press the PLAY/EXEC button. 3 Select the desired item by pressing the PREVIOUS/REW button or the NEXT/FF button and press the PLAY/ EXEC button. 4 Return to the VIDEO mode screen by pressing the STOP button. Press the MENU button to close the menu screen. Notes You cannot record or play back movies while the menu screen is displayed on the LCD screen. Also, you cannot change to the menu screen on the LCD screen during recording or playback. 6
-
 1
1 -
 2
2 -
 3
3 -
 4
4 -
 5
5 -
 6
6 -
 7
7 -
 8
8 -
 9
9 -
 10
10 -
 11
11 -
 12
12 -
13
-
14
-
15
-
16
-
17
-
18
-
19
-
20
-
21
-
22
-
23
-
24
-
25
-
26
-
27
-
28
-
29
-
30
-
31
 |
 |
